UPR Migration
This feature is activated by HHAeXchange System Administration. Contact HHAeXchange Support Team for details, setup, and guidance.
As part of this migration, your agency has access to the newly designed HHAeXchange software including Linked Contract functionality (Universal Patient Records) offering more control and flexibility over the Patient Management processes within the software.
The billing process now includes a step for merging member records, aligning with the latest system efficiencies. Use the sections (dropdowns) below to view all of the important changes related to the UPR Migration.

This topic covers the Universal Patient Record (UPR) Linked Contract functionality and how it affects the Patient record in the HHAeXchange system. The purpose of this functionality is to improve the Patient Management experience by resolving or removing certain limitations associated with current Linked Contract processes in the system. Linked Contracts refer to contracts that are governed by Payers via their own HHAeXchange system to send placements and authorizations to Providers.
Key benefits include:
- Elimination of duplicate records. The system allows one patient record to host both Internal (Provider-controlled) and Linked (Payer-controlled) contracts.
- Greater Provider control of the Patient record. Previously, the majority of Patient details could only be updated by the Payer. Providers can edit more fields within the Patient record associated with UPR Linked Contracts.
- Standardization of functionality and workflows across all Patient records, regardless of the contract type.
The HHAeXchange system continues to:
- Ensure claim integrity across all contracts in the system with built-in safeguards to prevent users from sending incorrect claims or falling out of compliance.
- Maintain the core benefits and functionality associated with the current Linked Contracts with Payers, such as:
- Authorizations sent to Providers directly from Payers via HHAeXchange,
- Communications functions for sharing information and messages with Payers, and
- the ability to submit claims with the proper validations in place that help increase payments and reduce denials.
In the UPR Migration Process, the Patient placement process remains the same. Provider receives and accepts the placement from the Payer. The one key difference is that the Provider cannot schedule a Master Week at the moment of placement or prior to accepting the placement.
Once the placement is accepted, the Enterprise system creates an internal record (Patient Profile) populating key demographic data received from the Payer system. Allow some time for the placement to process in the system. Once a placement is accepted, it cannot be accepted by another Provider.
Refer to the Merge Patient Records section to consolidate a new placement with an existing Patient record.


Because the placement now behaves similarly to an Internal Contract Patient record, Providers can edit fields and add multiple addresses, without affecting the Payer record. The same editing ability applies for phone numbers, emergency contacts, emergency preparedness, etc.
In the UPR Migration Process, when accepting a placement for a new Patient, the Patient Profile consists of many more editable fields including the ability to add multiple Patient addresses.

Any changes or updates are NOT synced back to the Payer platform. These updates are contained within the Enterprise platform.
Patients placed with multiple Providers have their own profile per Provider; no information (including addresses) is shared between Providers.
For billing purposes, the initial Patient Demographic details are stored at a Contract level in the Provider system and are kept up to date as changes are made by the Payer. Although Providers can change a Patient’s demographic data on their system, the Payer system maintains the original details.
The Admission ID (the Payer’s original at the time of placement) becomes the Alt Patient ID when the internal Patient record is created. In turn, the system creates a new Admission ID (specific to the Provider) and the Alt Patient ID is stored for tracking purposes.
It is recommended that the Primary (Billing) address coming from the Payer not be changed to prevent billing/claims issues. Providers can add and track multiple alternative addresses for EVV and operational purposes.
A new placement can be merged into an existing Patient record, creating a new single Patient record. The new Patient Profile pulls information from the Payer placement. If a Patient already has an existing Profile, then the Merge feature is used to consolidate records.
Complete the steps below to merge a record for a Patient with multiple records in the system.
-
Generate a Patient Search to locate the Patient Profile to merge records into. This is known as a Parent record in the system, where the merge is initiated from. Merged records into the Parent record are Child records. For example, a temporary record or a former Linked Contract record for the same Patient.
-
On the Patient General page, click the Merge Patient button to generate a list of other possible records matching the Patient record.

-
The system uses the following criteria to determine potential Child records that match the Parent record:
-
SSN; or
-
Medicaid ID; or
-
First Name + Last Name + DOB
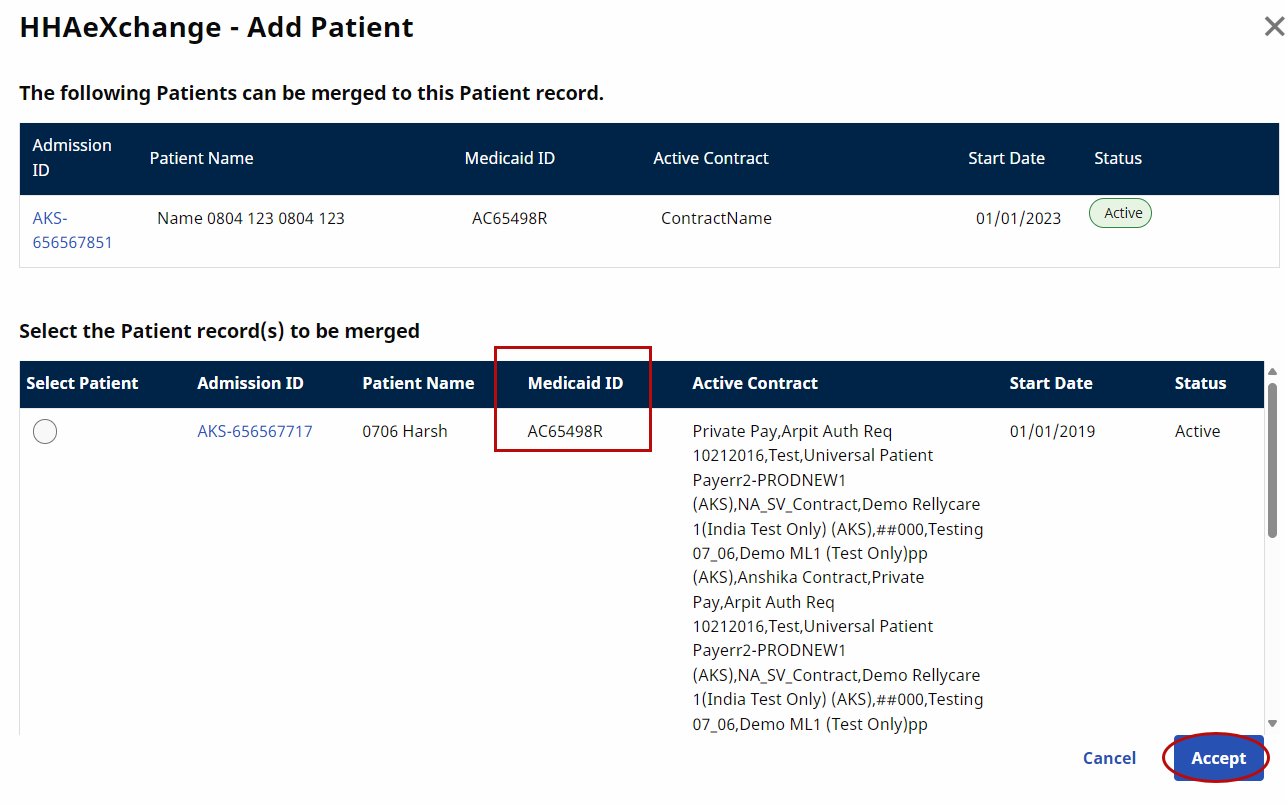
-
The following image displays the Patient’s Medicaid ID in the Parent record (top) matching to several potential Child records (bottom). Click on the radio button to select the applicable Child record and click on Accept to initiate the merge request.
 For efficiency purposes, the system allows only one merge request per Patient at a time. One merge must be complete before initiating another.
-
-
The Confirm window opens. The system alerts that some information may not transfer over because of potential conflicts (such as overlapping field values, visit exceptions, scheduling issues, etc.). Click OK to continue.

-
The Patient Merge request is complete. Click OK to continue.

On the Patient General page, the newly merged record displays with a Pending Status, until the merge process completes.

When the merge status is Pending, additional updates can be made to both the Parent and the Child record before the merge takes place. A merge request with a Pending Status can also be cancelled led by clicking on the Action link and selecting Cancel. Once the status changes to In Progress, the record is locked.
Once a Parent and Child record are merged, visits for both records can be seen in the Patient calendar. Invoices are also updated to point to the Parent record for continuity in scheduling, invoicing, billing, and remittances.

When the merge process completes, the Merge Patient request displays with a Completed Status. The system allows up to 5 days before permanently merging the records and discarding the Child record completely. Within this 5-day window, users can either Confirm the merge permanently (before the 5 days) or Unmerge the records (reverting back to 2 separate records).
An Action link becomes available under the Action column, per row for records with a Completed Status. Click the link to open the menu to either Confirm the merge or Unmerge the merged record.

-
Confirm: Accept the merge permanently and the system discards the Child record via the nightly process
-
Unmerge: Undo the record consolidation and revert back to 2 separate records. The Child record returns with its data set. The Status changes to Unmerged.
Providers cannot edit Authorization details for UPR Linked Contracts. Editing has been disabled for these contracts to protect Providers from changing values that may potentially cause claims rejections. If the Payer changes any details on their HHAeXchange system, then the edit automatically reflects on the Provider’s platform.
For UPR Linked Contracts, the Patient Authorization information is controlled by the Payer and most fields are locked including the Billing Diagnosis Code fields. The Diagnosis Code table is not seen for these Authorizations.
The Diagnosis Codes for an Authorization coming from the Payer are represented as read-only Billing Diagnosis Code fields on the Provider platform.

If a Payer does not send a timely authorization for a Patient, the Provider can create a TEMP Authorization. This enables the Provider to schedule visits and pay their Caregivers until the authorization is received from the Payer. An official Payer Authorization is required for billing; otherwise, the visits are stopped in Billing Review and cannot be billed.
To create a TEMP Authorization, go to Patient > Authorizations/Orders and click on the Add button to open the Patient Authorization window.
Select the UPR Linked Contract from the Contract dropdown field. The Authorization Number field immediately auto-fills with TEMP (unavailable to edit).

Complete required fields (denoted with a red asterisk) and click Save to finalize.
In this case, once the Payer sends the official authorization, then applicable visits can be updated, and billing can take place. The TEMP Authorization can be deleted.
The following scenarios are examples and recommended resolutions to handle Temp Contracts, Temp Authorizations, and Temp Patients after the UPR Migration.
Recommended Steps: The UPR migration process converts records to Patient Records with access to both Internal Contracts and UPR Linked Contracts. No additional steps to take.
Recommended Steps: The UPR migration process converts both records into separate Patient Records, each with access to UPR Linked Contracts.
-
Identify the Child record to merge. Select a Parent record and identify the Child record to merge. Initiate a merge for overnight processing.
-
Review results.
-
Confirm the merge. Manually confirm the merge as soon as possible. Providers have up to 5 days to Unmerge. The merge is confirmed automatically after 5 days (no Unmerging at this point). Until confirmed, a Child record exists with a Waiting Status.
Recommended Steps:
-
Identify the Child record to merge. Select a Parent record and identify the Child record to merge. Initiate a merge for overnight processing.
-
Review results.
-
Confirm the merge. Manually confirm the merge as soon as possible. Providers have up to 5 days to Unmerge. The merge is confirmed automatically after 5 days (no Unmerging at this point). Until confirmed, a Child record exists with a Waiting Status.
-
Once two records are merged into a single record, select the third record and repeat the process.
Recommended steps: The UPR migration process converts the Linked Contract Patient record into a Patient record with access to both Internal and UPR Linked Contracts.
-
Merge the two Patient records.
-
Create a TEMP Authorization for the merged Patient record. Refer to Create a TEMP Authorization section.
-
Change the Contract on the merged visits via the Schedule tab from the “Temporary” to the UPR Linked Contract.
Recommended Steps: The UPR migration process does NOT impact this record.
- When the placement is sent, accept the placement from the Payer UPR Linked Contract.
- Merge the placement with the Temporary Patient record and manually change the Contract on the Schedule tab to the UPR Linked Contract.
The following are examples and recommended resolutions to handle missing Patient and/or Authorization scenarios.
Recommended Steps: Review and accept Pending Placement. A Patient Record with access to Internal and UPR Linked Contracts is created with an authorization.
Recommended Steps:
-
Review the Pending Placement and accept. Once accepted, a new Patient record is created with access to both Internal and UPR Linked Contracts.
-
Create a TEMP Authorization. Refer to Create a TEMP Authorization section.
-
Create and process visits as usual (from scheduling through payroll). Note: Claims are held in Billing Review for TEMP Authorization.
When the official Payer Authorization is received, two authorizations now exist for the Patient.
-
Delete the TEMP Authorization.
-
Click on the Update link to recalculate. The recalculation process applies the Payer Authorization to the visits. Invoices are updated with the Payer Authorization number and claims can be processed.
Recommended Steps:
-
Create a new Patient record.
-
Assign an existing UPR Linked Contract to the Patient record.
-
Create a TEMP Authorization. Refer to Creating a TEMP Authorization section.
-
Create and process visits as usual (from scheduling through payroll). Note: Claims are held in Billing Review for TEMP Authorization.
When the official Payer Placement and Authorization are received.
-
Issue: The contract for the Payer Placement has overlapping Start of Care dates with the contract for the newly created Patient Record.
-
Resolution: Adjust the overlapping dates, as follows:
-
Compare the dates on the contracts for the two Patient records.
-
Change the Start of Care date and Discharge date on both Contracts so that no overlap occurs. Contracts must have different period of care (date ranges).
-
Merge the records.
-
Click the Update link on the Authorization page. The Payer Authorization is applied to all services once the nightly process completes.
-
The Payer continues to issue and control the Patient’s Discharge Date, reflected on the Patient’s contract. The information is synced from the Payer platform to the Provider platform, if/when modifications are applied by the Payer.
At times, the Provider may need to change a Patient’s Discharge Date when a Patient is ready for discharge, but the Payer has not modified the information, skewing census count. In these cases, the Provider-modified Discharge Date only appears on the Provider platform (NOT synced to the Payer platform). This also applies if the Provider needs to extend the Discharge Date, with the understanding that those visits may not have authorization from the Payer.

In addition, the system is equipped with a Discharge Date e-billing rule to help catch any discrepancies which may result in claim errors if the Discharge Date (changed by either a Provider or Payer) has elapsed for a visit's Date of Service.
On the Patient’s Calendar, the Copy/Paste and Copy/Create features are now available for UPR Contracts (same functionality as for Internal Contracts).
All Contracts (Internal and UPR Linked) appear on the Primary bill to field and can be selected when scheduling a visit on the Schedule tab.

The same applies when scheduling a Master Week. Providers can select Contracts (both Internal and UPR Linked) from the Bill To field interchangeably from one Patient Profile.

On the Visit Info tab, some fields, such as TT/OT, are unavailable if the contract selected for the visit is a UPR Linked Contract. This does not apply to internal contracts.
For UPR Linked Contracts, Billing information is limited or unavailable to edit on the Billing Info tab to prevent Providers from changing any information that may result in a rejected claim. For example, the Adj. Hours, Banked Hours, TT/OT Hours, and Bill Rate fields are locked in the Primary Bill To section. The Secondary Bill To section is completely unavailable for UPR Linked Contracts.

The Patient Calendar functionality remains the same as for Internal Contracts to include the Copy/Paste and Copy/Create features for UPR Contracts.
The Patient’s Plan of Care (POC) functionality is standardized and streamlined for Providers to create and use one POC for a Patient, regardless of the selected Contract. The POC is fully controlled by the Provider. The Payer does not send the POC.
The Patient Special Request functionality is created and managed by the Provider.
A Rates page is available for UPR Linked Contracts. If the Payer allows, a Provider can:
-
add rates at the Patient level,
-
manage (control) rates in the visit Billing Info tab and in the Contract Setup > Billing Rates tab.

This section covers each phase of the Billing Process for UPR Linked Contracts.
Before the upgrade, be aware of a significant e-billing update. This new change requires you to perform a billing review and select which records to export before submission.
Click Billing Worflow Overview to view a video on the billing workflow.
-
Go to Billing > New Invoice - (Internal) to generate a New Invoice Batch. Search for a specific visit using the filters or click on Search to generate all results.
 - Invoice Batch")
-
Select the visits to invoice and click the Generate Batch Invoice button.
-
The system alerts that the Billing Batch is generating. Click OK to continue.

-
Go to Billing > Electronic Billing > E-Submission Batch to generate a New Batch Claim.
-
On the Search E-Submission Batches page, select the UPR Linked Contract from the Contract field and click the Add Original Claims button.

-
The Add Original Claims E-Submission Batch page opens. Select the Contract and click the Add Claims button.

-
Click Search in the Add Claims page.

-
On the Claim Search page, select the available claims and click the Add button. The blue banner above the claim rows shows the number of eligible claims.
")
-
The claims appear on the Add Original Claims E-submission Batch page. Click on the Save Batch & Export button to send the claims to the SFTP to be picked up by the Payer system via the overnight process.
 Using any of the other buttons only creates the claims batch but does not send to the SFTP. Refer to Phase 3 for further instructions.
 -
The system alerts that the export file is generating. Click Close to continue.
-
(Optional) Navigate to Admin >Process Monitor to view the progress of the submission. Expand the Billing section to view. The file can either be in Pending or Completed status.

-
In this case the file displays as Completed. Click the Close button to exit.

Follow the steps below to review claims batches. If claims are saved but not sent, follow the instructions below to Send the claims batch.
-
Go to Batch Search window under Billing > Electronic Billing > Batch Search to review the claims.
-
Select the Contract and any other criteria to generate a search result.
-
The search results display the claims batches with information such as the Batch Number, the Contract, Claim Type, Amount, and Dates. Use the Export link to export the claim. Use the Detail and Summary links to download the files.

-
Go to Billing >Electronic Billing > E-Submission Batches.
Note: This process is the same for UPR Linked Contracts and Internal Contracts -
On the E-submission Batches page, select the Contract and click on the Add Resubmit Claims button. Click on Search to generate a claim search.

-
The Add Resubmit Claims E-Submission page opens. Select Contract and Add Claims.

-
The Add Claims page opens. Select the Office(s) and click Search to continue.
-
On the Claim Search page, select the applicable batches and click the Add button.

-
On the Add Resubmit Claims E-submission Batch page, click on the edit icon to open the Claims Adjustment window for the selected claim. To adjust all claims in the batch, click the Adjust All Claims button above the table.

-
For UPR Linked Contract claims, several fields have been disabled on the Claim Adjustment window such as Billed Adjusted Hours, TT Hours, and 3rd Party.
If the resubmission is an Adjustment or Void, then the TRN Number field is required.

Go to Admin > Contract Setup > Contract Search to locate the Contract. UPR Linked Contracts are created via the linking function (not by the Provider as with Internal contracts). Specific changes to highlight for UPR Linked Contracts are in the General, Billing Rates, and Scheduling/Confirmation tabs.
In the General tab, the following fields are read-only for Providers: Contract Name, Offices, ICD Code Requirement, and the entire Address section.

In the Billing Rates tab, the edit icon and Update Rate buttons are enabled if the Payer allows the Provider to update rates. As stated in the Patient Rates Page section, rates can also be managed (controlled) in the Billing Info tab for a UPR visit, and in the Contract Setup/Billing Rates tab.

In the Scheduling/Confirmation tab, various fields are unavailable for Providers to edit. In the Scheduling Configuration section, the Service Authorization Required checkbox is preselected and the Service Authorization Week field is hard-coded for all UPR Linked Contracts as a standard.
")
Providers have autonomy on other areas in the Scheduling/Confirmation tab such as requiring fields on the Patients’ Visit Info tab, Clinical Documentation, and Timesheets requirements.
")