Service Codes

-
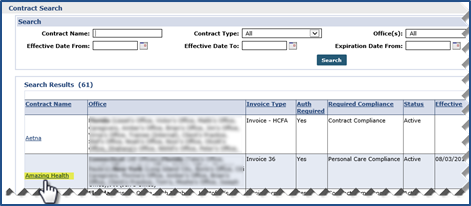
Go to Admin > Contract Setup >Search Contract to locate the applicable contract.
-
Select the applicable contract from the search results.
-
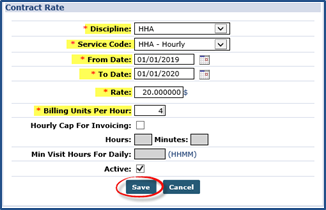
Select the Billing Rates tab and click the New Rate button.
-
On the Contract Rate window, complete the required fields to include: Discipline, Service Code, From/To Date, Rate, and Billing Units Per Hour.
-
Click Save.

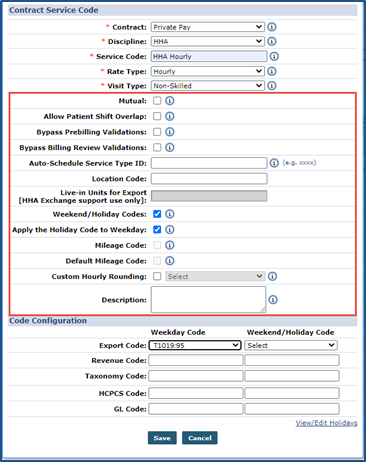
Additional Service Code fields on the Contract Service Code window are used to address specific billing and scheduling scenarios.
|
Field |
Description |
|---|---|
|
Mutual |
Select this checkbox if the Service Code is used for Mutual Visits. Overlapping visits scheduled with a Mutual Service Code may be scheduled with the same Caregiver without triggering a validation error. |
|
Allow Patient Shift Overlap |
Select this checkbox if the Service Code is used for visits that overlap. This allows two separate Caregivers to be scheduled for a single Patient at the same time without triggering a validation error. |
|
Bypass Prebilling Validations |
Select this checkbox to allow visits scheduled with the associated Service Code to bypass Prebilling validations, with the following exceptions:
|
|
Bypass Billing Review Validations |
Select this checkbox to allow visits scheduled with the associated Service Code to bypass all Billing Review validations. |
|
Auto-Schedule Service Type ID |
This field allows Agencies using the Service-Specific EVV Confirmation model to enter a 4-digit identifier for the Service Code. When a Caregiver enters this 4-digit identifier at Clock Out, the system applies the Service Code to the visit. |
| Location Code | Code based on the location (region) of the servicing Agency/Office for billing purposes. |
| Weekend/Holiday Codes | Select this checkbox to activate the second Weekend Holiday Code fields. Codes entered in these fields only apply to respective weekdays (with weekday code) and weekends (weekend code). |
| Apply the Holiday Code to Weekday | Selecting this checkbox applies Weekend/Holiday Codes on either weekends OR holidays according to the chosen Holiday Template. Authorizations selected as Weekend/Holiday in the authorizations section pulls from visits that occur on a weekend OR a weekday if the holiday happens to fall on a weekday (M-F). |
| Mileage Code | Select this checkbox to apply a mileage event on the Patient Calendar. |
| Default Mileage Code | Select this checkbox to display entry on the Patient and Caregiver Calendars allowing the default code to be billable and payable. Only two Default Mileage Codes can be enabled per Contract; apply to Other (Skilled) and Other (Non-Skilled) disciplines. |
| Custom Hourly Rounding |
Select to apply custom hourly rounding logic to the Service Code, as follows:
Once selected, all visits with this Service Code applied override Contract-Level Rounding Rules. |
| Description |
Enter content to include in the Notes section of a claim file to help support/reference the claim. If left blank, then the Visit Confirmation Times are displayed on the claim. |
| Code Configuration | |
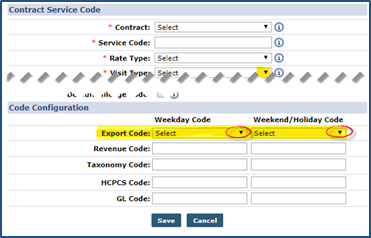
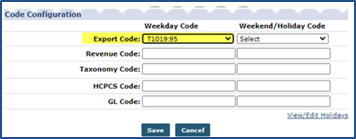
| Export / Revenue / Taxonomy / HCPCS / Location Code | These codes are used in the actual Invoice file for Billing. The Export and Weekend/Holiday Code fields are created and managed in the Export Code Reference Table. Refer to the Export Code Reference Table section below. |

-
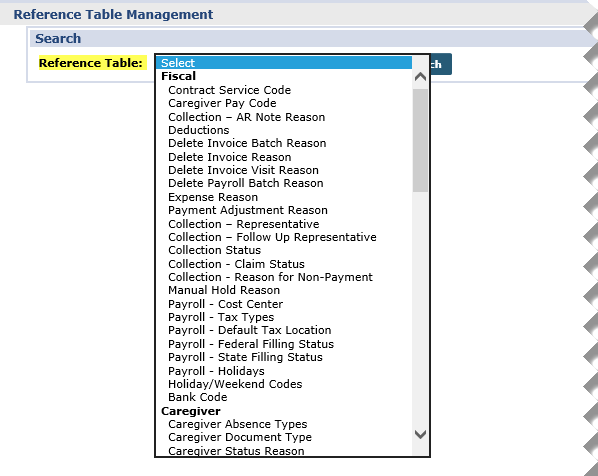
Go to Admin > Reference Table Management .
-
Select Contract Service Code from the Reference Table field and click Search to continue.
-
On the Search Results page, click the Add button.
-
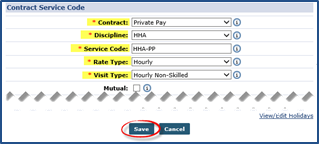
On the Contract Service Code window, select all required fields to include a Contract , Discipline, Service Code, Rate Type, and Visit Type.
-
Click Save to finalize.

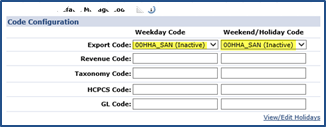
To edit an existing Export Code, click the applicable Export Code Name link from the Export Code Reference Table. The Edit Export Code window opens. Edit the Export Code in the required field. Select Inactive to deactivate the code; otherwise, leave as Active. Click Save.
The Edit window contains a History link to view the past activity for the Export Code.
When adding a modifier to an existing Export Code, a : colon must be added after the existing code. For example, Export Code T1019 with a modifier of 95 is entered as T1019:95 in the Export Code text field.

All Export Codes (including Weekday and Weekend Codes) are created and stored in the Export Code Reference Table. To access the table, go to Admin > Reference Table Management and select Export Code under the Fiscal category from the Reference Table field. Click the Search button to generate the table.
