Workflow Management
The Workflow Management function is used to create a workflow, or an automated process consisting of an initial triggering action or a series of actions and an Output. Once a workflow is created, the process runs automatically each time the initial action specified in the workflow is met.
For example, an Agency creates a workflow so that the system automatically generates and sends an email to the Intake Manager (Output) when a Referral Profile Status is edited (Action).
Creating a new Workflow consists of three phases: Name the Workflow, Apply Action, and Define the Output.

The first step involves creating a Workflow Name and applying/defining the Module to which the Workflow is activated for. Complete the required fields.
|
Field |
Description |
|---|---|
|
*Workflow Name |
(Required) Enter the Workflow Name. |
|
*Office |
(Required) Select the Office the Workflow is to apply to. |
|
Description |
Enter a description for the Workflow. |
|
*Module |
(Required) Select the module to apply the new Workflow to. |
The triggering actions available in the next section are dependent on the module selected.

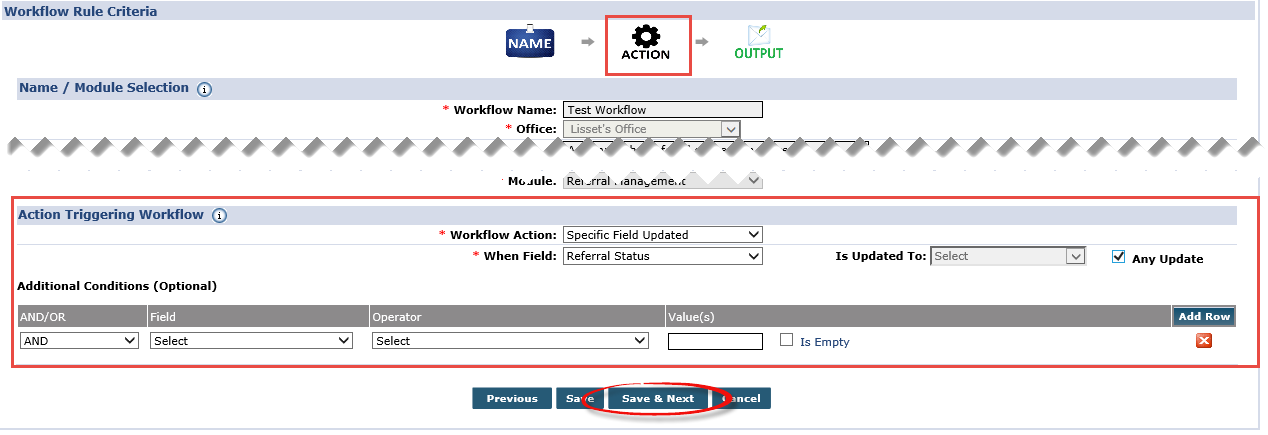
The second phase involves defining the triggering Action of the Workflow. Refer to the field descriptions in the table below.
|
Field |
Description |
|---|---|
|
*Workflow Action |
(Required) Select the Action triggering the Workflow. The options provided depend on the Module selected in the previous step. Note: Some Actions require additional information or further specification and the following fields appear. |
|
*When Field |
(Required) Define this field if a triggering Action occurs when a field is updated. |
|
*Is Updated To |
(Required) Unless the Any Update checkbox is selected (to the right), this field is required. Define if a specific value within that field is the triggering Action. |
The additional fields generated by the value selected in the Workflow Action dropdown may vary from value to value.
Additional Conditions
If the action triggering the Workflow requires further refinement, then Additional Conditions are applied, described as follows:
|
Field |
Description |
|---|---|
|
AND/OR |
Selecting And to require both the workflow action that was specified and the selected field to occur. Select Or to require either variable be selected. |
|
Field |
Select the field that triggers the additional condition. |
|
Operator |
Select the operator that defines the relationship between the condition established and the value that is entered in the next field. |
|
Value(s) |
The variable that is entered to explicitly define the condition. |

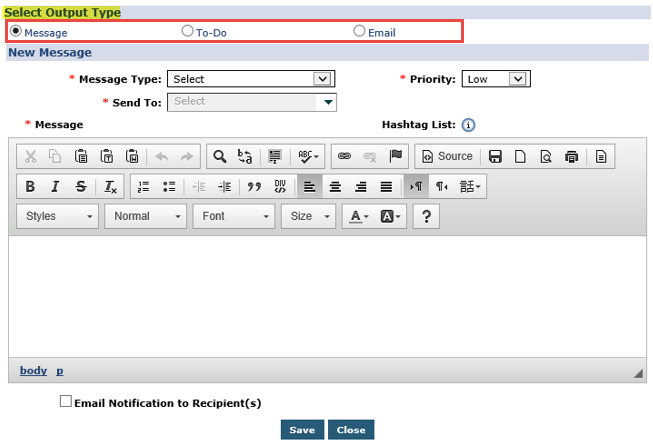
The third and final phase involves defining the Output, which may be a Message, a To-Do, or an Email, as seen in the following image and described in the tables below.
Multiple Outputs may be added to a Workflow.

|
Select |
Description |
|---|---|
|
*Message Type |
(Required) Select who receives the message:
|
|
*Send To |
(Required) If Private or Role is selected for the Message Type, define which users or roles, respectively, receive the message. |
|
*Priority |
(Required) Define the priority of the message. |
|
*Message |
(Required) Enter the message to send. |

|
Select |
Description |
|---|---|
|
To |
Select who receives the message:
|
|
Assign To |
Define which users or roles receive the message. |
|
*Priority |
(Required) Define the priority of the message. |
|
*Due |
(Required) Enter the number of days after the workflow action has taken place for an assigned user/role to complete the task(s). |
|
*Description |
(Required) Describe the task(s). |

|
Select |
Description |
|---|---|
|
*To |
(Required) Enter the email addresses of all relevant parties. |
|
CC |
Enter the email addresses of any parties copied on the message. |
|
BCC |
Enter the email addresses of any parties blind-copied on the message. |
|
*Subject |
(Required) Enter the subject of the email |
|
*Message |
(Required) Enter the email message. |


