Compliance Setup

This section is intended for Agency Admin users responsible for setting up Caregiver Compliance.
The Compliance Setup under Admin > Compliance Setup is the second level of the Compliance module. Each Compliance Setup is a collection of rules used to calculate compliance for any Office linked to the setup. The values or fields applied to a given Compliance Setup are taken directly from the Item Manager.
The Compliance Setup is comprised of six tabs to include General, I-9 Requirements, Criminal Background, Training Schools, Compliance Field, and Medicals/Other Compliance.
One can either create a New Compliance Setup or search for an existing setup by entering the Setup Name, selected Office(s), and/or Status. The results are also organized by these fields.
|
Field |
Description |
|---|---|
|
Setup Name |
Enter the Setup name in this free text field. |
|
Office(s) |
Select the applicable Office(s) to generate a Search. |
|
Status |
Select All, Active or Inactive to search for a Setup by Status. |

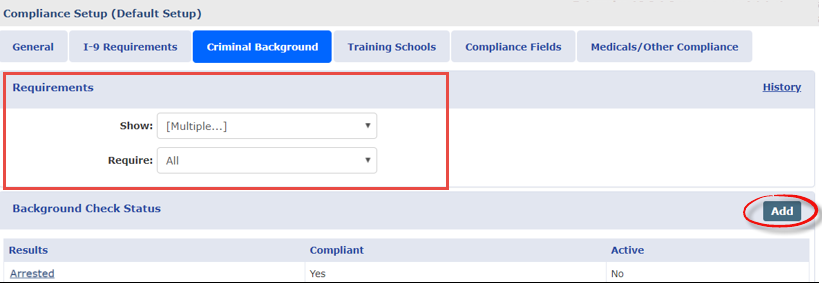
Select the Criminal Background tab to set values for the selected Compliance Setup. There are no additional rules which may be set for Criminal Background.
In the Background Check Status section, the previously created results values appear with the corresponding information under the Compliant and Active columns. To add a Criminal Background Result value, click the Add button.
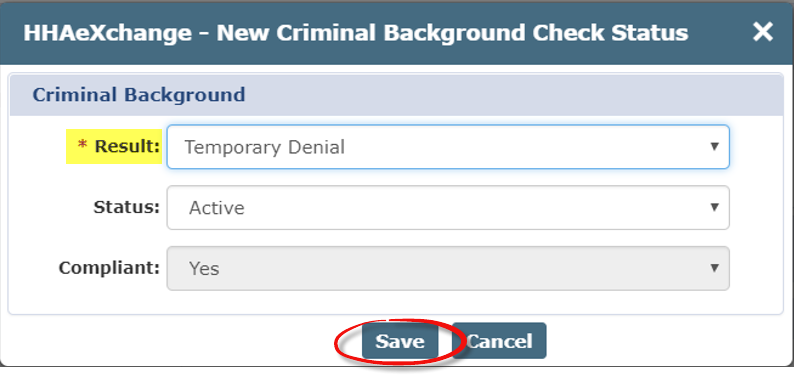
The HHAeXchange – New Criminal Background Check Status window opens. Complete the fields as indicated. The Result field is required.
To edit a Criminal Background Check Status value, click the named value link.
Review the selected values for the Criminal Background check to ensure there is at least one compliant value entered. Upon saving on the Compliance Setup, Criminal Background tab, the system validates if there is at least one Active compliant value. If not, the system issues a validation warning. Note that the warning does not stop one from saving and to proceed without an active compliant value for this section.

The Compliance Fields tab is used to set the custom fields for the selected Compliance Setup. Unlike the other compliance sections, where users define the fields which Show and/or are Required (per Discipline) to remain compliant, Compliance Fields are configured on a field by field basis.
For example, if an Agency wants to capture the Professional License Number for Skilled Disciplines, a Professional License Number Compliance Field is created via the Item Manager, then added to a Compliance Setup. When applying the field to the Compliance Setup, the user then has the option to select which Disciplines the field is required for.
The Requirements section only has the Show checkbox; unlike other Compliance sections. When the Show checkbox is selected, all added Compliance Fields for the given Compliance Setup show for all Disciplines. Fields are then set as Required for specific Disciplines. If not selected, no custom field section displays on the Caregiver Compliance profile.
Under the Field List section, the custom field records are listed with respective information in columns to include Field, Active, Require, Disciplines, and Field Type. Up/Down sort arrows allow users to place these fields in appearance order on the Caregiver Compliance page.
To add a New Compliance Field, click the Add button.
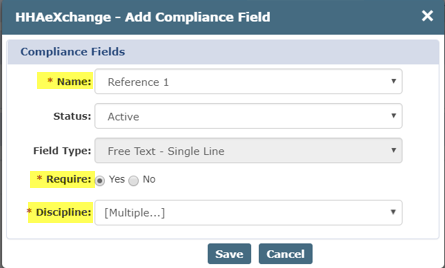
The HHAeXchange – Add Compliance Field window opens. Complete the fields.
Once a Record is saved, only certain values can be edited; the Field Name cannot be edited.
|
Field |
Description |
|---|---|
|
Name |
Select the name of the custom Compliance Field from the list of fields created in the Compliance Item Manager. |
|
Status |
The status of the field. By default, the status is set to Active. |
|
Field Type |
Select the Field Type for the dropdown menu (refer to the Item Manager). Depending on the selection, other fields may be required or customized as needed. If a Compliance Field is set as either a Single-Select or Multi-Select dropdown, then one must add values once it is taken into the Compliance Setup. |
|
Require |
Select the Yes or No radio-buttons as desired.
|
|
Discipline |
Select all applicable Disciplines listed in the system. If Discipline is not selected, the field continues to display on the page. |
Accepted Selection Validations
An Accepted Selection may be required for certain Compliance Fields for the system to properly calculate Caregiver Compliance. If a Single-Select or Multi-Select field is set to Required, then at least one value must be designated as the Accepted Selection.
If no Accepted Selection is detected, then the system issues a validation error prompting one to define an Accepted Selection. An Accepted Selection must be defined to save the Single-Select or Multi-Select field designated as Required and Active.

The Medicals/Other Compliance tab is used to set the Medicals and Other Compliance Items for the selected Compliance Setup. Like the Compliance Fields, this compliance section displays and requires Compliance Items on a discipline-by-discipline basis.
In the Compliance Items section, a list of compliance items is displayed with respective information in columns to include Item, Active, Require, and Disciplines. To add a New Medical/Other Compliance Field, click the Add button.
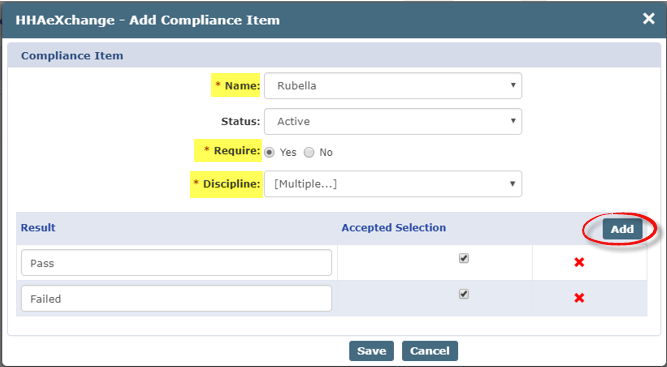
The HHAeXchange– Add Compliance Item window opens. Complete the fields.
Once a Record is saved, only certain values can be edited; the Field Name cannot be edited.
|
Field |
Description |
|---|---|
|
Name |
Select the Name of the Compliance Item, populated from the Item Manager. |
|
Status |
The status of the field. By default, the status is set to Active. |
|
Require |
Select the Yes or No radio-buttons to specify if the item is required to meet compliance.
|
|
Discipline |
Select all applicable Disciplines listed in the system which should be validated for this Compliance Field. If Discipline is not selected, the field continues to display on the page. |
|
Result |
Create/Enter Results to specify whether compliance is met in the open text fields. For example, Pass or Fail. For each Result entered, indicate the Accepted Selection. |

As with other tabs, Medical/Other Compliance Fields can be edited via the Compliance Setup functionality. To edit an item, click the item Name link and edit information as needed.

An Accepted Selection may be required for certain Medicals/Other Compliance Items for the system to properly calculate Caregiver Compliance. If a Single-Select or Multi-Select field is set to Required, then at least one value must be designated as the Accepted Selection.
If no Accepted Selection is detected, then the system issues a validation error prompting one to define an Accepted Selection. An Accepted Selection must be defined to save the Single-Select or Multi-Select field designated as Required and Active.

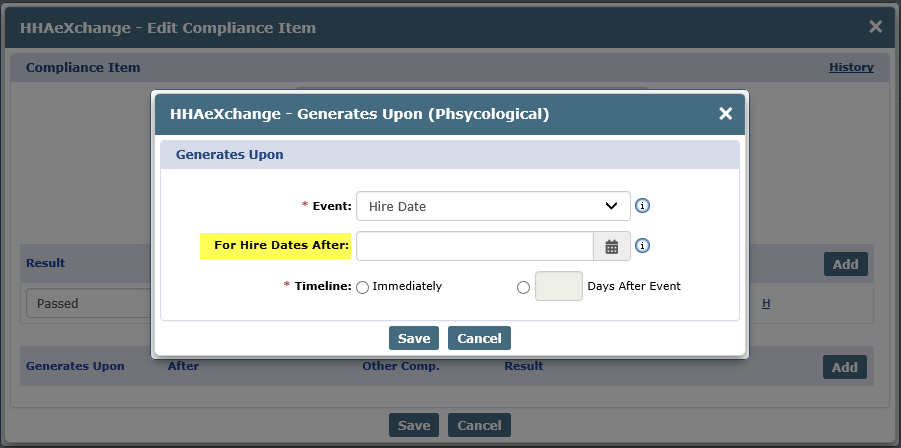
When the Generates Upon function under Admin > Search Compliance > Compliance Item > Add has Hire Date selected under the Event field, an added For Hire Dates After field becomes available to set a date for new medicals to automatically generate based on the Caregiver hire date.
For example, if a Caregiver’s Hire Date is 01/28/2018, and the For Hire Dates After is set for 01/12/2018, then the Medical is automatically generated. If the For Hire Dates After is set for 01/30/2019, then the Medical is not automatically generated.

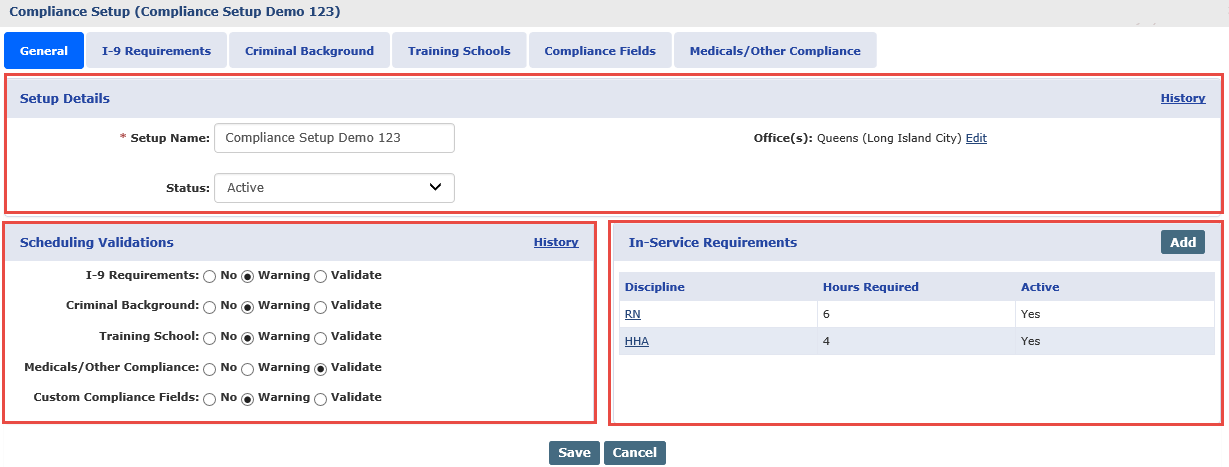
The Compliance Setup under Admin > Compliance Setup function opens to the General tab as a default. The Setup Details section is seen below the Tabs Menu including the Setup Name, Status, and Office(s) listing the Offices for which to add/edit the selected Setup.
To the left of the screen, a Scheduling Validations section displays the setup tab names. From here, one can select whether the system checks the item prior to scheduling for compliance, and if so, whether the item is validated for compliance, or only issues a warning for non-compliance. Select the No, Warning, or Validate radio buttons per section, as desired.
To the right of the screen is the In-Service Requirements section used to add In-Service Requirements on a Compliance Setup level assigning certain values to specific Disciplines. In-Service Requirements are organized and displayed in a table format by Discipline, Hours, and Status (Active or Inactive).

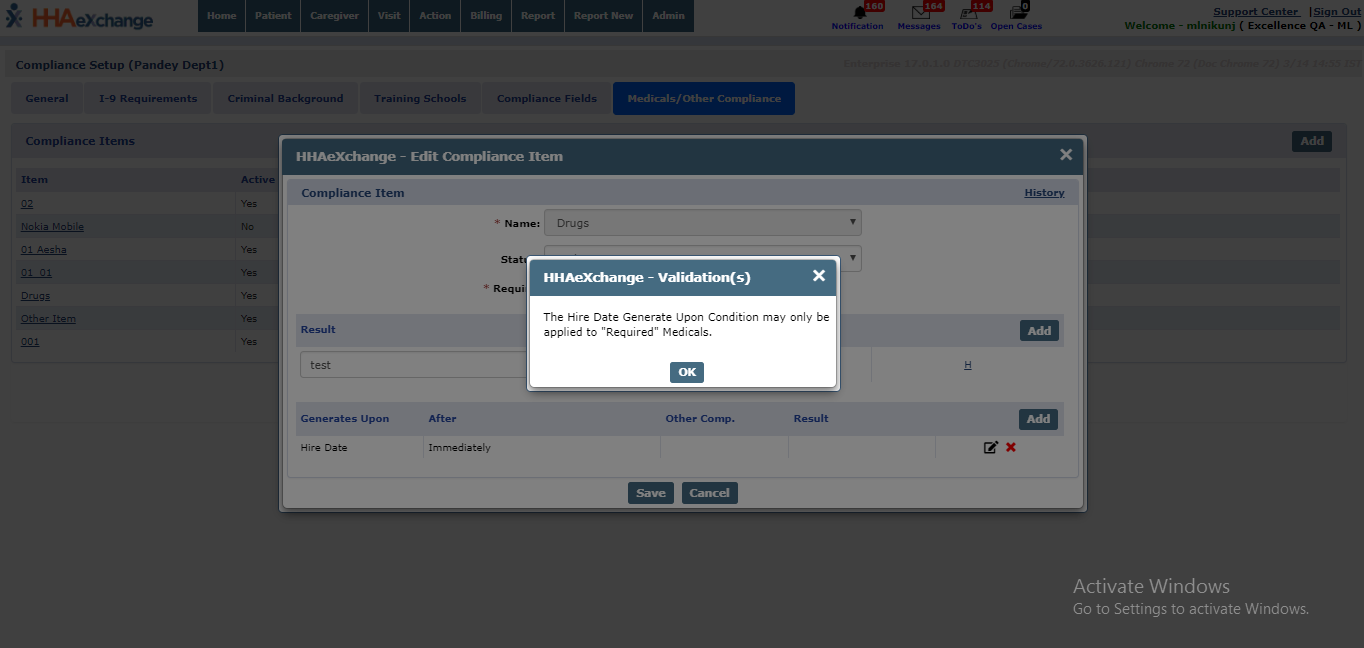
The Hire Date Generates Upon condition creates records for only those Caregivers with the selected Discipline field. If a new value is selected in the Discipline field for a Caregiver, then the system applies Medical/Other Compliance records for the newly defined Discipline upon publishing the Compliance Setup. If the value is unselected for the Discipline field, then the previously added Medical/Other Compliance record is not affected.
If a Hire Date Generates Upon condition is entered for a Medical/Other Compliance item that is not required, then the system does not generate any records for any Caregiver, existing or new. If a Hire Date is entered without an added required Discipline(s), then a validation message populates when saved.

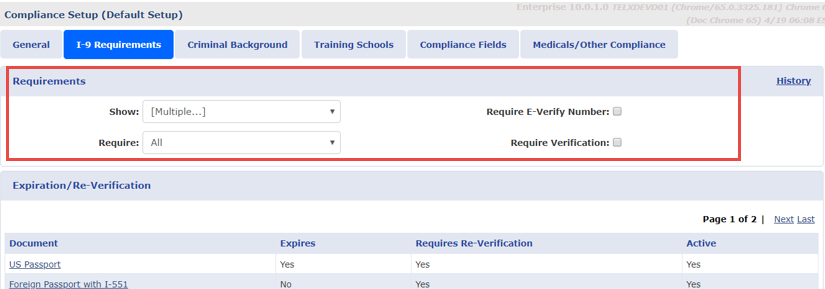
Select the I-9 Requirements tab to create an I-9 Compliance Setup. Unlike other compliance areas, I-9 requirements are dictated by the Federal government; therefore, these the values and rules are predefined. In the HHAeXchange system, users have the option to specify if a given I-9 document expires and/or requires re-verification (like the functionality currently controlling I-9 requirements).
This tab includes a Requirements section and an Expiration/Re-Verification section.

The I-9 Requirements, Criminal Background, and Training School tabs allow users to specify whether that specific section of compliance either Shows and if so, whether it is Required for a given set of Caregiver Disciplines.
-
If a Discipline is set to Show in a compliance section, that section displays on the Caregiver Compliance page. Associated information can be captured in the compliance section; however, it is not used in their compliance calculation unless it is also set to Required.
-
Once a Discipline is set to Show in a compliance section, one can specify (in the Required dropdown) if that Discipline needs to meet the compliance requirements of the section to remain compliant.
Agencies have the option to specify whether an E-Verify Number and/or Verification is required for compliance purposes.

The Expiration/Re-Verification section provides a list of values to include Document (type), Expiration (Yes/No), Requires Re-Verification (Yes/No) and the Active (enable/disable a value). The document types/values are preloaded based on federal regulations. Agencies cannot rename values; however, Agencies have the option to specify expiration requirements.
Complete the steps below to edit value requirements in this section.
-
Click the Document title.
-
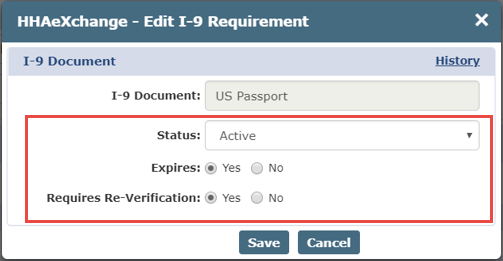
The HHAeXchange - Edit I-9 Requirement window opens. The fields available to edit are the Status as well as whether the requirement Expires and/or Requires Re-Verification. The I-9 Document title is unavailable to edit.
Field
Description
Status
The status of the I-9 document for the specific Compliance Setup. By default, the status for all I-9 items is set toActive.
Expires
Select theYes or No radio-buttons as desired. If Yes is selected, users must enter a value for the I-9 Document Expiration field on the Caregiver Compliance page.
Requires Re-Verification
Select the Yes or No radio-buttons as desired. If Yes is selected, the Caregiver changes to Non-Compliant if the current date exceeds the entered I-9 Document Expiration value on the Caregiver Compliance page.
-
Click the Save button to save requirements.

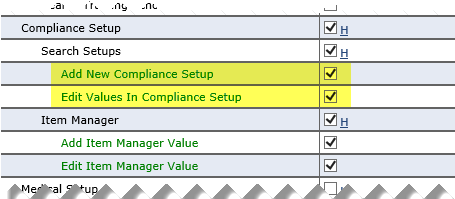
The following permissions are necessary to add new information or edit the Compliance Setup under Compliance Setup > Search Setup:
|
Permission |
Description |
|---|---|
|
Add New Compliance Setup |
Allows users to create a new Compliance Setup. |
|
Edit Values in Compliance Setup |
Allows users to add and edit existing values in the Compliance Setup. |
Go to Admin > User Management > Edit Roles. Select Admin from the Section dropdown and Admin from the Roles dropdown to enable these permissions.

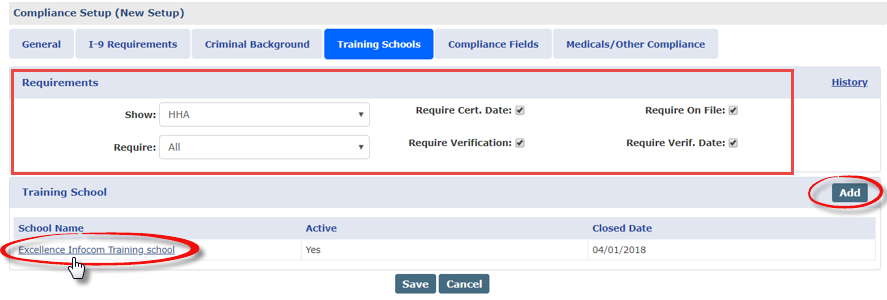
The Training Schools tab is used to set values for the selected Compliance Setup. From here, determine whether the below-listed fields are required for compliance when entering a training school record on the Caregiver Compliance page: Certification Date, On File, Verification, and Verification Date.
Refer to the Show vs Required in the Requirements (previously covered) for a description of how to select by Caregiver Discipline. Select checkboxes to require Cert Date, On File, Verification, and Verification Date.
In the Training School section, a list of created Training School records displays in columns to include the School Name, Status (Active/Inactive) and Closed Date. To add a Training School created in the Compliance Item Manager), click the Add button.
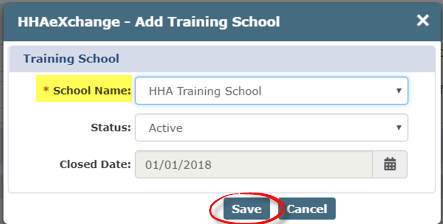
The HHAeXchange – Add Training School window opens. Complete the fields as indicated. The School Name field is required. Select from the list of Training Schools as created in the Item Manager.
To edit a Training School value, click the School Name link under the Training Schools section.


