HomeCareHub Mobile App Schedule Page

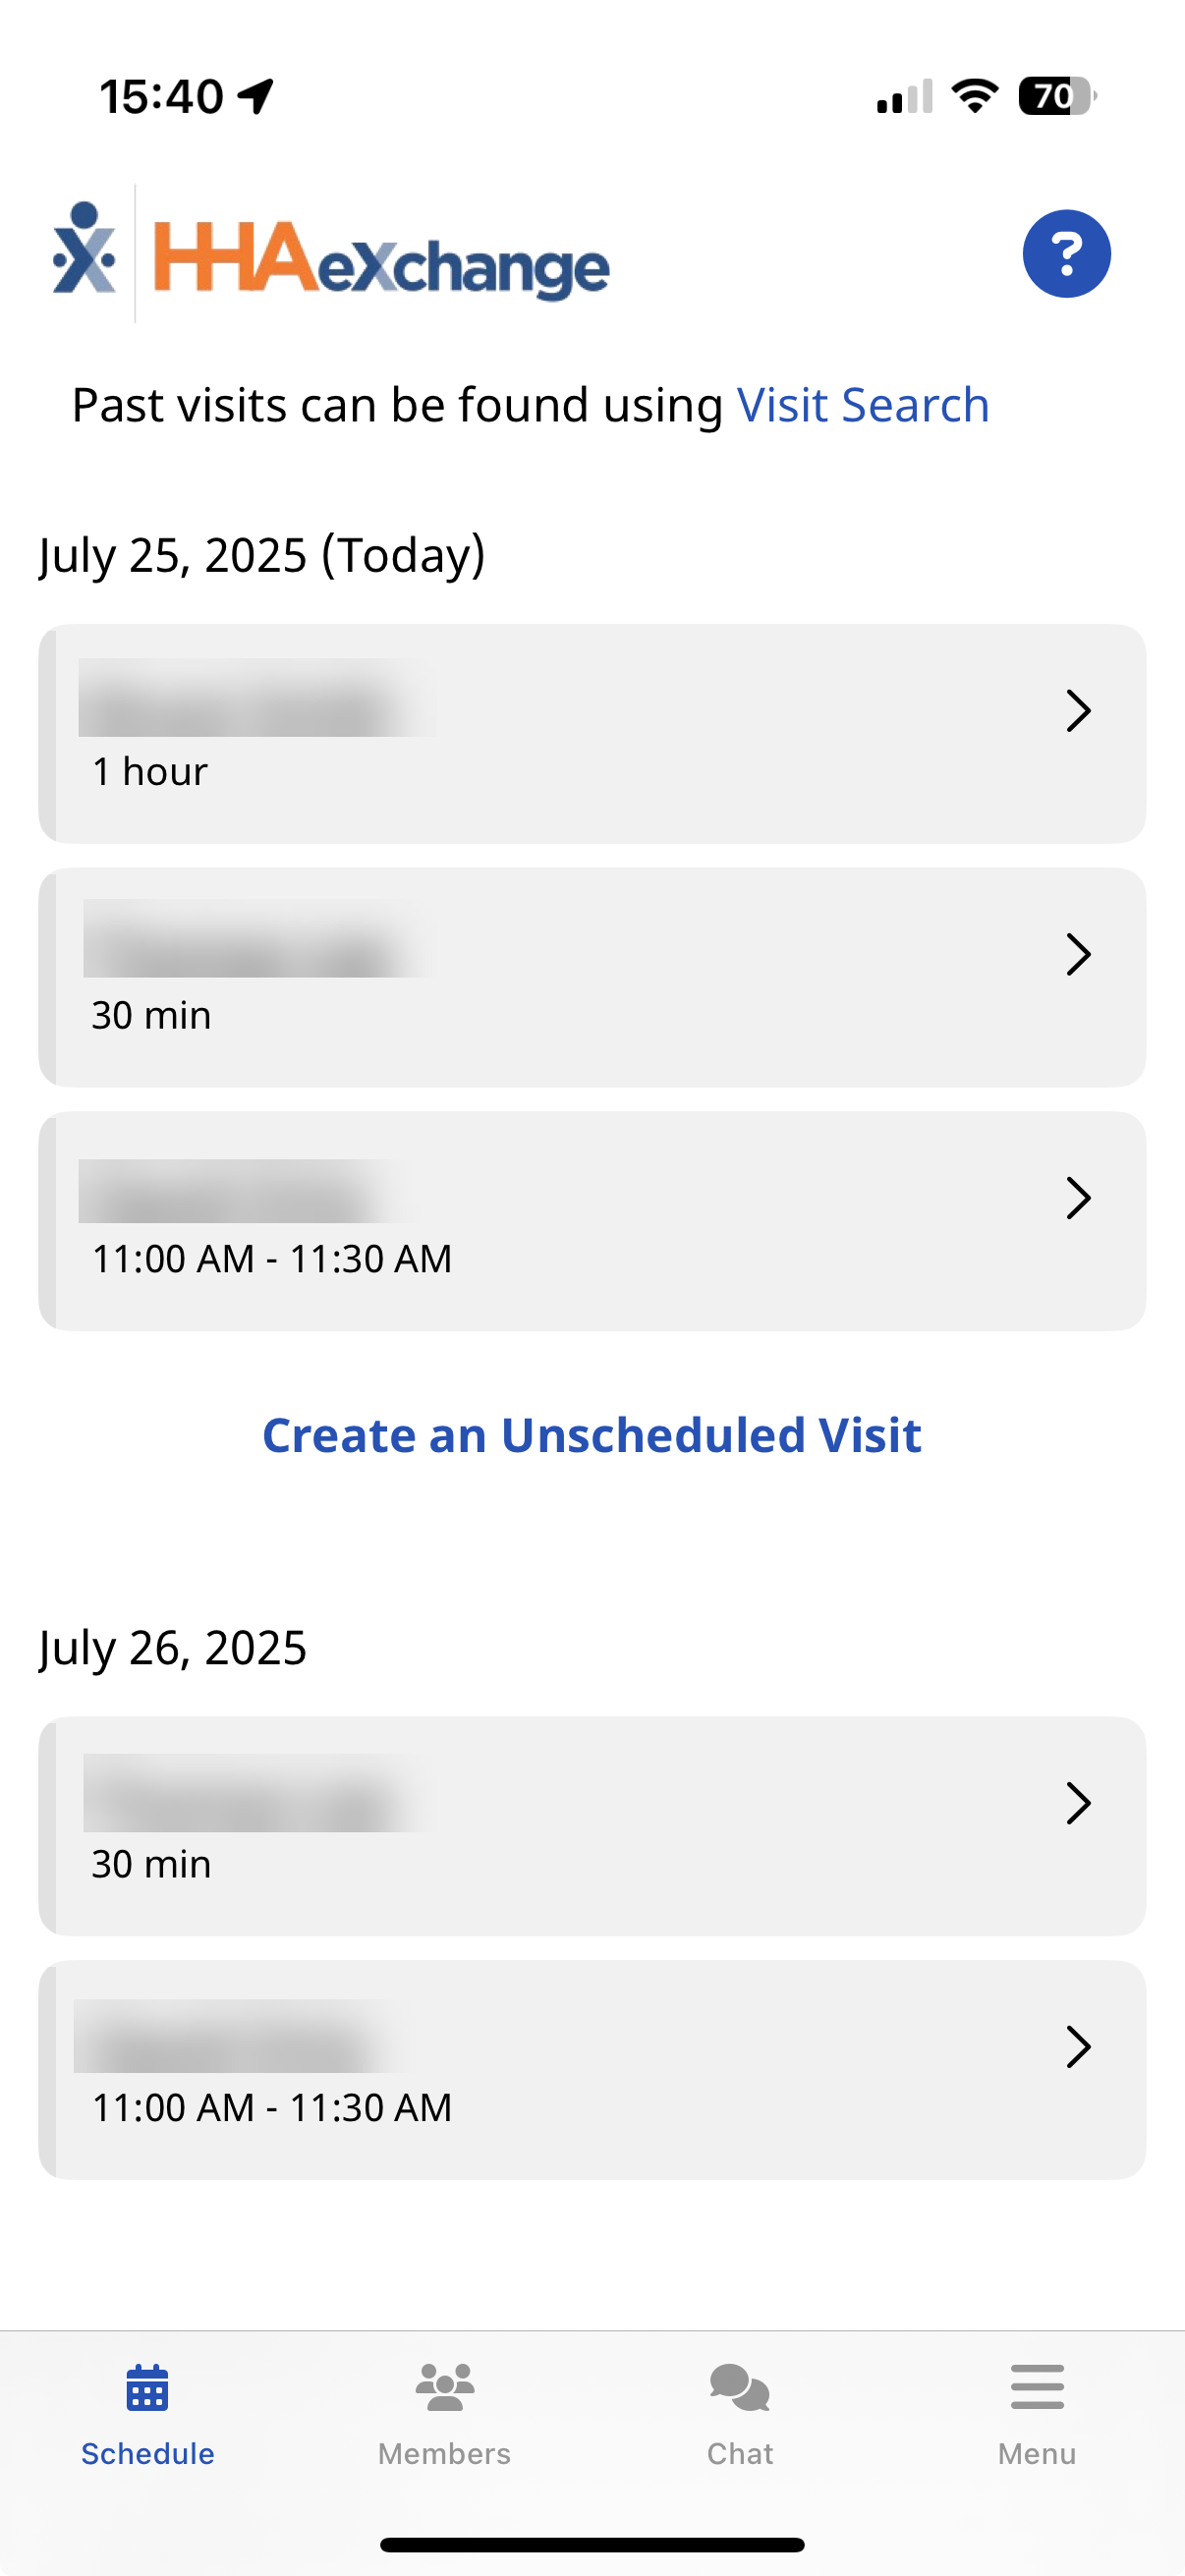
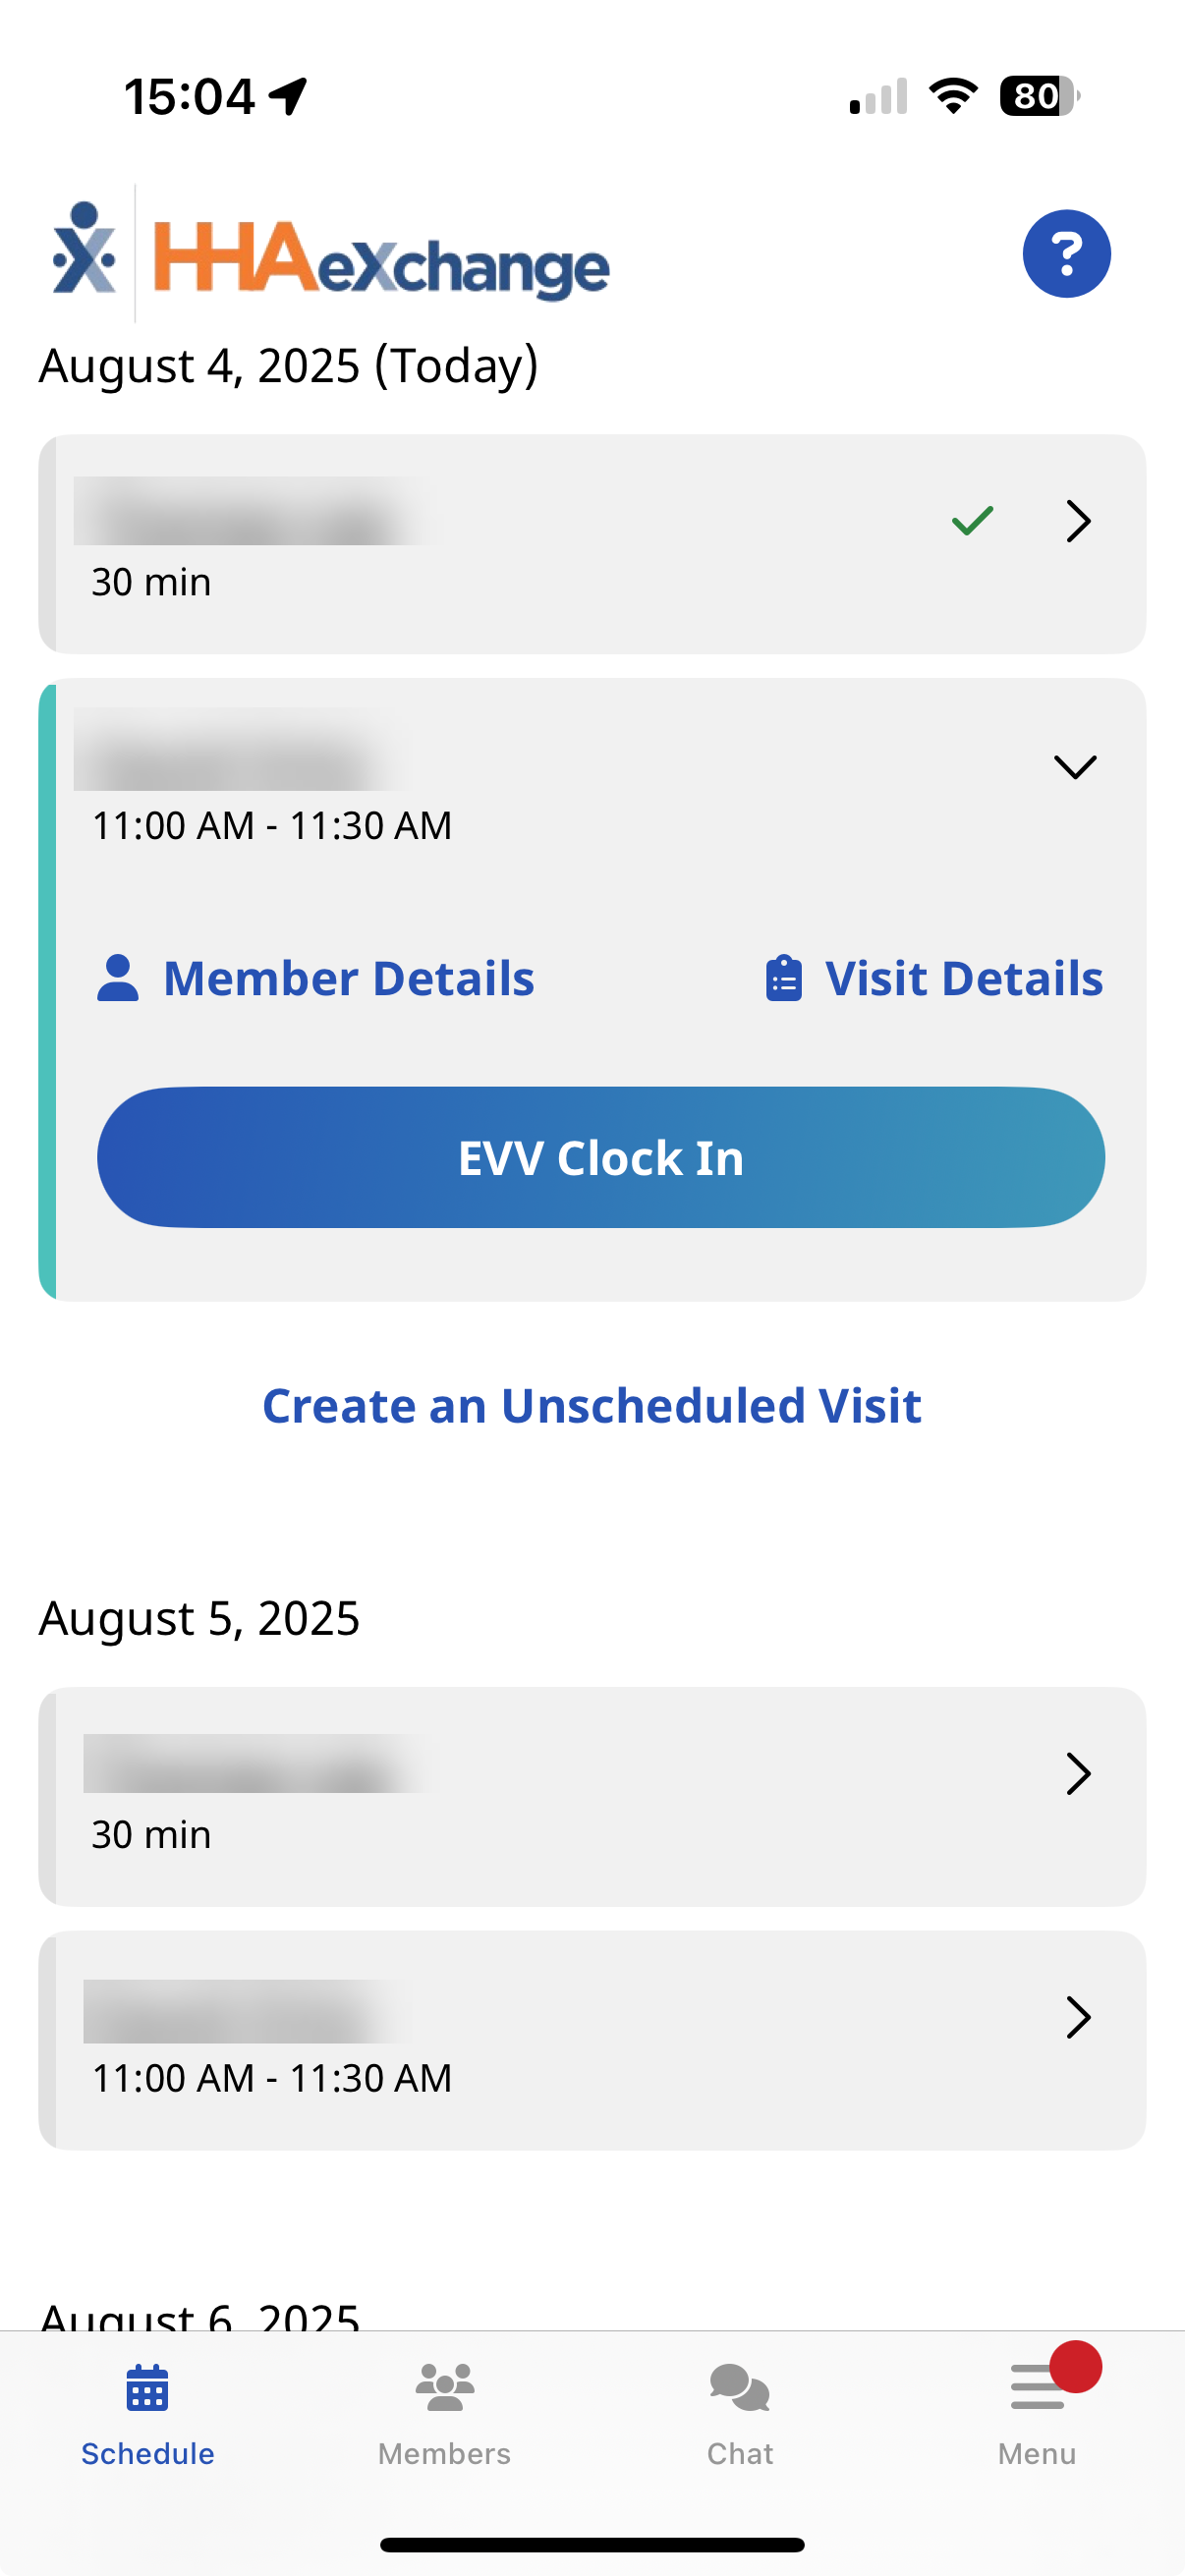
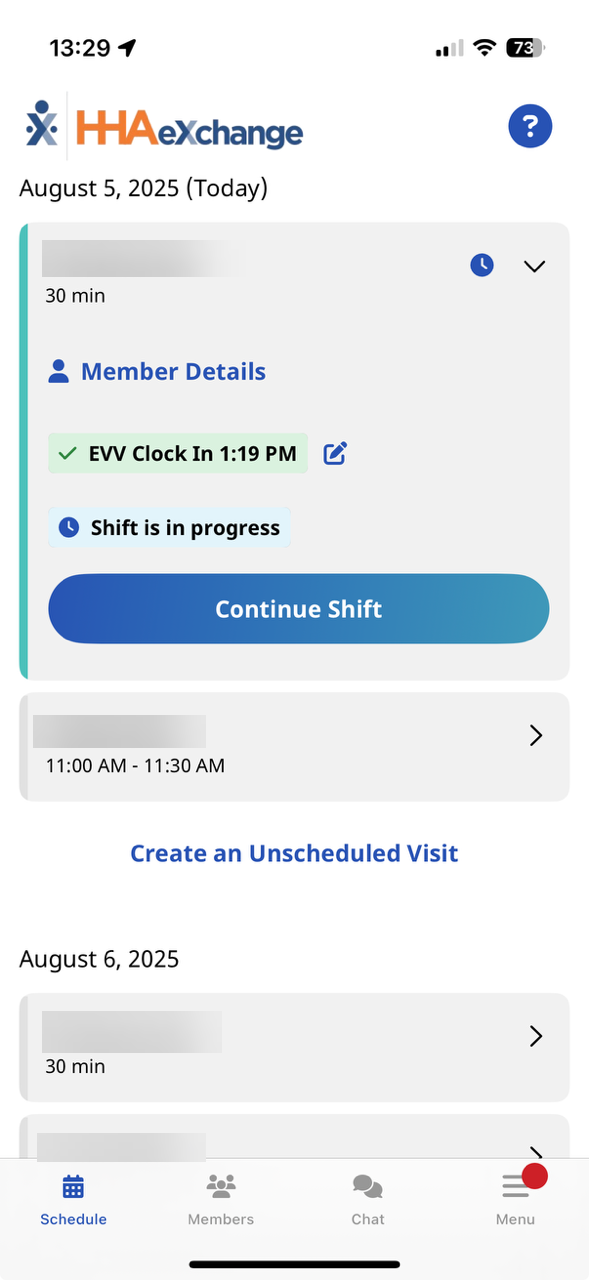
From the Schedule page, you can Clock In to a visit, view patient details, view visit details, and create an unscheduled visit.
The Schedule page shows up to a week of your scheduled visits. Pull down on the Schedule page and then tap the Visit Search link to view previous visits.
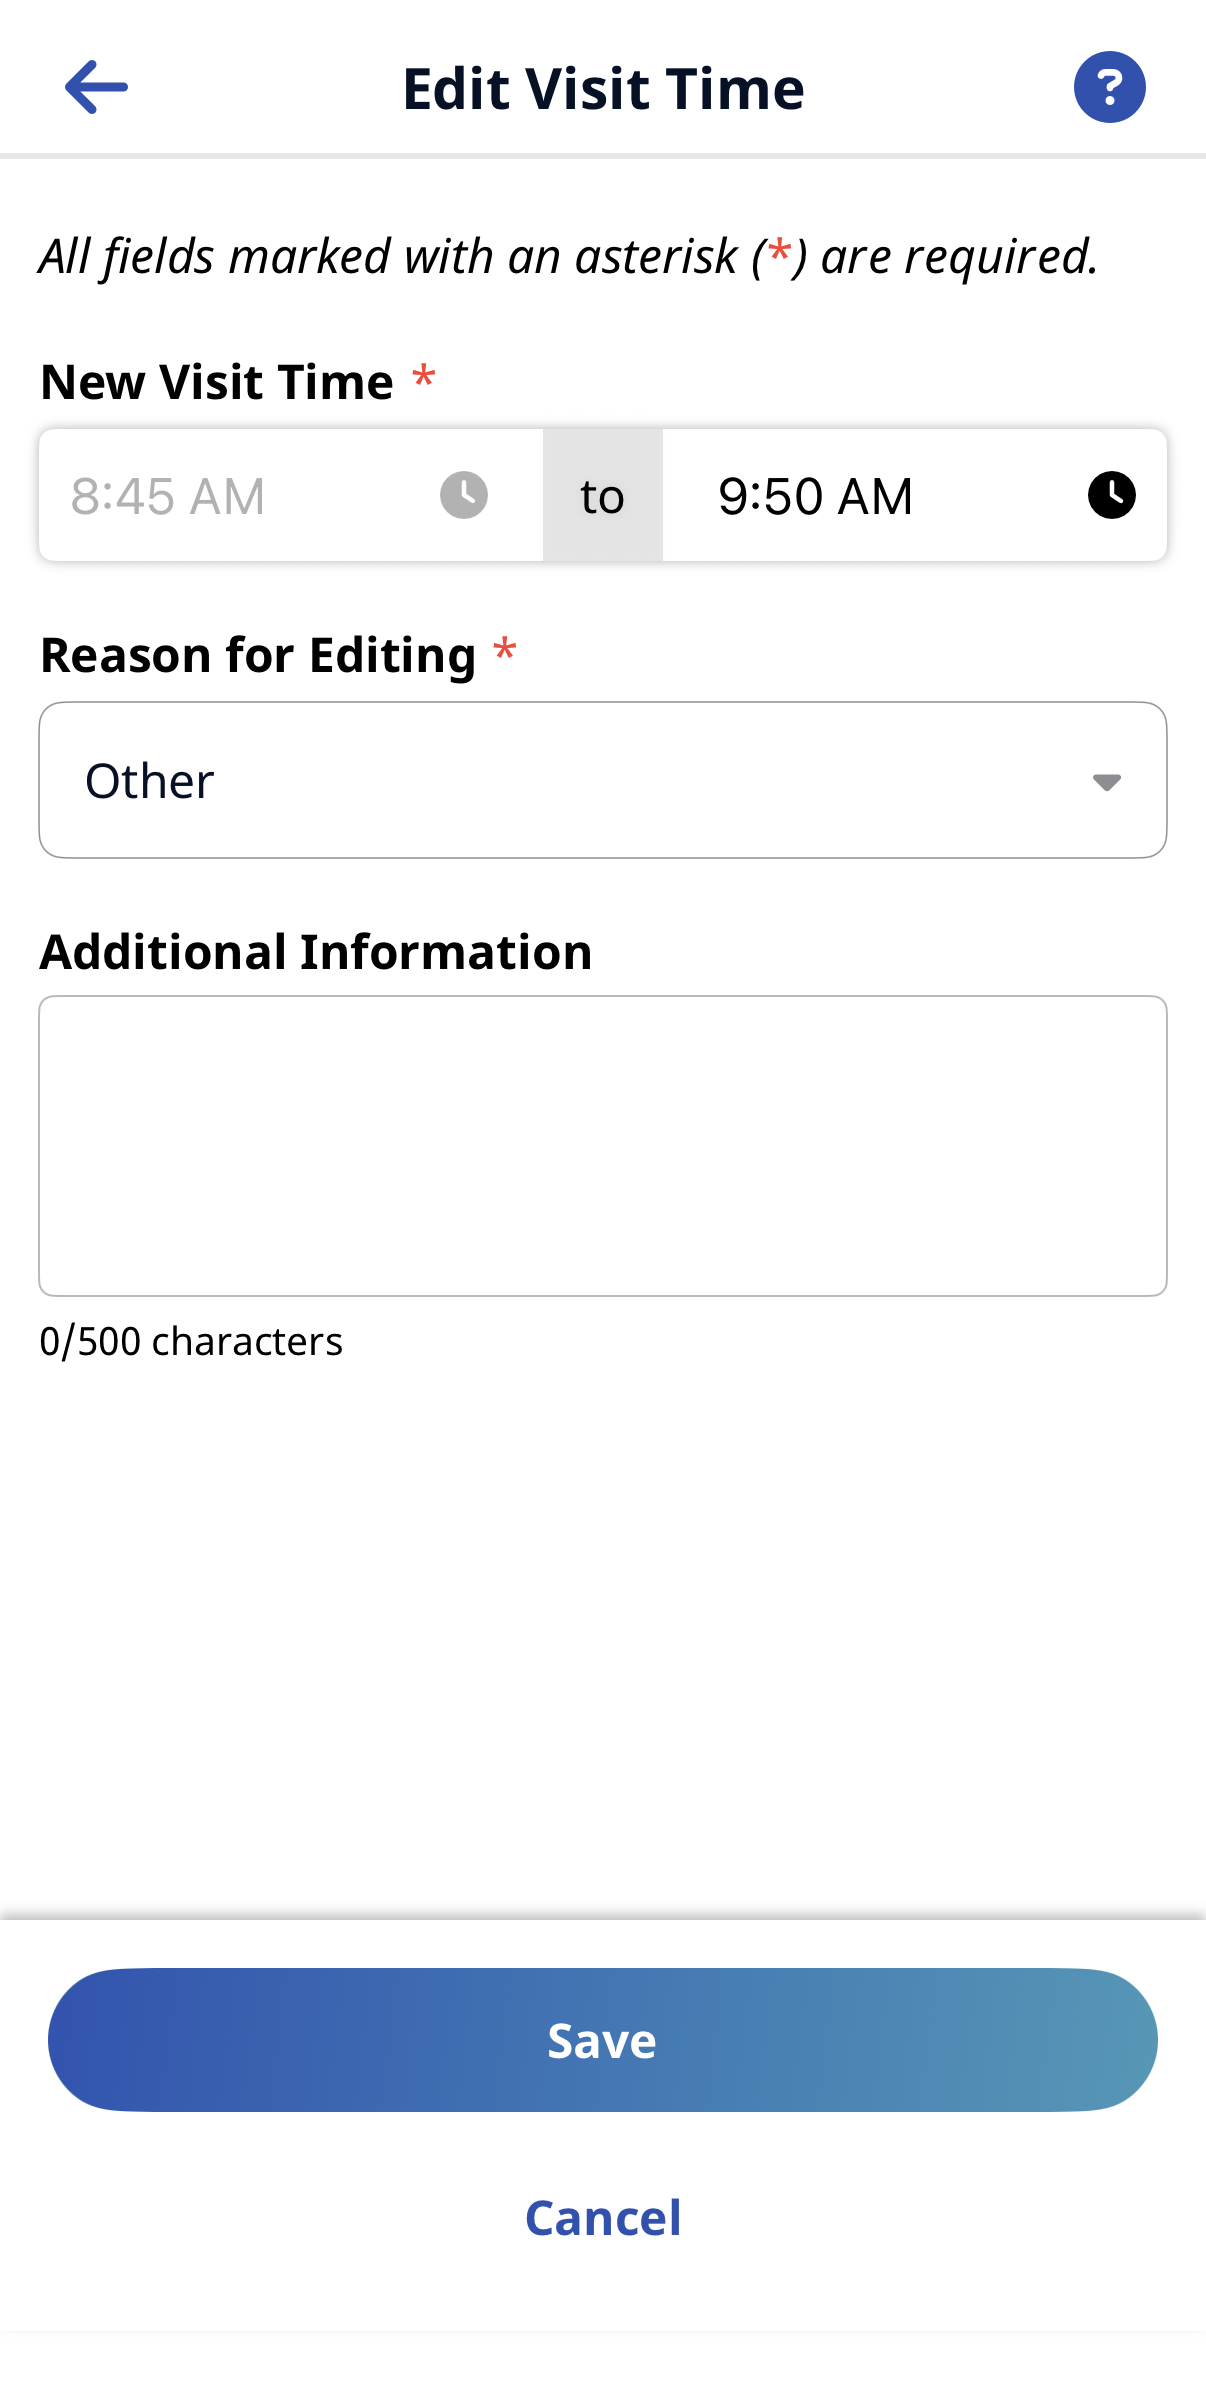
If configured by the Agency, you can edit a visit that has already completed. From the Schedule page, expand the visit and tap View Details to adjust the duties associated with the visit. If allowed, from the Visit Details page, you can tap Edit Visit Time (upper right) to adjust Clock In and Clock Out times.

-
From the Schedule page, select the patient visit, and then tap clock in.
If the patient visit is not on the Schedule page, tap +New Unscheduled Visit to create an Unscheduled Visit.
-
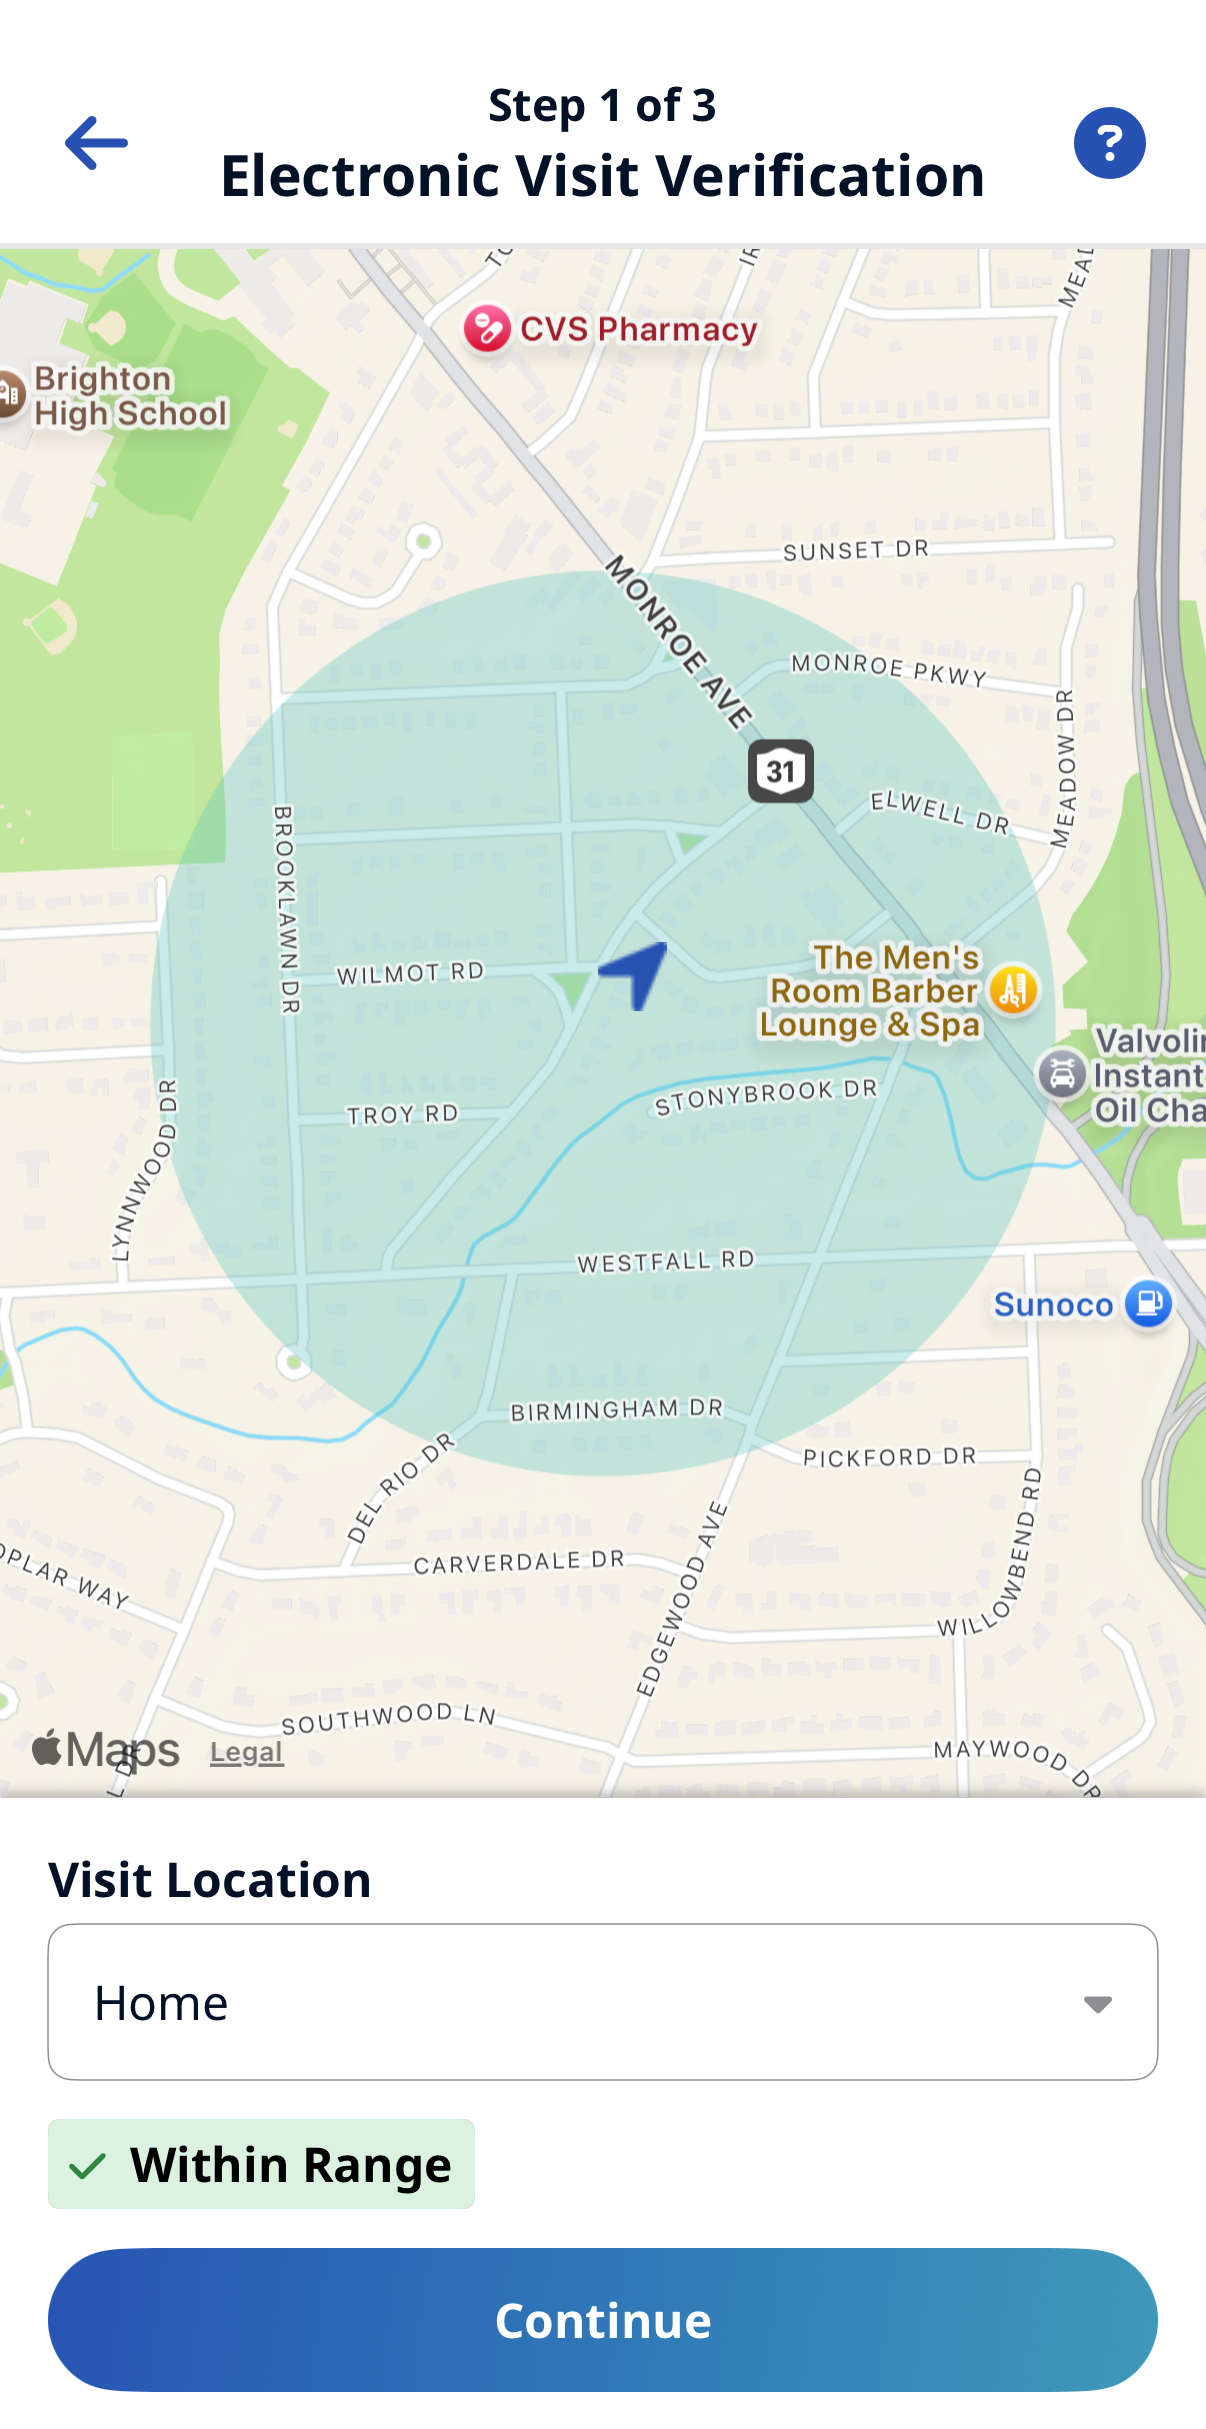
If configured by the Agency, When you clock in the Electronic Visit Verification page opens. Select GPS or Alternative Device as the EVV method. Tap Continue.
-
If you select GPS, after you allow the app access to your location, you can use the map to help locate the Patient Address. If configured by the Agency, you can change the Visit Location from the Patient's home to another value to bypass the need for proximity to the Patient Address.
-
If you select Alternative Device, you are prompted to enter the six-digit Device ID and Passcode.
-
-
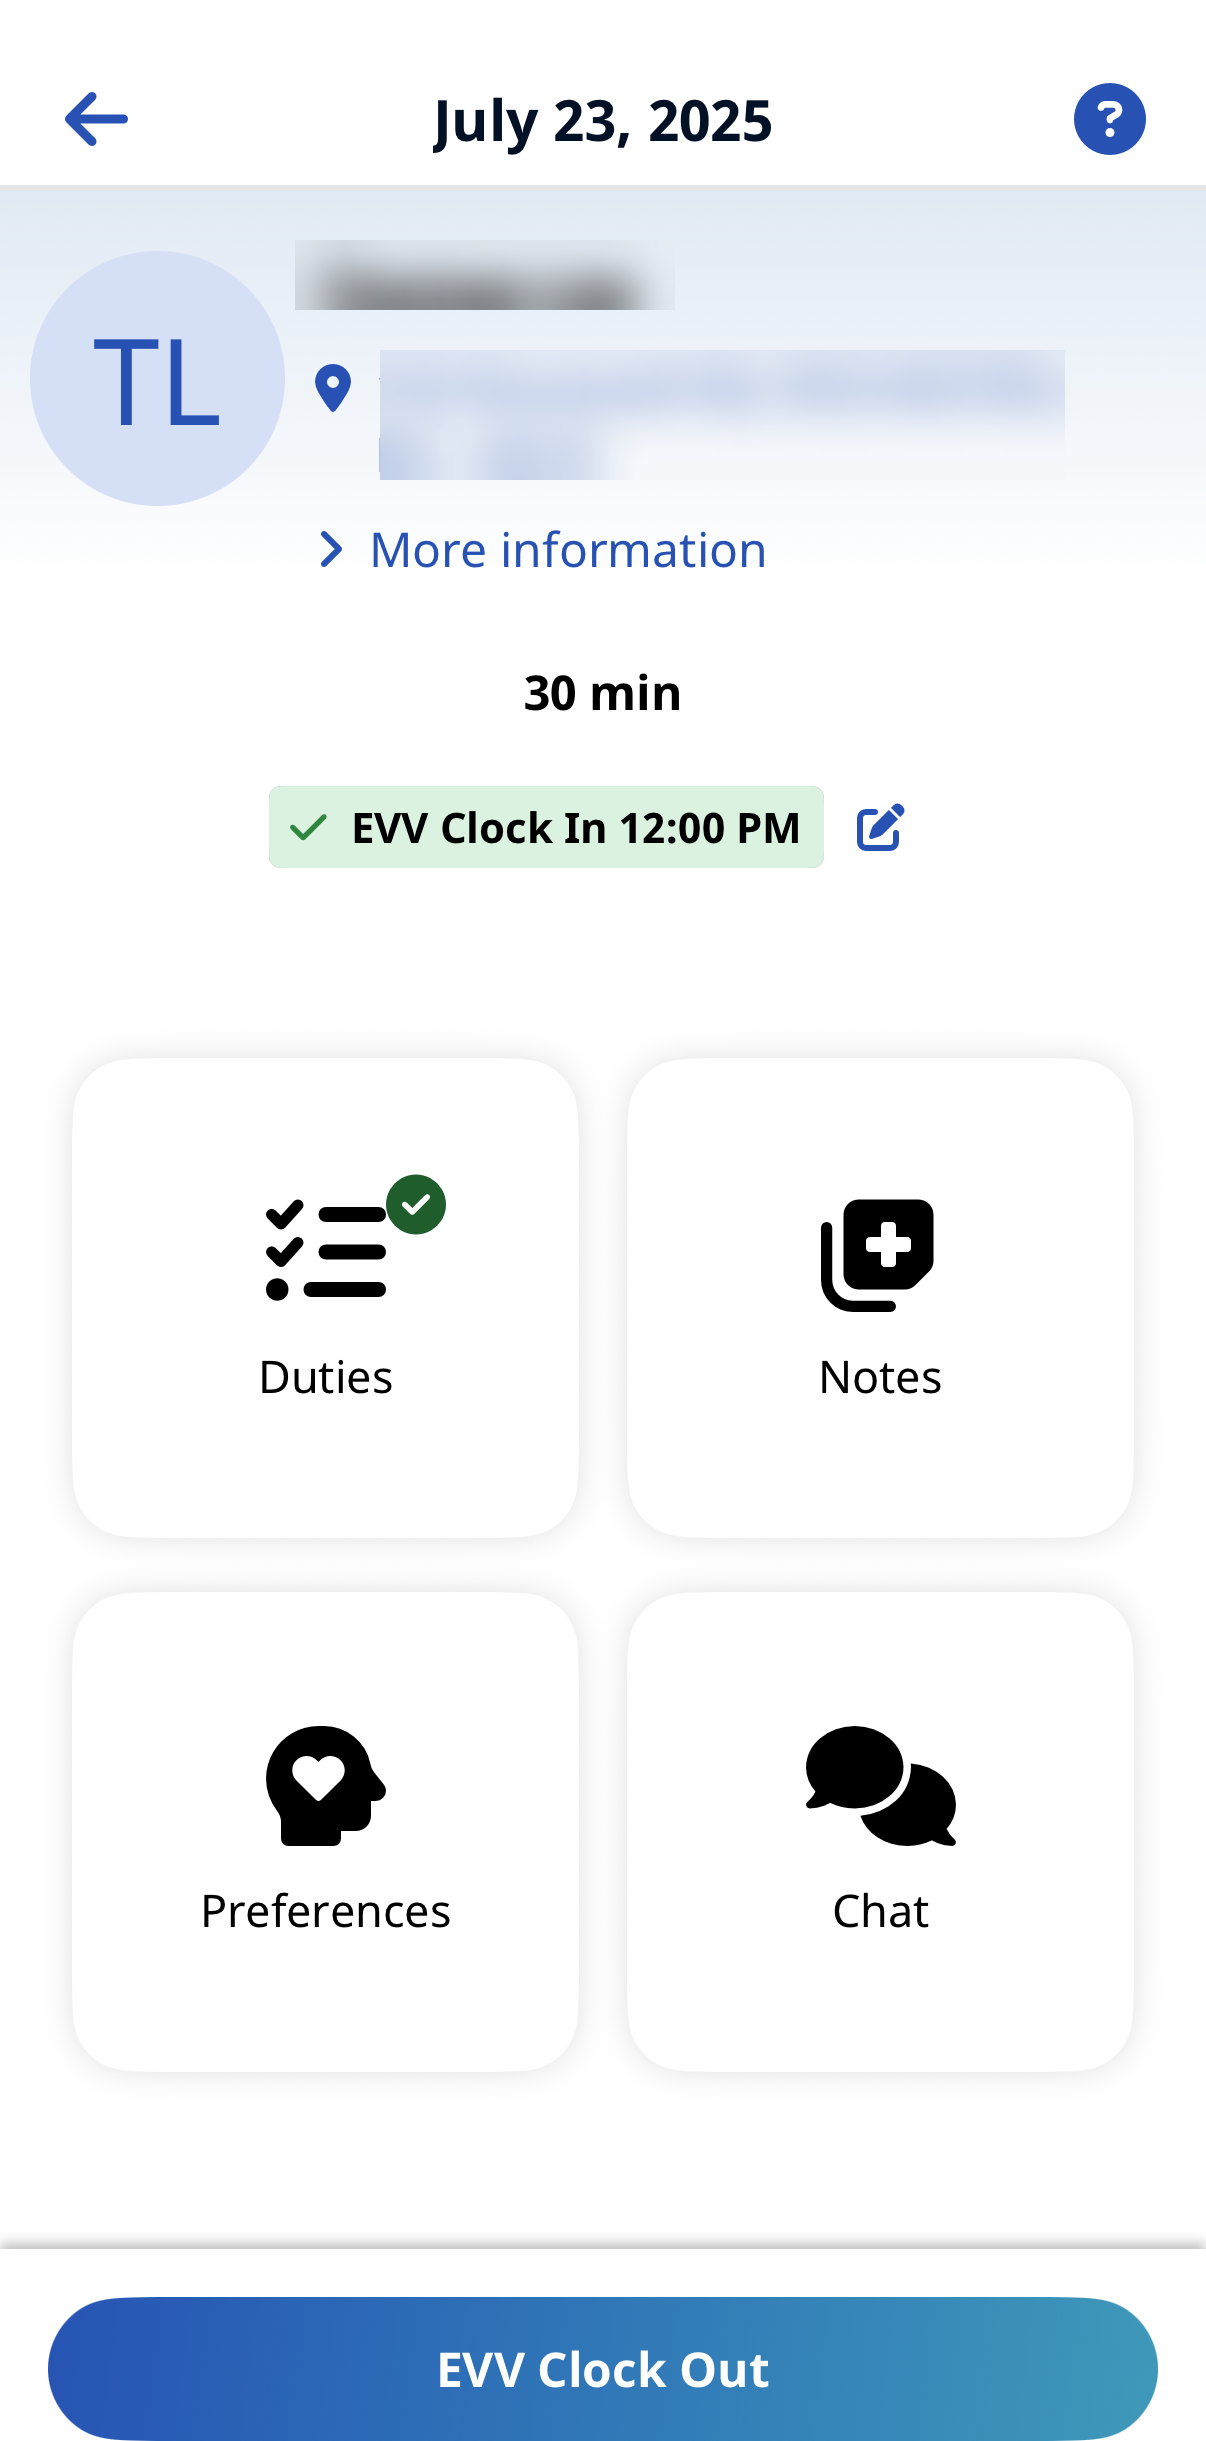
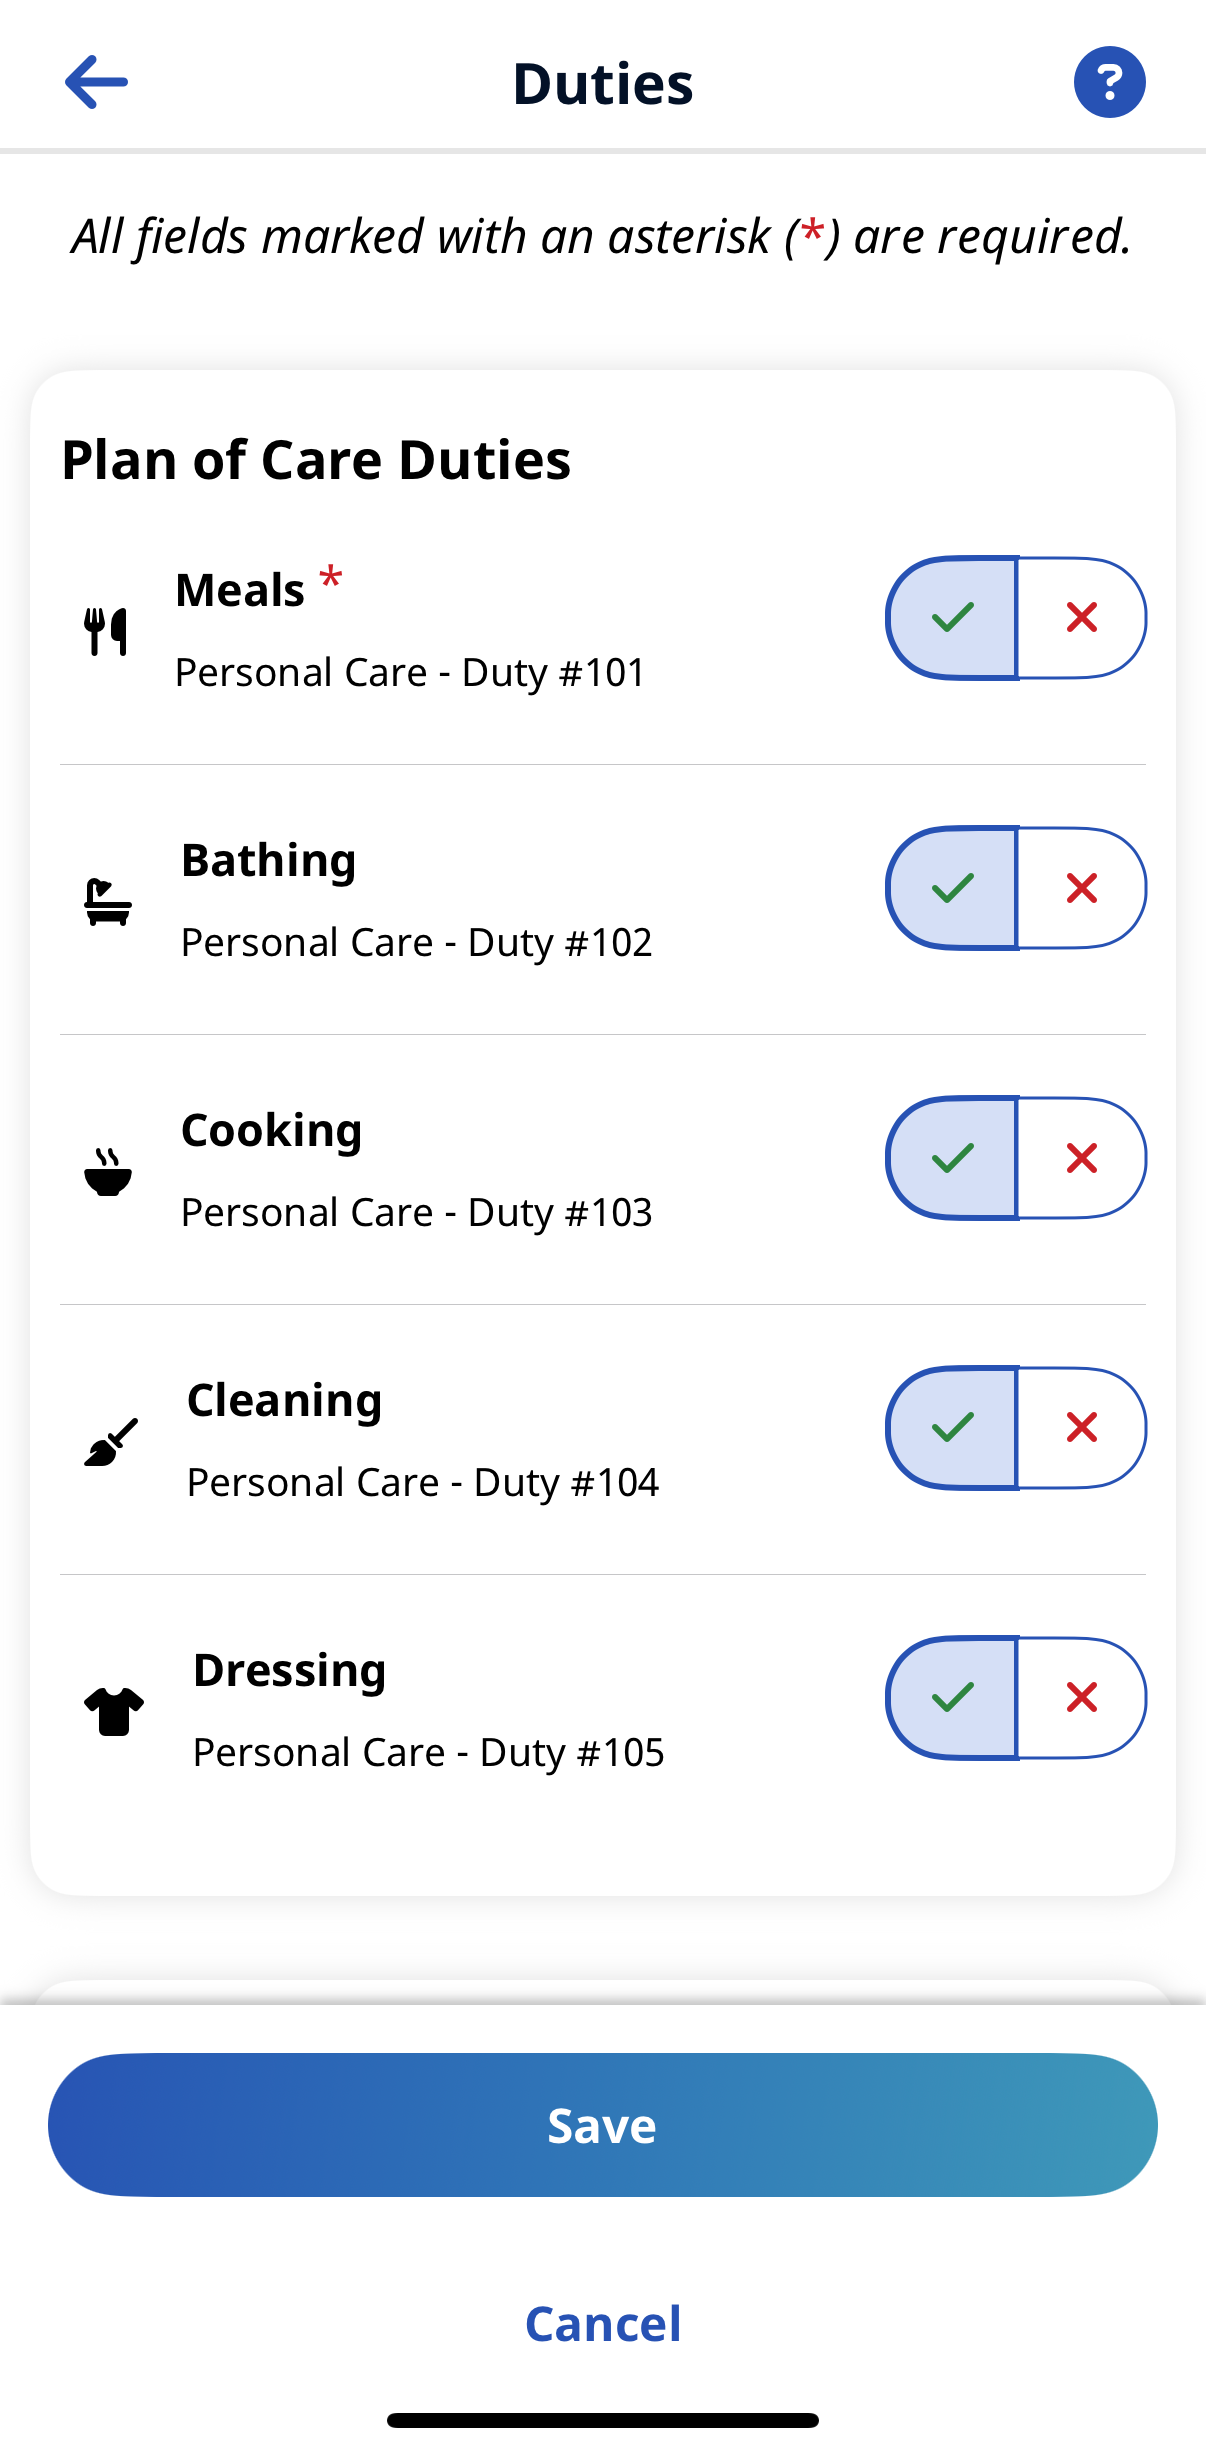
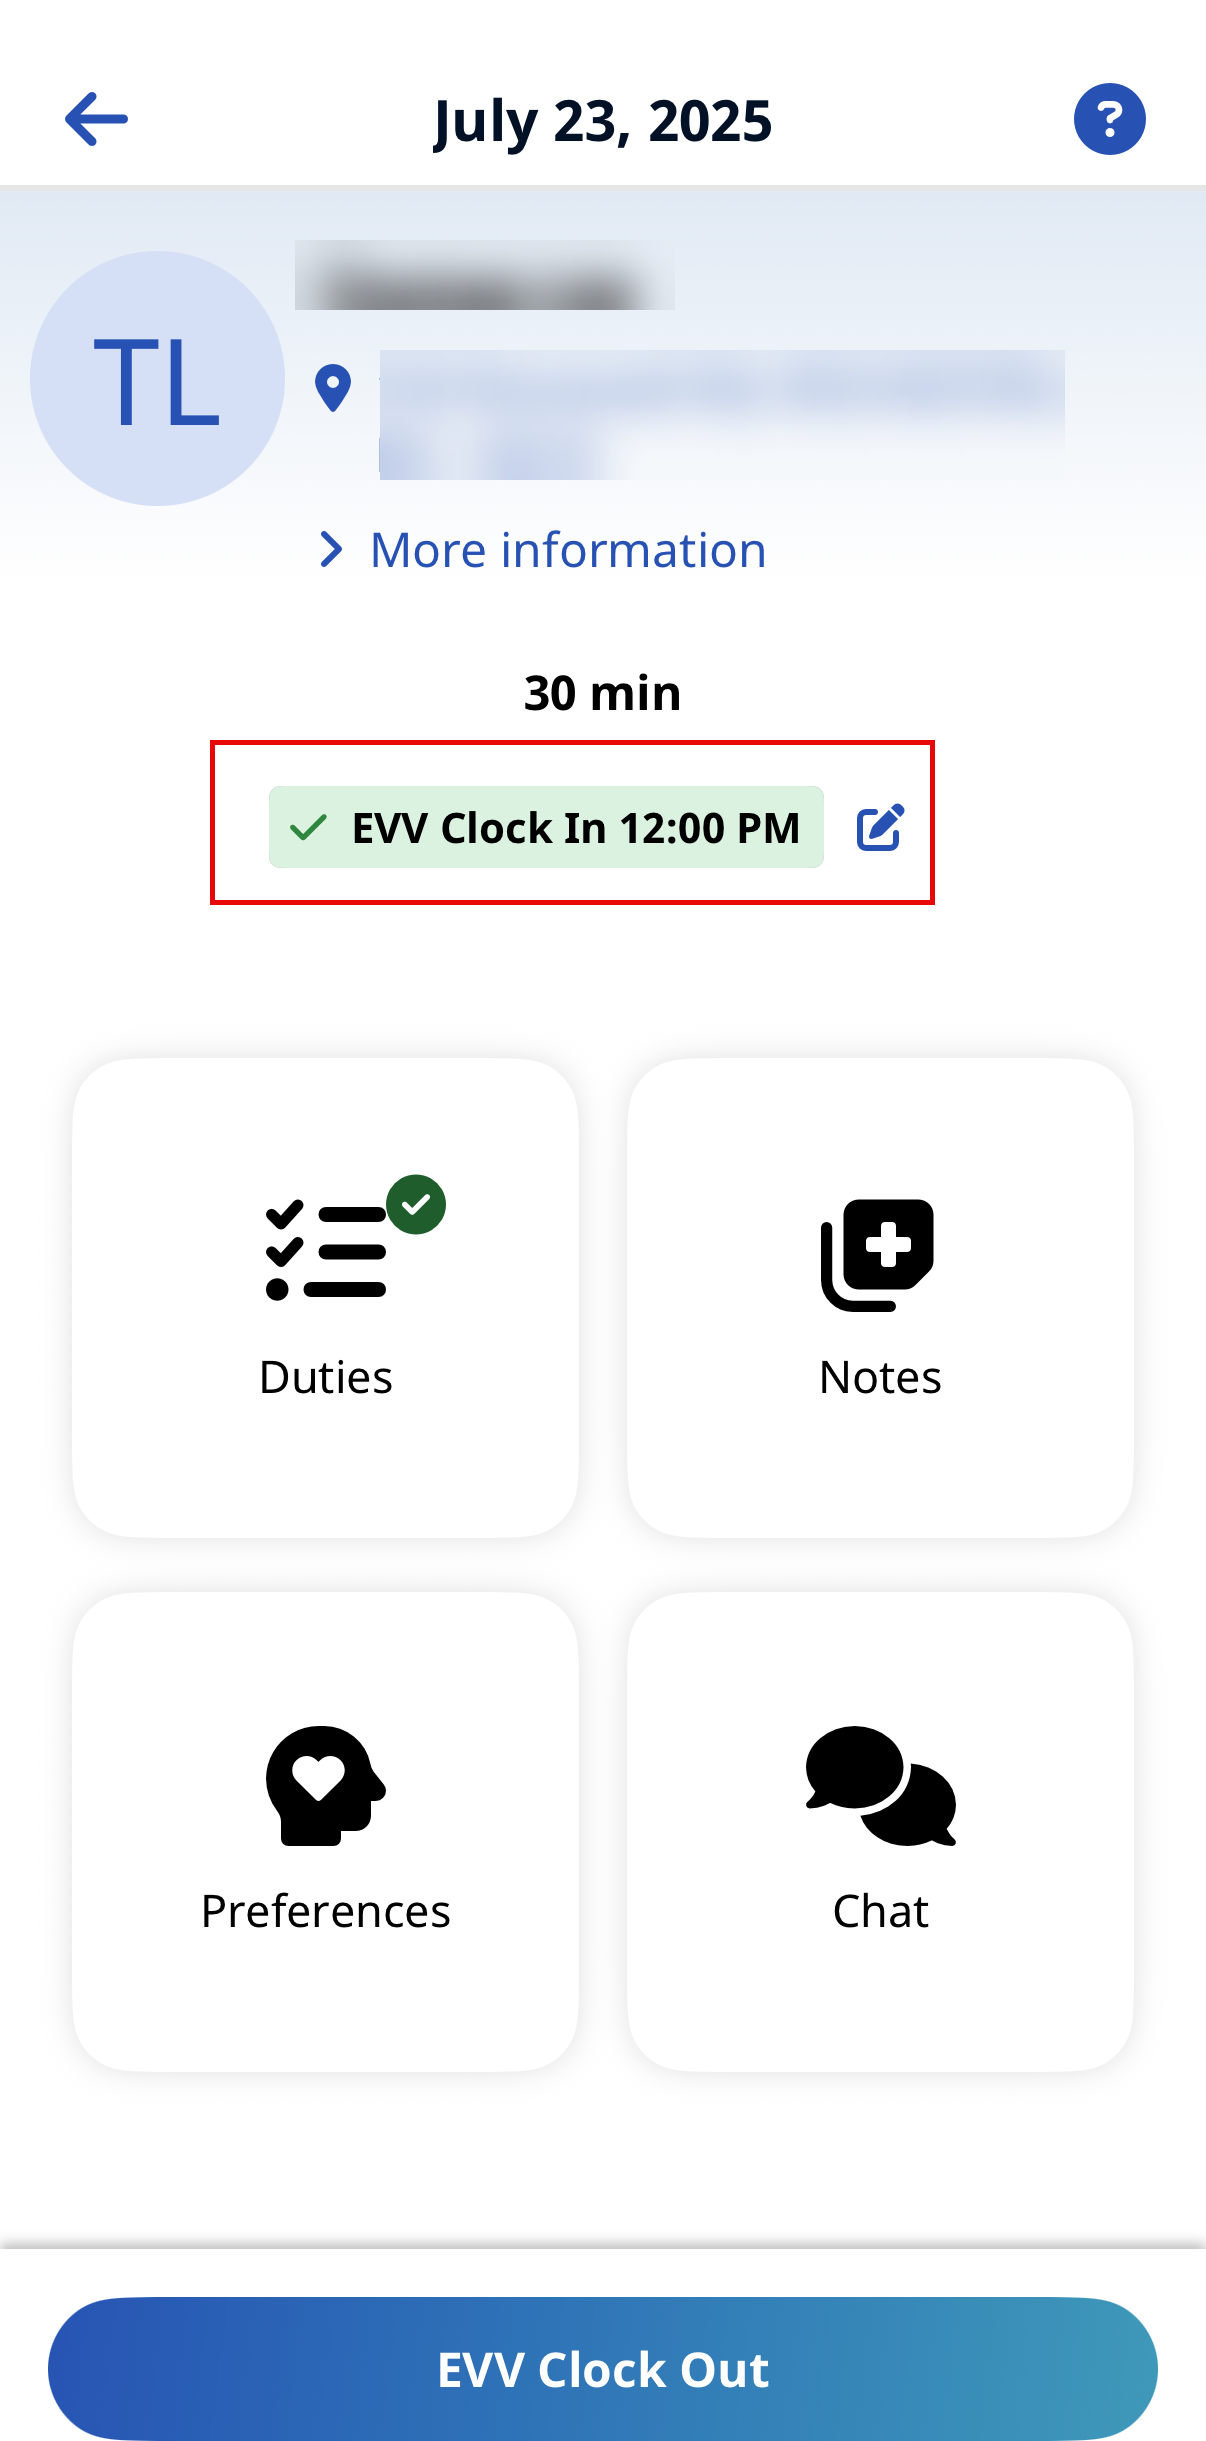
From the Visit Details page, complete the visit tasks. If configured, Duties, Questionnaires, Medications, Chat, Preferences, and Notes display to complete.
Tap More Information on the patient details to view more information about the patient.
-
If required, obtain a Patient Signature, an RN (Coordinator) Signature, and a Caregiver Signature. Tap Submit or Skip if available, and then select the reason for skipping.
-
If required, to obtain Patient Voice Consent tap Record to record consent, and then tap Stop Recording to complete. Tap Done or Skip if available, and then select the reason for skipping.

-
From the Schedule page, select the patient visit, and then tap Continue Shift.
-
Tap Clock Out at the bottom of the page.
-
If required, on the Electronic Visit Verification page, update GPS or Security Token settings and tap Continue.
-
If required, obtain Patient Signature and any other required signatures and tap Submit, or tap Skip if available and select the reason for skipping.
-
If required, obtain Patient Voice Consent (Record, Stop Recording) and tap Done, or tap Skip if available, and select the reason for skipping.

You can create an Unscheduled Visit for any Patient to whom you have access, whether or not you have previously worked with the Patient.
To create an Unscheduled Visit from the Schedule page:
Create an Unscheduled Visit can also be started from the Patients Page.
-
Tap the Patient that you want to create an Unscheduled visit for.
-
Tap Create an Unscheduled Visit.
-
If configured by the Agency, on the Electronic Visit Verification page, select GPS or Alternative Device as the EVV method.
-
If you select GPS, after you allow the app access to your location, you can use the map to help locate the Patient Address, and (if configured by the Agency) you can change the Visit Location from Home to another value to bypass the need for proximity to the Patient Address.
-
If you select Alternative Device, you are prompted to enter the six-digit Device ID and Passcode.
-
When you are finished, tap Continue. The Visit Details page displays.
-
-
From the Visit Details page, complete the visit tasks. If configured, Duties, Questionnaires, Medications, Chat, Preferences, and Notes display to complete.
Tap More Information on the patient details to view more information about the patient.
-
If required, obtain a Patient Signature, an RN (Coordinator) Signature, and a Caregiver Signature, and tap Submit, or tap Skip if available and select the reason for skipping.
-
If required, obtain Patient Voice Consent (Record, Stop Recording) and tap Done, or tap Skip if available, and select the reason for skipping.

-
From the Schedule page, select the patient visit, and then tap Continue Shift.
-
Tap Clock Out at the bottom of the page.
-
If required, on the Electronic Visit Verification page, update GPS or Security Token settings and tap Continue.
-
If required, obtain Patient Signature and any other required signatures and tap Submit, or tap Skip if available and select the reason for skipping.
-
If required, obtain Patient Voice Consent (Record, Stop Recording) and tap Done, or tap Skip if available, and select the reason for skipping.

When enabled by the Agency, the Consecutive Shifts feature allows you to perform a single Clock-In and Clock-Out for multiple Consecutive Shifts for the same Patient or for one Consecutive Shift for two Linked Patients, such as a husband and wife receiving back-to-back services at the same address.

-
From the Schedule page, tap the shift for a single Patient with scheduled consecutive visits. Visit Details are displayed with the Start Time of the first shift and the End Time of the last shift.
-
Tap Clock In to begin the Consecutive Shift.
-
If configured by the Agency, on the Electronic Visit Verification page, select GPS or Alternative Device as the EVV method.
-
If you select GPS, after you allow the app access to your location, you can use the map to help locate the Patient Address, and (if configured by the Agency) you can change the Visit Location from Home to another value to bypass the need for proximity to the Patient Address.
-
If you select Alternative Device, you are prompted to enter the six-digit Device ID and Passcode.
-
When you are finished, tap Continue.
-
-
If required, obtain a Patient Signature, an RN (Coordinator) Signature, and a Caregiver Signature, and tap Submit, or tap Skip if available and select the reason for skipping.
-
If required, obtain Patient Voice Consent (Record, Stop Recording) and tap Done, or tap Skip if available, and select the reason for skipping.
When Clocked In, the Confirmed Start Time for the Consecutive Shift is the Start Time of the first shift.

-
If Duties or Other Duties have been added, select the duties performed checkmark and duties refused X. Select any required Value for duties performed and any Refused Duty Reason the Agency requires.
You can add other duties that the Agency has configured for the visit by tapping + Add Other Duties.
-
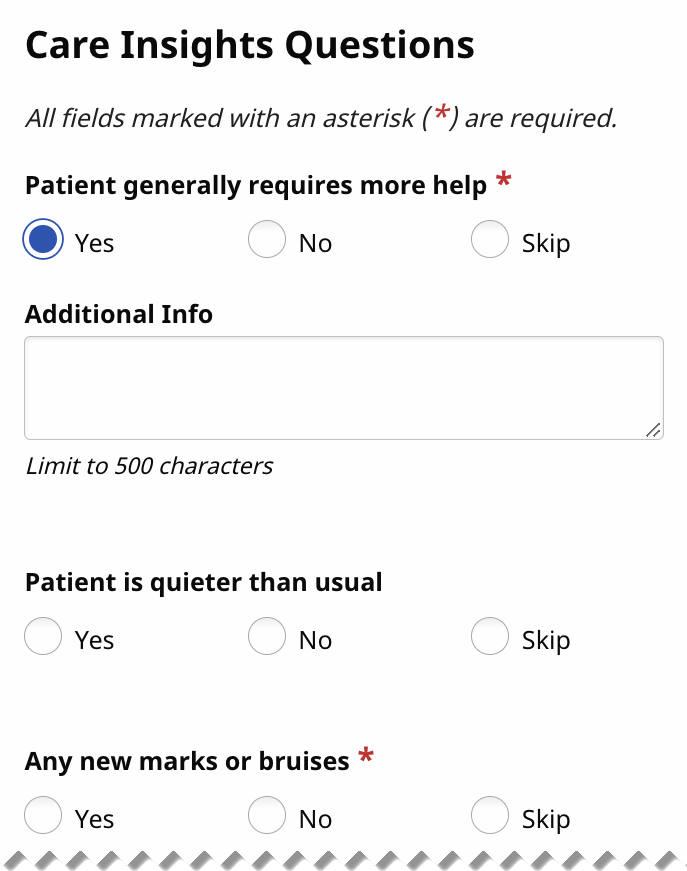
If the first shift includes Questionnaires, answer all required questions, and provide Additional Info as needed. Tap Submit.
-
If you want to add a note about the first shift, tap Notes.
-
When you finish documenting the first shift, tap Continue at the bottom of the page to display the next consecutive shift's details.
-
When the next consecutive shift's details are displayed, complete the above steps for that shift. When you finish documenting the last consecutive shift, tap Clock Out at the bottom of the page.
-
If required, on the Electronic Visit Verification page, update GPS or Alternative Device settings and tap Continue.
-
If required, obtain Patient Signature and any other required signatures and tap Submit, or tap Skip if available and select the reason for skipping.
-
If required, obtain Patient Voice Consent (Record, Stop Recording) and tap Done, or tap Skip if available, and select the reason for skipping.
After the Consecutive Shift is completed, the Consecutive Shift association is broken. You can only access each shift as an individual shift to make edits for the length of time after Clock Out allowed by the Agency. To make edits, return to the Schedule page, and select any shift in the Consecutive Shift sequence to apply updates to that specific shift by tapping View Details.
-
If you Clock Out before the planned end of all shifts and don't Clock In for the remaining shifts, the remaining shifts are marked as Missed.
-
If any shift in a Consecutive Shift sequence wasn't started, you can Clock In to that shift and complete it. If these are multiple shifts, they are treated as a new Consecutive Shift.
-
Consecutive Shifts for a Single Patient and Consecutive Shifts for two Linked Patients cannot be co-mingled.
-
Consecutive Shifts don't allow rounding at the contract level when there are multiple contracts with different rounding methods for the same Patient.

![]() Linked Patients are labeled as such on the Schedule page and are designated with a chain link icon.
Linked Patients are labeled as such on the Schedule page and are designated with a chain link icon.
To Clock In for a Linked Patients Consecutive Shift:
-
From the Schedule page, tap the first shift in the Linked Patient Consecutive Shift. Visit Details are displayed with the Start Time of the first shift and the End Time of the last shift. All Linked Patient names are listed.
-
Tap Clock In to begin the Consecutive Shift.
-
If configured by the Agency, on the Electronic Visit Verification page, select GPS or Alternative Device as the EVV method.
-
If you select GPS, after you allow the app access to your location, you can use the map to help locate the Patient Address, and (if configured by the Agency) you can change the Visit Location from Home to another value to bypass the need for proximity to the Patient Address.
-
If you select Alternative Device, you are prompted to enter the six-digit Device ID and Passcode.
-
When you are finished, tap Continue.
-
-
If required, obtain a Patient Signature for each of the linked patients, an RN (Coordinator) Signature, and a Caregiver Signature, and tap Submit, or tap Skip if available and select the reason for skipping.
-
If required, obtain a Patient Voice Consent (Record, Stop Recording) for each of the linked patients and tap Done, or tap Skip if available, and select the reason for skipping.
When Clocked In, the Confirmed time is the Start time for the Consecutive Shift.
To Clock Out of a Linked Patients Consecutive Shift:
-
If the Visit includes Duties or Other Duties have been added, select the duties performed checkmark and duties refused X for the first linked patient. Select any required Value for duties performed and any Refused Duty Reason the Agency requires.
You can add other duties that the Agency has configured for the visit by tapping + Add Other Duties.
-
If the Visit includes Questionnaires, answer all required questions, and provide Additional Info as needed. Tap Submit.
-
If you want to add a note about the visit, tap Notes.
-
When you are finished, tap Continue at the bottom of the page.
-
When the next linked patient's visit is displayed, complete the above steps for that linked patient. When you finish documenting the visit for that linked patient, tap Clock Out at the bottom of the page.
-
If required, on the Electronic Visit Verification page, update GPS or Alternative Device settings and tap Continue.
-
If required, obtain a Patient Signature for each linked patient and any other required signatures and tap Submit, or tap Skip if available and select the reason for skipping.
-
If required, obtain a Patient Voice Consent (Record, Stop Recording) for each linked patient and tap Done, or tap Skip if available, and select the reason for skipping.
After the Consecutive Shift is completed, the Consecutive Shift association is broken. You can only access each shift as an individual shift to make edits for the length of time after Clock Out allowed by the Agency. To make edits, return to the Schedule page, and select any shift in the Consecutive Shift sequence to apply updates to that specific shift.
-
If you Clock Out before the planned end of all shifts in the sequence, the remaining shifts are marked as Missed.
-
If the second shift in a two patient Linked Consecutive Shift sequence wasn't started, you can Clock In to the second shift to complete it.
-
Consecutive Shifts for a Single Patient and Consecutive Shifts for two Linked Patients cannot be co-mingled.
-
Consecutive Shifts don't allow rounding at the contract level when there are multiple contracts with different rounding methods for a Patient.
-
Clock Out for the first shift and Clock In for the second are derived from the scheduled duration of the first shift. The Clock Out time recorded is used as the End time for the second shift.

If configured by the Agency, you can edit the time of an EVV Visit that has already been completed.
To edit Visit Time,
-
From the Schedule page, tap the completed Visit, and then tap View Details.
-
On the Visit Details page, tap the Edit Visit Time icon next to the Clock In time.
-
On the Edit Visit Time page, select the from and to values for the New Visit Time.
-
When prompted, select a Reason for your change.
-
Provide Additional Information to explain your change and then tap Save.
-
If prompted, obtain a Patient Signature, and Clock Out.
Your Time Edit is submitted to your Agency for approval.

Linked Patient Visits (when not handled as a Consecutive Shift) are treated as two individual shifts, each shift requiring Clock In and Clock Out.
![]() Linked Patients are labeled as such on the Schedule page and are designated with a chain link icon.
Linked Patients are labeled as such on the Schedule page and are designated with a chain link icon.
Patient 1:
-
Clock In for Linked Patient 1 as you would for any Scheduled Visit.
-
Perform Linked Patient 1 Duties.
-
Clock Out for Linked Patient 1 as you would for any Scheduled Visit.
When complete, the Mobile App reports a successful Clock Out for Linked Patient 1.
Patient 2:
-
Clock In for Linked Patient 2 as you would for any Scheduled Visit.
-
Perform Linked Patient 2 Duties.
-
Clock Out for Linked Patient 2 as you would for any Scheduled Visit.
When complete, the Mobile App reports a successful Clock Out for Linked Patient 2.

Mutual Patient Visits are treated as two separate patient visits handled at the same time, with Clock In and Clock Out performed from either of the two visits.
![]() Mutual Patients are labeled as such on the Schedule page and are designated with a Two-person Silhouette icon.
Mutual Patients are labeled as such on the Schedule page and are designated with a Two-person Silhouette icon.
-
Tap Clock In for a Mutual Patient Visit, and both patient visits indicate the same Clock In time.
-
If required for the first patient, enter Duties or Other Duties, answer Questionnaires, and then tap Continue.
-
If required for the second patient, enter Duties or Other Duties, answer Questionnaires, and then tap Clock Out.
When you tap Clock Out, both Visits are Clocked Out.

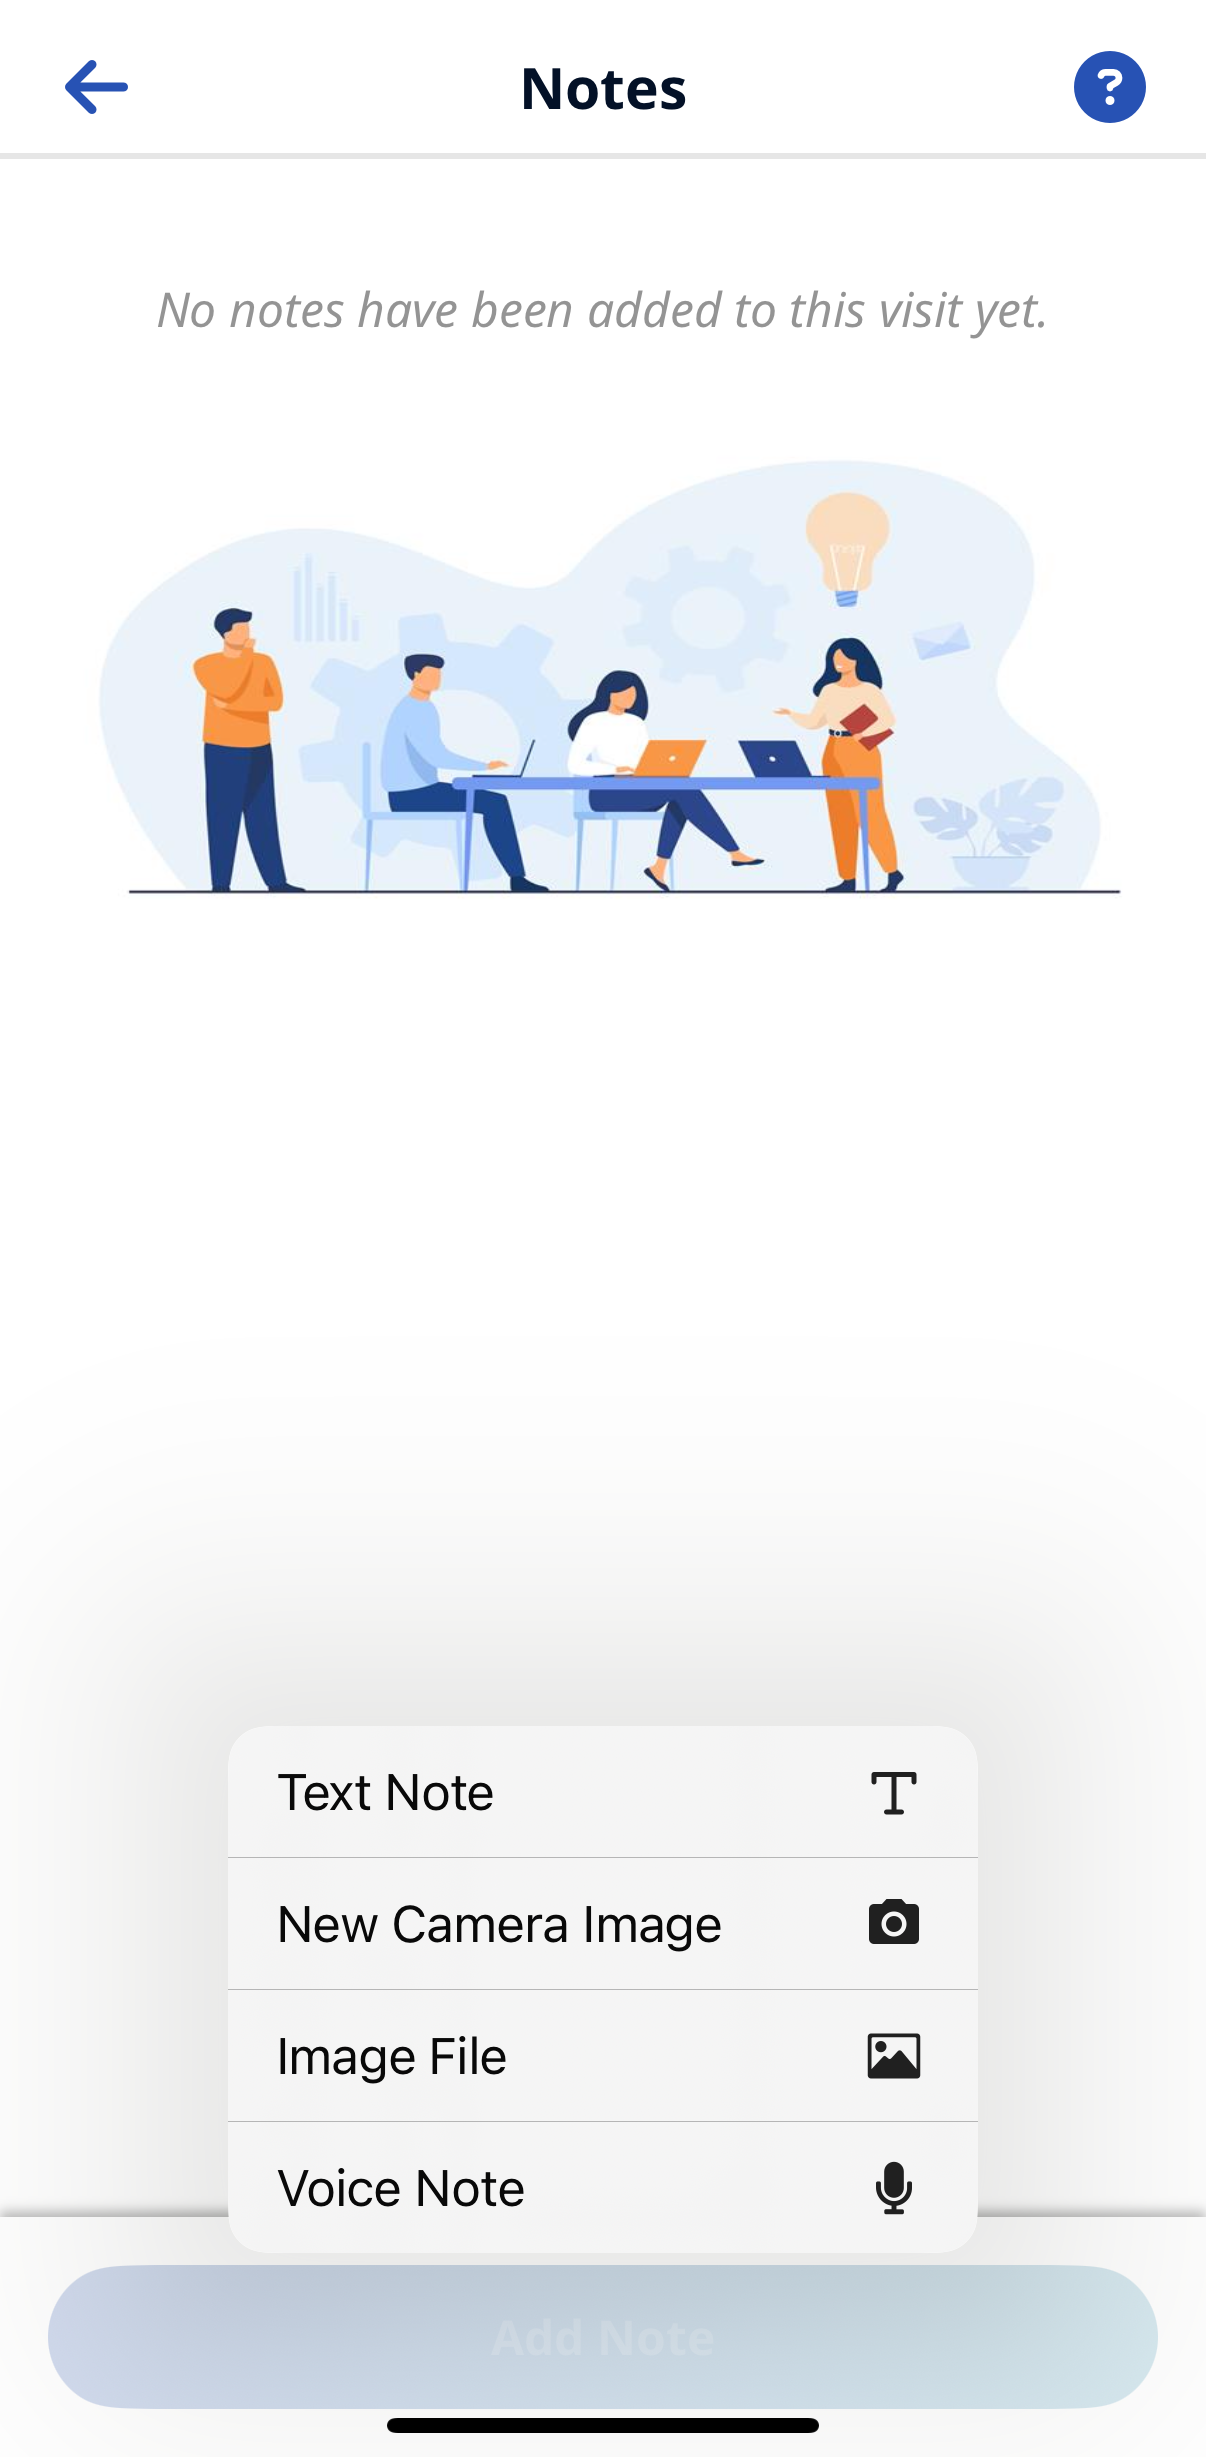
Follow these steps to enter a Visit Note.
-
From the Visit Details page, tap Notes.
-
Select the Add Note. Choose note type.
-
Text Note - Up to 1000 characters.
-
New Camera Image - Opens the phone's camera, allowing you to take a photo and add a description up to 500 characters.
-
Image File - Opens a Search page where you can browse the phone for an image to attach.
-
Voice Note - Opens a recorder where you can record and save audio comments.
-
-
Obtain and attach the Note, and then tap Add Note.
From the Visit Details page, tap Notes:
-
To edit an attached note, tap the Edit icon.
-
To delete an attached note, tap the Delete Note button.

If Configured, Push notifications alerts you that a scheduled visit clock in is coming up within 5 minutes. A Push notification also displays 5 minutes before clock out.
Tap the notification to open the Mobile App.
