How do I manage patient authorizations for linked contracts?
Providers can’t edit authorization details for UPR linked contracts. HHAeXchange turns off editing for these contracts to protect providers from changing values that may cause rejected claims. If the payer changes any details on their HHAeXchange system, that edit is automatically shown on the provider's platform.
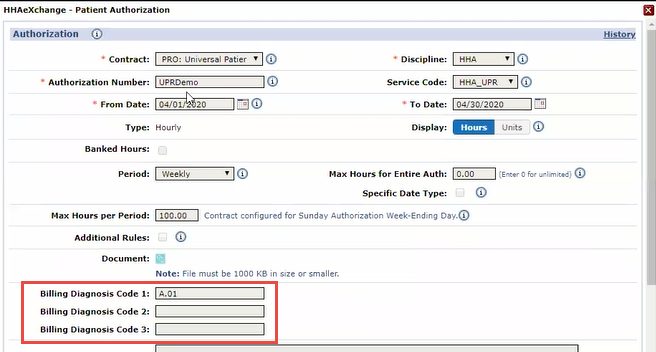
For UPR linked contracts, payers control patient authorization information with most fields locked, including the Billing Diagnosis Code fields. You won't see the diagnosis code table for these types of authorizations.
The system displays any diagnosis code for authorizations from the payer as a read-only Billing Diagnosis Codes on the provider platform.

This function only applies to hourly rate types. Payers can restrict entire period authorizations to prevent providers from over utilization (over-servicing the member). Guardrail settings decide how providers distribute the authorization, ensuring that units are available throughout the entire period until the scheduled end date.

For UPR contracts, when a payer sends a placement, authorization fields are usually locked. Providers can set an authorization guardrail for the entire period of authorizations for UPR contracts. This preserves the payer’s overall authorization limit but allows the provider to subdivide the authorization period (monthly, weekly, or daily) totals and use the Additional Rules function.
When the payer sends an entire period authorization, the provider can edit the Period field on the Patient Authorization page, as shown below.
If the provider selects any other period type, the system moves the value from the Max Units per Period field to the read-only Max Units for Entire Auth field. The Additional Rules checkbox also becomes available to edit.

The system requires an authorization before you can release the visits from Billing Review and bill for them.
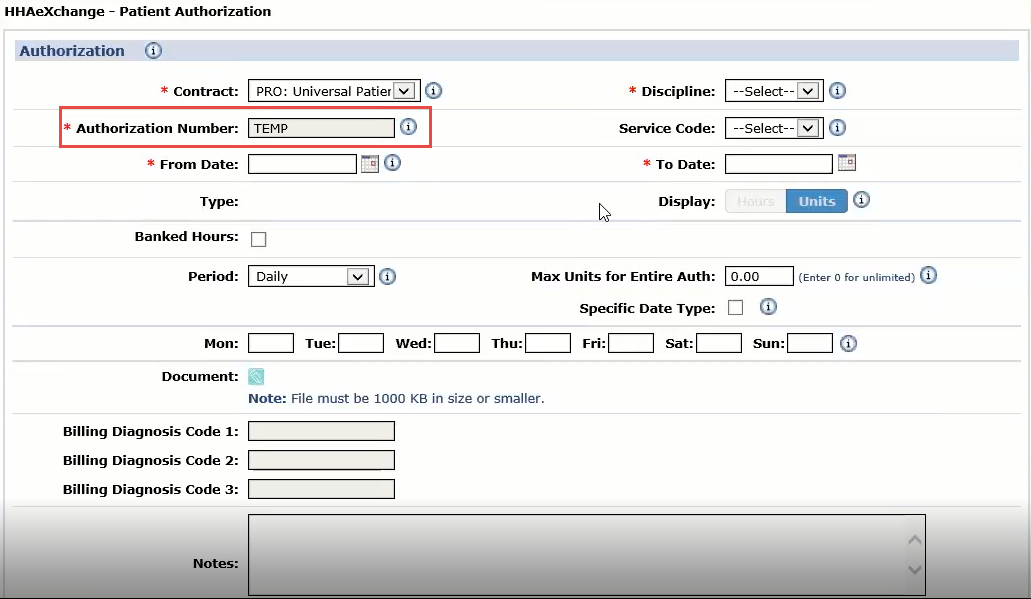
If a payer doesn’t send an on-time authorization for a patient, you can create a TEMP authorization. This allows you to schedule visits and pay caregivers until the payer sends the authorization. The system holds visits with a TEMP authorization at billing review.
Create a Temporary Authorization.
-
Go to Patient > Authorizations/Orders.
-
Click Add to open the Patient Authorization page.
-
Select the UPR Linked Contract from the Contract list. The system puts TEMP into the Authorization Number field an is not editable.
-
Complete the required fields (marked with a red asterisk).
-
Click Save.
-
When the payer sends the official authorization, update applicable visits and bill for them. Delete the TEMP Authorization.
-
When the payer sends the placement, accept the placement (UPR linked contract).
-
Merge the placement with the temporary patient record and manually change the contract on the Schedule tab to the UPR linked contract.

Examples and recommended solutions for handling missing patient and/or authorization information are listed in this section.

Review and accept the pending placement. The system creates a patient record with access to internal and UPR linked contracts with authorization.

-
Review and accept the pending placement. Once accepted, the system creates a new patient record with access to internal and UPR linked contracts.
-
Create a temporary authorization. Refer to Creating a TEMP Authorization.
-
Create and process visits as usual (from scheduling through payroll). The system holds claims in billing review for a temporary authorization.
When you receive the official payer authorization, and two authorizations exist for the patient.
-
Delete the temporary authorization.
-
Click the Update link to recalculate and apply the payer authorization to the visit(s). The system updates invoices with the payer authorization number, and you can process claims.

-
Create a new patient record.
-
Assign an existing UPR linked contract to the patient record.
-
Create a temporary authorization. Refer to Creating a TEMP Authorization.
-
Create and process visits as usual from scheduling through payroll. The system holds claims in billing review for a temporary authorization.
When you receive the official payer placement and authorization, and the contract for the payer placement overlaps Start of Care Dates with the contract for the newly created patient record:
-
Change the Start of Care Date and Discharge Date on both contracts to avoid overlap. Contracts must have different periods of care (date ranges).
-
Merge the records.
-
Click the Update link on the Authorization page. The system applies the payer authorization to all services during nightly processing.


