How do I move my patient to another office?
Providers can move patients across their agency’s offices using the Patient Office Move feature. This feature applies to Classic Linked (Non-UPR), UPR-Linked, and Internal Contract Patients.
But first,
-
HHAeXchange must enable the feature for the agency.
-
Once the feature is activated for the agency and available in the portal, Providers must assign role permissions for users who use the feature. Refer to the Patient Office Move Permissions section for details.

For a successful Patient office move from an existing (source) office to a new (destination) office, both offices must have the same Time Zone, Duty List Setup, and Payroll Setup. These items must be an exact match to be able to move the Patient from one office to another.
For Classic Linked (Non-UPR) and UPR-Linked contract patients:
-
The Payer must be associated with the destination office.
-
If the patient has visits or authorizations with the source office, then an exact active service code must also exist in the destination office (same exact Name, Discipline, and Rate Type).
For UPR-Linked contract patients only:
-
A “child” Patient Profile cannot be moved if the Patient Profile is merged. In this case, the “parent” (original) Patient Profile must be moved or added to the destination office. Once completed, both profiles are moved.
-
A split patient cannot be moved to an office where the other part of the split patient already exists.
For Internal contract patients, add or create the destination office and then move the Patient.

Complete the following steps to enter the Office Move request in the provider portal. Once saved, the move occurs automatically via the overnight system process.
-
Go to Patient > Search Patient and open the patient’s profile .
-
Select the General page and scroll to the Office Move section.
-
Select the Destination Office (value) from the dropdown field and click the Move button.
-
On the Confirmation window, click the Confirm button to confirm the office move.
-
If successful, the system issues a message letting you know that the move request has been registered successfully. The system completes the move via an overnight process. Check the status in the Office Move History section (to display Completed once done).If issues come up, and the move cannot be made, then the system displays a specific failure message. Refer to the System Validations section below for more information. No further action is needed.

-
Caregiver Secondary Office: If a patient has a visit with a caregiver who is not assigned to the destination office, then the system adds the destination office to the caregiver as a secondary office.
-
Billing and E-Billing Batch Split: Because billing batches are created in an office, the billing batch is split into a new batch with the destination office, when a patient is moved to a destination office. All the data related to the patient moves to the new batch and the existing batch summary is adjusted. The Batch Number and Batch ID are updated in all dependent tables.

Success Message
Your request to move office has been registered successfully and is processed overnight. Check the status of your request in the Office Move History section.
Failure Messages
-
An office change request is already in progress.
-
The source and destination office do not have same Time Zone, Duty List Setup, or Payroll Setup.
-
A merged child Patient Profile cannot be moved directly. Move the base merge patient.
-
A Split Patient cannot be moved to an office where other split patient already exists.
-
Current Patient office is the same as the requested Destination Office.
-
Destination office does not have the Rate Setup for the following Service Code(s): (Service Codes)
-
Visits are pending in Billing Batch process.
-
Destination office is not linked with Payer.
-
Patient has internal contracts that are not linked with the Destination Office.

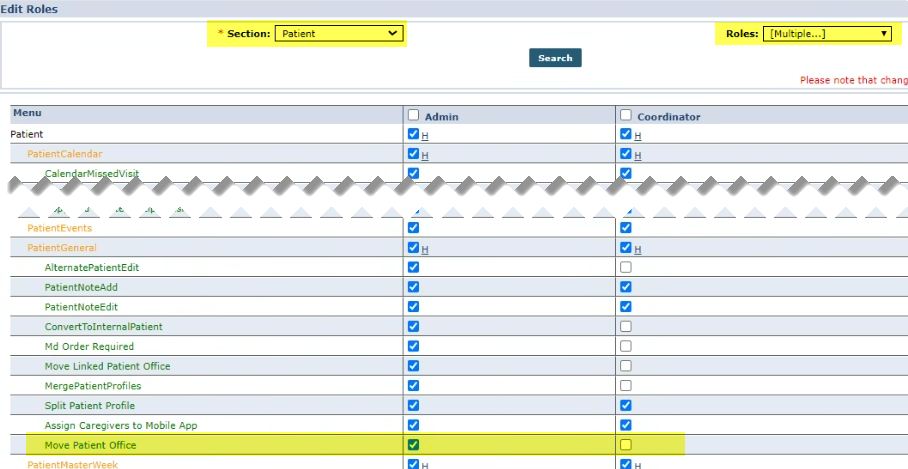
To assign Patient Office Move role permissions:
-
Go to Admin > User Management > Edit Roles.
-
In the Edit Roles page, select Patient from the Section dropdown field and applicable roles from the Roles dropdown field.
-
Click Search to generate permissions.
-
Select the Move Patient Office permission for each role (if multiple roles are applicable).
-
Click Save to complete.

