Billing Process for UPR Linked Contracts
This section covers each phase of the Billing Process for UPR Linked Contracts.

Providers can view up-to-date export statuses for related billing batches. On the Batch Details page under Billing > Invoice Search > By Batch, batches display the payment Status for exported claims to include Pending, Billed, Partially Billed, or N/A.
To view the status for a batch individually, click the Batch Number and view the Status on the top-right of the Batch Details page.

-
Go to Billing > New Invoice - (Internal) to generate a New Invoice Batch. Search for a specific visit using the filters or Click Search to generate all results.
To search all prior visits (eligible for invoicing), HHAeXchange recommends that the From Date field is left blank.
-
Review the results and select the visits to invoice.
-
Once the visits are selected, there are various options at the bottom of the page as described in the following table. Select an action button to proceed. To invoice, click the Invoice Batch button.
Option
Description
Cancel Cancel entire batch. Invoice Batch
Invoice all selected visits and generate a new Invoice Batch.
Save
Saves all the selected visits, but does not invoice them. From here, go to the next page of search results (if applicable) without losing the selection.
Save & Next
Saves all the selected visits and loads the next page of search results (if applicable).
Select All & Save
Saves all visits on the current page. From here, go to the next page of search results (if applicable) without losing the selection.
Unselect All
Unselect any selected/saved visits.
-
The system alerts that the Billing Batch is generating. Click OK to continue.

-
Go to Billing > Electronic Billing > E-Submission Batches to generate a New Batch Claim.
-
On the E-Submission Batches page, click the Add Original Claims button.
-
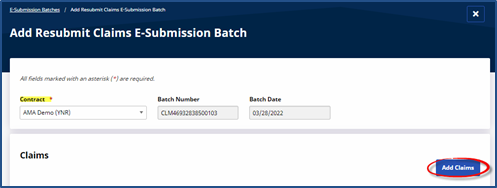
On the Add Original Claims E-Submission page, select the Contract. The Batch Number and Batch Date populate. Click the Add Claims button.
-
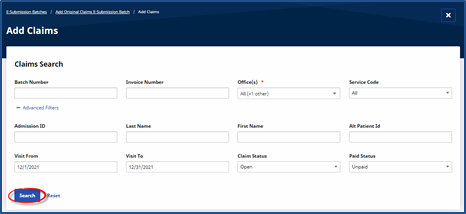
On the Add Claims, Claims Search page, use the search filter fields or click the Search button to find claims.
-
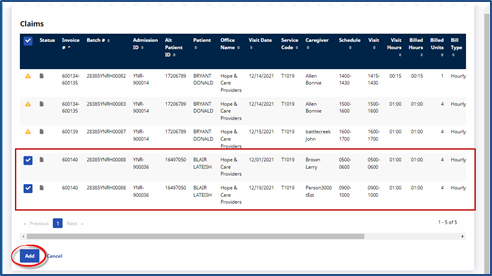
On the Search Results in the Claims section, select the claims to be added and click the Add button at the bottom of the page.
Visits with a yellow warning icon (with no active checkbox) are held in Billing Review with an On Hold Status and must be resolved prior to billing. Hover over the icon for a pop-up indicating the hold reasons.
-
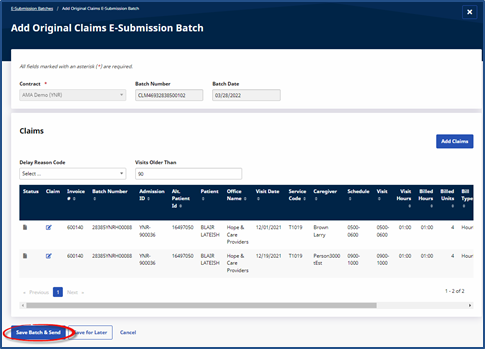
The claims appear on the Add Original Claims E-submission Batch page. Click the Save Batch & Send button to send the claims to the SFTP to be picked up by the Payer system via the overnight process.
Using the Save for Later button only creates the claims batch but does not send to the SFTP. Refer to Reviewing a Claims Batch for further instructions
-
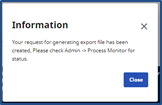
The system alerts that the export file is generating. Click Close to continue.
-
Go to Admin >Process Monitor to view the progress of the submission. Expand the All Sections category to view. The file can either be in Pending or Completed status.

Follow the steps below to review claims batches. If claims are saved but not sent, follow the instructions below to Send the claims batch.
-
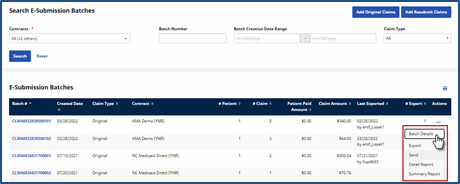
Go to the Batch Search window under Billing >Electronic Billing > E-Submission Batches to review the claims.
-
On the E-Submission Batches page, select a contract from the Contracts field and click the Search button to search for batches. On the Search Results, locate the batch and click the ellipsis (…) under the Actions column for a list of menu options to include Batch Details, Export, Send, Detail Report, and Summary Report.
If the batch has been submitted to the SFTP, then the Send option appears unavailable to select. If the Send option appears available, then the claim has not been sent.
-
Select the Send option to manually send a claims batch to the SFTP.


