Clinical Information
Linked Contract Patient Profiles contain the complete Clinical section. The Clinical section for Linked Contract Patient Profiles functions identically to the existing Clinical section for Internal Patient Profiles. The Clinical Info page is used to track various pieces of medical information for Linked Contract Patients, as follows:
|
Medical Information |
Description |
|---|---|
|
Advanced Directives |
Legal documents that allow Patients to indicate end-of-life decisions ahead of time (such as DNRs, Wills, and Power of Attorneys). |
|
Physicians |
Physician(s) in charge of the Patient’s case. A Patient’s Physician can be entered (added) directly into the system from this page, as needed. |
|
MD Orders |
Enter and track a Patient’s MD Orders. |
|
Diagnosis |
This section is used to record the Patient’s illnesses or conditions using the International Classification of Disease (ICD) codes. |
|
Surgical Procedure |
This section is used to record any surgical procedures the Patient has undergone. This section also utilizes ICD codes. |
|
Pharmacies |
Record the Patient’s pharmacies in this section of the Info page. |
The following section covers how to enter information for each of these categories.

Advanced Directives include documents such as DNRs, Wills, and Power of Attorney. Complete the following steps to enter a new Advanced Directive.
-
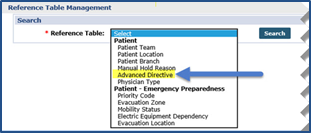
Go to Admin > Reference Table Management and select the Advanced Directive Reference Table.
-
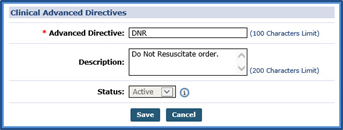
On the Search Results page, click the Add button to create an Advanced Directive document type such as DNR, Power of Attorney, Living Will, etc.
-
The Clinical Advanced Directives window opens. Complete the fields; those denoted with a red asterisk are required. Click Save to finalize.
-
Go to Patient > Patient Search and select a Patient. Select the Info link.
-
Go to the Advance Directive(s) section. Click the Add button.
-
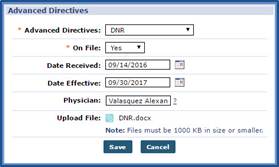
The Advanced Directives window opens. Complete the fields to enter a record of the directive.
-
Click the Paperclip
 icon to attach supporting documentation. Click Save to finalize.

The Diagnosis section of the Info page is used to capture a Patient’s documented illness or condition. Follow the steps outlined below to record.
-
Go to Patient > Patient Search and select a Patient. Select the Info link.
-
Go to the Diagnosis section. Click the Add button.
-
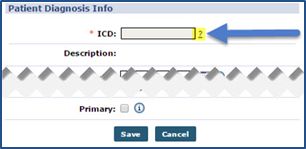
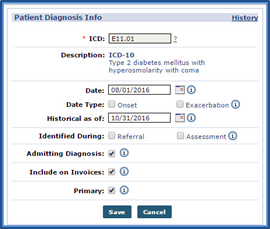
The Patient Diagnosis Info window opens. Click the ? to the right of the ICD field to search for the diagnosis code.
-
At the top of the Diagnosis Search page, specify whether to search for either ICD-9 or ICD-10 codes. In the Description field, enter the name of the disease or condition. The system returns codes that match the value in the Description field, even if it is not a complete word.
-
Click Search to continue.
-
In the search results, ICD-9 codes display in the left column and ICD-10 codes display in the right column. Click the ICD code link to select the code for the Patient.
-
To convert an ICD-9 code to an ICD-10 code, select the radio button to the left of the code and then click the ICD-10 button in the Crosswalk column. The corresponding ICD-10 code is then populated.
The same conversion may be done from ICD-10 to ICD-9.
-
Once the ICD code has been added, click the Save button to add the diagnosis. If applicable, enter values for the other fields on the Patient Diagnosis Info window.

Record a Patient’s MD Order information via the MD Orders section of the Info section for tracking purposes. Complete the following to an MD Order record.
-
Go to Patient > Patient Search and select a Patient. Select the Info link from the left nav.
-
Go to the MD Orders section. Click the Add button.
-
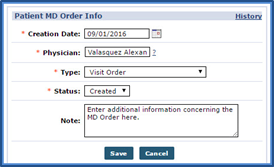
The Patient MD Order Info window opens.
Complete the following fields:
-
Creation Date: The date the order was issued.
-
Physician: The Physician who issued the order.
-
Type: The type of order issued.
-
Status: The status of the order.
-
-
Click Save to record the MD Order.

Enter a Patient’s Physician(s) in the Physicians section of the Info page. Complete the following steps to add a Physician to the system.
-
Go to Patient > Patient Search and select a Patient. Select the Info link from the left nav.
-
Go to the Physicians section. Click the Add button.
-
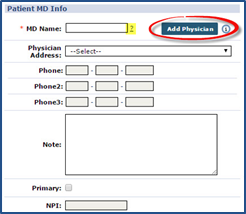
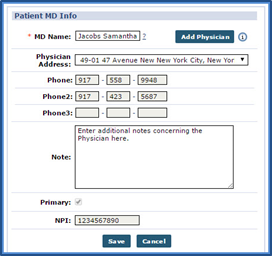
The Patient MD Info window opens. Click the ? link to the right of the MD Name field to search for and select a Physician record.
The Physician Address, Phone, Phone2, Phone3, and NPI fields populate automatically if they are entered in the Physician record. Click the Add Physician button if the Physician has not been entered in the system.
-
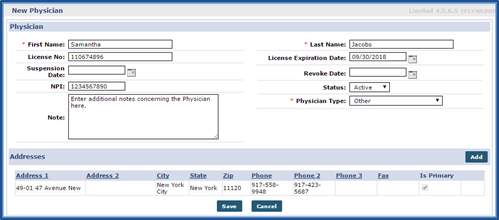
The New Physician window opens. Enter the Physician information. Required fields are denoted with a red asterisk: First Name, Last Name, and Physician Type fields. Click the Add button in the Addresses section to add the Physicians address.
-
Click Save to finalize. The new Physician record may now be applied to any Patient in the system.
-
The new record is automatically applied to the Patient MD Info window. Click Save to assign the Physician to the Patient.

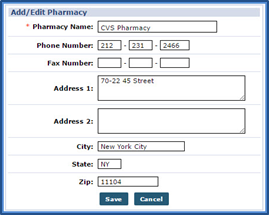
Use the Pharmacies section to capture a Patient’s specific or preferred Pharmacy(ies) where they pick up their medication from. Complete the following steps to add a Pharmacy.

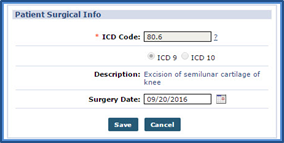
The Surgical Procedure section in the Info page is used to capture a Patient’s surgical procedure history. Complete the following steps to add a surgical procedure.
-
Go to Patient > Patient Search and select a Patient. Select the Info link.
-
Go to the Surgical Procedure section. Click the Add button.
-
Click the ? to the right of the ICD Code field to search for the surgical procedure code.
-
At the top of the Surgical Search page, specify whether to search for either ICD-9 or ICD-10 codes. In the Description field, enter the name of the surgical procedure. The system returns codes that match the value in the Description field, even if it is not a complete word.
-
Click Search to continue.
-
In the search results, ICD-9 codes display in the left column and ICD-10 codes display in the right column. Click the ICD code link to select the code for the Patient.
-
To convert an ICD-9 code to an ICD-10 code, select the radio button to the left of the code and then click the ICD-10 button in the Crosswalk column. The corresponding ICD-10 code is then populated.
The same conversion may be done from ICD-10 to ICD-9.
-
Once the ICD code has been added, click the Save button to add the surgical procedure. If applicable, enter values for the other fields on the Patient Surgical Info window.
