Enter Authorizations
Authorizations refer to a Contract’s rules concerning the type, duration, and frequency of the service the Agency provides on their behalf. If a Contract requires Authorizations, all scheduled visits must comply with the Authorization rules. If a visit does not comply with the Authorization, it is held in the Prebilling Exception page until it is edited to comply.

Complete the following steps to enter an Authorization.
-
Go to Patient > Patient Search > Patient Profile > Authorization/Orders.
-
Select the Authorization tab and click the Add button.
-
Complete the required fields. Specify the Contract*, Discipline*, Authorization Number*, and From/To Date*. Depending on the Contract, include the Service Code.
Users can Select only Contracts and Disciplines that have been assigned for the Patient. If Authorization Number, has not been provided, use TEMP as a placeholder.
-
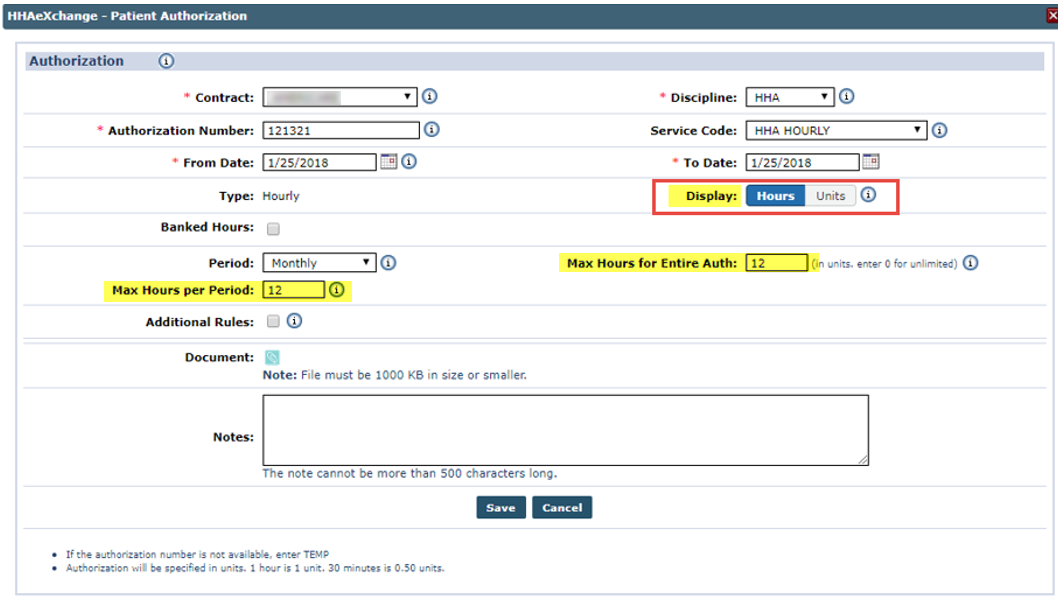
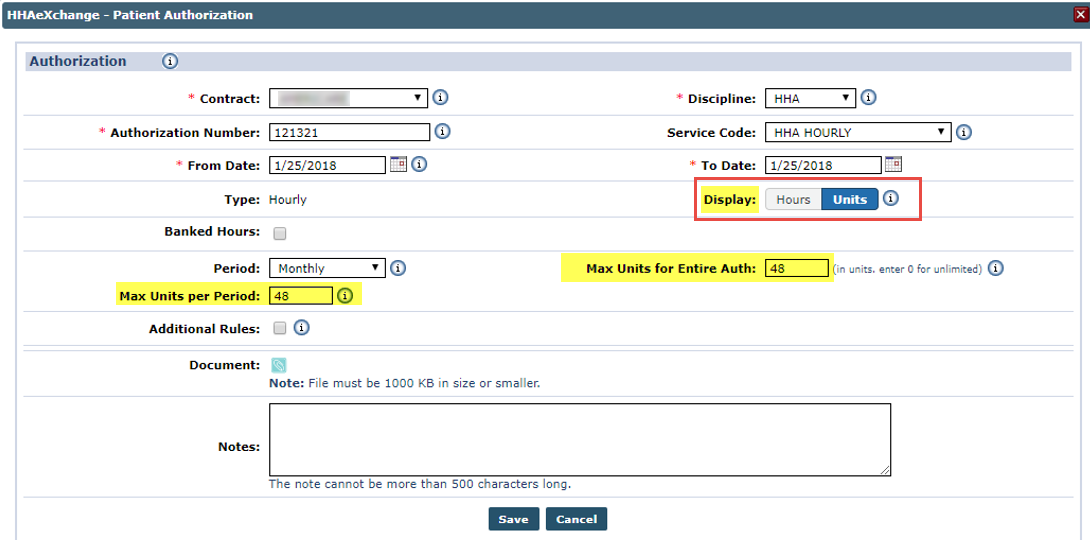
From the Display field, select how to view the Authorization in either Hours or Units (toggle between the two for automatic conversion).
Select the Authorization Period; refer to the table below for guidance.
Period
Description
Daily
Enter the specific allowed hours per day. If the visit is scheduled on a different day, or for more hours on these days is flagged.
Weekly
Enter the allowed hours per week. Visits scheduled after this weekly limit is reached are flagged.
Monthly
Enter the allowed hours per month. Visits scheduled after this monthly limit is reached are flagged.
Entire Period
Enter the allowed hours that are between the Authorization Start and End Dates. Visits scheduled after this limit is reached are flagged.
-
Specify the Max Units for Auth/Period, which cap the number of units Agencies can bill. The Max Hours for Entire Auth and Max Hours per Period fields also reflect the chosen display method. When Units is selected, these fields change (adjust) to Max Units for Entire Auth and Max Units Per Period.
-
Use the Document and Note fields to record any other relevant information pertaining to the Authorization.
-
If the Authorization is tied to a specific ICD Code, enter it using the Billing Diagnosis Code(s) field. If the Patient, or selected Contract, already has a set Billing Diagnosis Code, the system alerts that one exists. Click the Add button to add other Billing Diagnosis Codes.
-
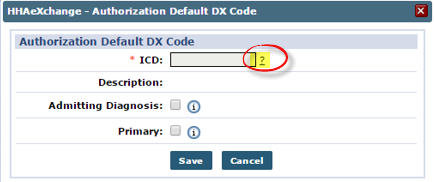
On the Authorization Default DX Code window, select the ? link to the right of the ICD field.
-
On the Diagnosis Search window, search and select ICD 10 Codes to apply to the Authorization. To add an ICD Code, select the appropriate link from the highlighted column.
-
Once an ICD Code is selected, the selection must be confirmed a second time before it is saved to the Authorization. Note that the new Code overwrites the existing Patient-level / Contract-level code.
Diagnosis Codes entered on Patient Authorizations receive the highest priority, meaning the system uses the Authorizations code for billing even if the Patient has one associated with their Profile (Patient Diagnosis Code Override) or the associated Contract has a Default Billing DX Code.
-
Click the Save button to finalize. Review the Authorization on the Authorizations/Orders page.
If additional Authorizations need to be entered, click Add to enter more Authorizations. Click the Edit link to adjust Authorization details, or the Delete
 icon to delete it.
On the Patient Calendar, scheduled visits which comply with the Authorization, display in Green. Those that do not, display in Pink. If the Contract does not require Authorizations, the visit display in White.

A Display field in the Authorization window allows users to toggle between Hours and Units. Users can view Authorizations in either hours or units without having to manually convert hours to units and vice versa, which may result in possible Authorization miscalculations.
This toggle only applies to the Authorization Page to assist with creating/loading initial Authorizations. This does not affect how Authorization information displays on other pages in the system. Authorization units display as hours in the rest of the system.
The Hours option is selected by default. The Max Hours for Entire Auth and Max Hours per Period fields also reflect the chosen display method. When Units is selected, these fields change (adjust) to Max Units for Entire Auth and Max Units Per Period.
For calculation purposes, the values in the Max Hours for Entire Auth and Max Hours Per Period are multiplied by 4 (4 units for each hour) when switching from Hours to Units. When switching from Units to Hours, these values are divided by 4.
The Display field works only when the values entered are in quarter-hour increments (such as 0.25, 0.5, 0.75, and 1) and can be equally divided by 4. Otherwise, the Display field becomes unavailable not allowing the conversion of Hours and Units functionality.
When a Service Code is not selected, or a visit Type is selected, the Display field is unavailable and automatically applies Authorization Units. This value is saved as entered into the database without dividing by 4.


