The Info Page
The Clinical Info page is used to track Patient medical information, comprised of seven sections described in the following table.
|
Section |
Description (Contains/Used to…) |
|---|---|
|
General |
Miscellaneous Medical information such as Patient allergies, health insurance number, and Physician comments. |
|
Advanced Directives |
House documents stating a Patient’s end-of-life decisions (such as DNRs and Living Wills). |
|
Physicians |
Indicates the Physician(s) in charge of the Patient’s case. If the Patient’s Physician has not yet been added in the system, users can enter a record directly from this page. |
|
MD Orders |
Enter and track a Patient’s MD Orders. |
|
Diagnosis |
Record the Patient’s conditions or illnesses using the International Classification of Disease (ICD) codes. |
|
Surgical Procedure |
Record the Patient’s surgical procedures. This section also uses ICD codes. |
|
Pharmacies |
Record the Patient’s pharmacies in this section of the Info page. |

The Advanced Directives section houses any instructions and documents provided by the Patient such as DNRs and Living Wills. The following table provides guidance on how to add or edit an Advanced Directive.
-
Go to Admin > Reference Table Management.
-
Select Clinical Advanced Directive from the Reference Table dropdown and click the Search button.

-
Click the Add button to create a new option or click the Advanced Directive link to edit an existing one.

-
Complete the fields in the Clinical Advanced Directives window. The Advanced Directive field is required. Click the Save button.

-
Go to Patient > Patient Search and select a Patient.
-
Select the Info link from the Index and go to the Advanced Directive(s) section.
-
Click the Add button to add an Advanced Directive.

-
The Advanced Directives window opens. Complete the required fields marked with an asterisk.

Field
Description
*Advanced Directive
(Required) Select the type of directive to add – DNR, Medical Proxy, Will, or any other added in the Reference Table.
On File
Is the directive on file? Select Yes or No.
Date Received
The date the directive was received.
Date Effective
The date the directive is effective.
Physician
The Patient’s Physician on record.
Upload File
(Icon) Attach applicable document(s).
-
Click the Save button to complete.
The Diagnosis section of the Info page serves to capture a Patient’s documented condition or illness. To apply this information, search for the ICD Code associated with the Patient’s condition. Any ICD Code entered on this page is considered a Clinical Code and the system automatically applies it to MD Orders.
The following steps provide instructions to add a diagnosis to a Patient’s profile.
-
Go to Patient > Patient Search and select a Patient.
-
Select the Info link from the Index and go to the Diagnosis section.
-
Click the Add button to add a diagnosis or the Edit link to update an existing diagnosis information for a Patient.

-
The Patient Diagnosis Info window opens. Click the ? to the right of the ICD field to search for the diagnosis code.

-
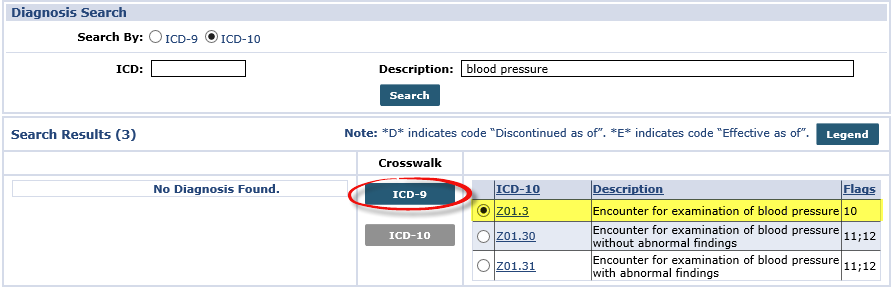
In the Diagnosis Search window, enter the Patient’s condition in the Description field and click the Search button.

The ICD-10 radio button is selected for this example. Select the ICD-9 radio button to search in the legacy database.
-
From the results, select the applicable condition. To cross-reference, click the ICD-9 button under the Crosswalk column for more options. Click the ICD-10 code link to proceed.
-
They system routes back to the Patient Diagnosis Info window. The selected ICD Code displays in the field with the description of the diagnosis. Complete the remaining fields.
 fields.")
-
Click the Save button to record the diagnosis.
-
Repeat Steps 3-8 to apply additional conditions, as needed.
Once created, listed diagnoses can be edited, deleted, or re-ranked in the Diagnosis section of the Clinical Info page.

The Diagnosis (ICD) Code functionality in the Clinical module to allows Providers to enter duplicate ICD records, providing that there is no overlapping in date range. This is applicable for Patients with chronic conditions who periodically require follow-up treatments or surgeries for the same condition (same Diagnosis). The same logic applies wherever an ICD Code may be entered.
The General section is used to capture miscellaneous medical information as described in the table below the image.

|
Field |
Description (Contains/Used to…) |
|---|---|
|
Comments |
Free text field to note Referral or any miscellaneous clinical information. |
|
Nursing Visit Due |
Indicate days corresponding to the Nursing Visit Due Reports (under Patient). |
|
MD Order Required |
Select checkbox if an MD Order is required for the Patient. |
|
MD Order Due |
If the MD Order required checkbox is selected, indicate (in number of days) when the MD Order Due Reports (Under Patient). |
|
Allergies |
Free text field to record any Patient allergies. |
|
Patient’s HI Claim No |
Text field to enter the Patient’s health insurance claim number; this number appears on the MD Order. |
Patient MD Order information, used for tracking purposes, is recorded in the MD Orders section of the Info section. Follow the instructions provided below to add an MD Order record.
-
Go to Patient > Patient Search and select a Patient.
-
Select the Info link from the Index and go to the MD Orders section.
-
Click the Add button to add an MD Order for a Patient.

-
The Patient MD Order Info window opens. Complete the required fields.

Field
Description
Creation Date
The date the Order was issued.
Physician
The Physician issuing the Order.
Type
Select the Order Type.
Status
Order Status: Created, Sent, Signed.
Note
(Optional) Enter notes as applicable.
-
Click the Save button to record the MD Order.
The Pharmacies section indicates the pharmacies where the Patient’s is registered to pick up their medication. Follow the steps below to add a Patient’s Pharmacy.
-
Go to Patient > Patient Search and select a Patient.
-
Select the Info link from the Index and go to the Pharmacies section.
-
Click the Add button to add a pharmacy for a Patient.

-
The Add/Edit Pharmacy window opens. The Pharmacy Name field is required. Complete other applicable fields. Click the Save button to apply to the Patient’s profile.

The Physicians section lists any Physician the Patient has on record in the system. Follow the instructions below to add a Physician to a Patient’s Info page.
-
Go to Patient > Patient Search and select a Patient.
-
Select the Info link from the Index and go to the Advanced Directive(s) section.
-
Click the Add button to add a Physician or the Edit link to update Physician information.

The system designates the first Physician entered as the Primary; adjust accordingly.
-
The Patient MD Info window opens. The MD Name field is required. To find a Physician in the system, click the ? link to the right of the field. If the Physician is not found, go to Step 5.
-
Once the Physician is selected, the information such as Address, Phone, Phone2, Phone3, Fax and NPI fields populates as entered in the Physician record. Click the Save button to apply to the Patient’s profile.

-
Physicians Profiles must be added to the system prior to adding to a Patient. If a Physician is not in the system, click the Add Physician button on the top-right and complete the New Physician window required fields are marked with an asterisk. Click the Add button to add the Physician’s Address and Phone numbers.
-
Click the Save button to save the Physician’s record and apply to the Patient’s profile.

Although not required, the NPI value is necessary for billing purposes. The Physician’s Fax Number is required to fax MD and Interim Orders.
A Primary ICD Code must be assigned as required in the system. Users are restricted from deleting an ICD Code assigned as the Primary Code. When attempting to delete a Primary ICD record, the system issues a validation alert stating that another ICD Code must be assigned as a Primary before deleting the selected Primary Code.

Furthermore, a Primary ICD Code cannot be assigned as a Historical record. In such a case, another record must be assigned as Primary before setting the current code as Historical.
The Surgical Procedures section of the Info page serves to document the Patient’s history of surgical procedures. Follow the instructions provided below to add surgical procedures to a Patient’s profile.
-
Go to Patient > Patient Search and select a Patient.
-
Select the Info link from the Index and go to the Surgical Procedures section.
-
Click the Add button to add a surgical procedure for a Patient.

The Add All button facilitates the entry of several procedures from one screen. See Step 8.
-
The Patient Surgical Info window opens. Click the ? to the right of the ICD field to search for the diagnosis code.

-
In the Surgical Search window, enter the Patient’s condition in the Description field, select the ICD code database to search, and click the Search button.

-
From the results, select the applicable condition. To cross-reference, click the ICD (9 or 10) button from the Crosswalk column for more options. Click the applicable ICD code link to proceed.

-
The system routes back to the Patient Surgical Info window. The selected ICD Code displays in the field with the description of the surgical procedure. Complete the remaining (optional) fields. Click the Save button to record.

-
To add multi surgical procedures, click the Add All button (Step 3). Follow Steps 4-6 to enter the various procedures with respective Surgery Date(s) for each. Click the Save button to record all entered surgeries.

Providers have the option to stop users from adding Flag 10 ICD Codes anywhere ICD Codes can be entered. To enable, go to Admin >Agency Profile and select the Validate Truncated ICD Code Selection checkbox.

Activating this validation does not remove existing Flag 10 diagnosis.
This validation is extended to Billing Dx Codes.
When the Validate Truncated ICD code Selection is selected, the validation for Flag 10-Truncated ICD DX Codes is applied anywhere an ICD Code can be entered. The following images illustrate an example and the validation generated.
|
|
|


Agencies can set a validation requirement for ICD Codes on the Agency Profile page using the Validate ICD Code Selections field. This validation reviews ICD Code flags, or requirements associated with each code, to ensure that it can be applied to the selected Patient based on specific information, such as age or gender.
The Diagnosis Search window contains an ICD Code Flags column. A Legend button is available to review the meaning of each flag at any time.

