Linked Visits
The Linked with Service Type involves servicing two Patients who have back-to-back visits. The Patients receiving service must be linked prior to the visit for service to be properly confirmed. For example:
-
Patient A is setup to receive Linked service.
-
Patient B is setup to receive Linked service.
-
Patients A and B are linked.
-
Visits on Patient A and B’s Calendar may be scheduled back-to-back and confirmed using a single EVV Clock-IN and Clock-OUT.
The setup and scheduling of Linked Visits, as well as the logic behind confirmation and Duty assignment is covered in this section.

Patient information needs to be properly configured to schedule Linked visits. This involves designating Patients as requiring Linked visits, linking two Patients together, defining a Primary Patient, and setting up Authorizations.

Complete the following steps to schedule Linked Visits.
-
Go to Patient > Patient Search and select the Primary Patient.
-
Select Calendar from the left navigation panel.
-
Select a date and add a New non-skilled visit. Complete all required fields. Ensure to select the correct Service Code. Click Save.
-
Upon saving the visit, a Warning
 icon in the visit cell appears. This warning indicates that the other Patient in the mutual case referred to as a Secondary Patient does not have a matching visit on their calendar.
Go to the Secondary Patient’s Calendar and create a new visit to match the scheduling details of the Primary Patient. Once saved, the Warning icon is removed from the Calendar.
-
The Caregiver is only required to Clock-IN and Clock-OUT once for both visits. The system applies the EVV to both visits if they are scheduled correctly. Duties are entered for both Patients when Clocking OUT. For example:
-
Caregiver Clocks IN at 1400 for the first visit.
-
The system applies two confirmations at 1600; one to close the first visit for the Primary Patient, and a second to begin the second visit for the Secondary Patient.
-
Caregiver Clocks OUT at 1800. The Caregiver enters the Primary Patient’s duties first, followed by 00 or 000 (depending on your Agencies IVR settings). The Caregiver then enters the Secondary Patient’s duties, followed by 00 or 000.
-
The system applies the EVV to the second visit.
-
The Duties are sorted to the appropriate Patient/visit.
-

Complete the following steps to designate a Patient requiring Linked Visits.
-
Go to Patient > Patient Search and select the applicable Patient.
-
Select General from the left navigation panel and click the Edit button.
-
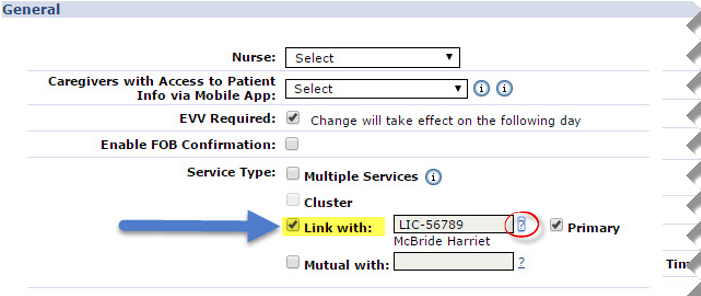
In the Service Type field select Link with. Two Patients must be linked to save changes when selecting this option. Click the ? link to the right of the field to search for the linked Patient.
The system only allows two Patients for Linked Visits if they have the same phone number on record.
-
Select the Primary checkbox to assign the Patient as the primary which allows the system to recognize which Patient’s Duties are being entered first when a Caregiver Clocks OUT.
-
Once a successful link is made between two Patients, a header message displays in both Patient Profiles.
Click the linked Patient’s Name to toggle between each of the Patients.


