Schedule Linked Contract Patients
This section provides high-level instructions on how to schedule visits using the Patient Calendar, and how to schedule using the Master Week function.

If no Caregivers are available at the time of scheduling, a TEMP Caregiver (Caregiver Code 1000, Assignment ID 010101) can be assigned as temporary placeholder.
To assign a TEMP Caregiver, enter 1000 for the Caregiver Code in the Schedule tab. The visit can now be saved without encountering any Authorization issues.
Adjust the visit once an actual Caregiver is assigned and scheduled. Note that visits staffed with a TEMP Caregiver are held in the Prebilling Review page.

If a Patient receives the same service on a regular basis, the Master Week function can be used to generate a permanent schedule. Once set, the system uses the information in the Master Week to update the Patient’s Calendar every night for 14 days into the future in a process called roll over.
Any changes to the Master Week are reflected in future visits when it rolls over again.
Follow the steps below to create a Master Week.
-
Go to Patient > Patient Search and select a Patient. Select the Master Week link.
-
On the Patient Master Week page, click the Add Master Week button.
-
The Add/Edit Masterweek page opens. In the From/To Date fields set the date range for the Master Week. Leave the To Date field blank if the schedule is indefinite. To stop the Master Week from rolling over past a certain date, enter a To Date.
-
Below the From/To Date fields, set the visit details for each Master Week day OR click the Hours link to setup a master schedule and apply it to the applicable days.
-
The Select Days window opens if the Hours link is selected. Complete the schedule using the available selections. Click the Save button to finalize.
-
At the bottom of the page, click the Save & Update Calendar button to roll over visits onto the Calendar based on the Master Week details.
-
The Patient’s Calendar is populated with the Master Week schedule.
-
To edit or delete a Master Week, click the Edit icon to edit Master Week details or click the Delete
 icon to delete the Master Week.

Non-clinical visits are classified as Non-Skilled; only Non-Skilled disciplines can be assigned to them. Complete the following steps to create a Non-Skilled Visit.
-
Go to Patient > Patient Search and select a Patient. Select the Calendar link.
-
Click the date number at the top-right of the Calendar cell which provides several options. Select New non-skilled visit from the menu to schedule a Visit for the selected date.
-
The Non-Skilled Schedule page opens. Enter values for the required fields * on the Schedule tab and click Save.

Once the visit is saved, the system automatically performs a series of validation and authorization checks to ensure it fulfills all the requirements set by the Payer. Authorized visits display in green, while visits which are not within the Authorization rules are displayed in pink on the Patient’s Calendar.
The system only reviews visits within a 14-day block, based on the current date. Visits outside of this range display in white.
Visits that are scheduled with a Service Code that is not covered by the Authorization or are set up to bypass Prebilling validations also display in white, even if they are within the 14-day block. Consult with the authorizing Payer to determine which Service Codes have been setup to skip Prebilling validations.
If a Patient has more than one Authorization with different Service Categories, then the Service Category is listed alongside the Service Code.

Clinical visits (involving medical services) are classified as Skilled. Only Skilled Disciplines, such as Nurses or Physical Therapists, can be assigned to them. Complete the following steps to create a Skilled Visit.
-
Go to Patient > Patient Search and select a Patient. Select the Calendar link.
-
Click the date number at the top-right of the Calendar cell which provides several options. Select New skilled visit from the menu to schedule a Visit for the selected date.
-
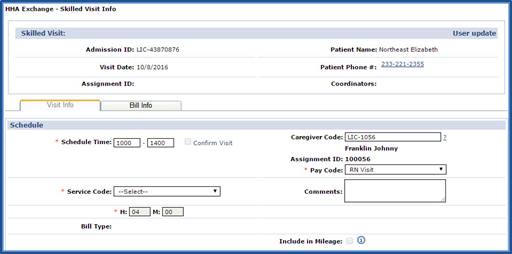
The Skilled Schedule page opens. Enter values for the required fields * on the Schedule tab and click Save.
Like the Non-Skilled visits in the previous section, once the visit is saved, the system automatically performs a series of validation and authorization checks to ensure that the scheduled visit does not breach any Provider rules or contractual obligations. The same validation rules apply where Authorized visits are denoted in green while those not meeting Authorization rules are displayed in pink.


