Michigan Individual Provider Services Portal

The Services Portal is a website for self-directed users used to capture and meet Electronic Visit Verification (EVV) requirements. Through the Services Portal, Consumers, Caregivers, and Representatives can review, adjust, and approve all EVV visits.
Both the HHAeXchange Mobile App (or Interactive Voice Response, IVR) and the Services Portal application are used in conjunction to create and manage shifts.
-
IVR: A designated toll-free phone line is available for Individual Providers using telephony (rather than Mobile App) to record EVV.
-
Mobile App: An email communication is sent to you with an Activation Code and instructions to download the mobile app from the App store. Once downloaded, begin the Sign Up process (create your login credentials) and verify your email address via the next system-issued email. Begin the Registration process by entering the Activation Code received in the initial email (used to link your mobile account to the State portal). Enter the demographic information to complete the process.
-
Services Portal: The Individual Provider’s Services Portal account is created in the State portal.

Congress passed the 21st Century Cures Act which requires state Medicaid programs to use EVV for many types of home and community-based services. Caregivers use EVV at the beginning and end of each visit. They use an app to electronically record required information for each shift (or visit) they work. The app records the start and end time of each shift, the location where the Caregiver is working, and the type of service they are providing. EVV helps to verify that Consumers are getting the care they need.

Consumers, Caregivers, and Representatives all use the Services Portal. The Provider begins the setup by creating a user account for each Services Portal user. A valid email address is required to create a user account.
Make sure the Provider has the correct email address when creating the user account.
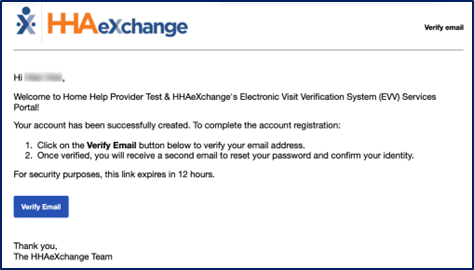
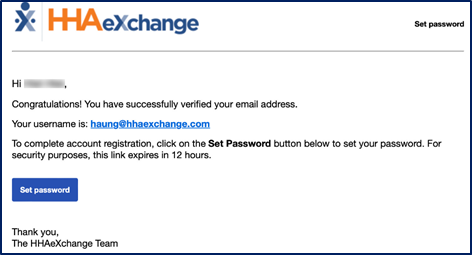
Once the Provider creates a user account, the user receives an email with instructions on how to confirm their email and set a password.
Individual Providers using the Mobile App can use the same credentials to log in to their Services Portal.

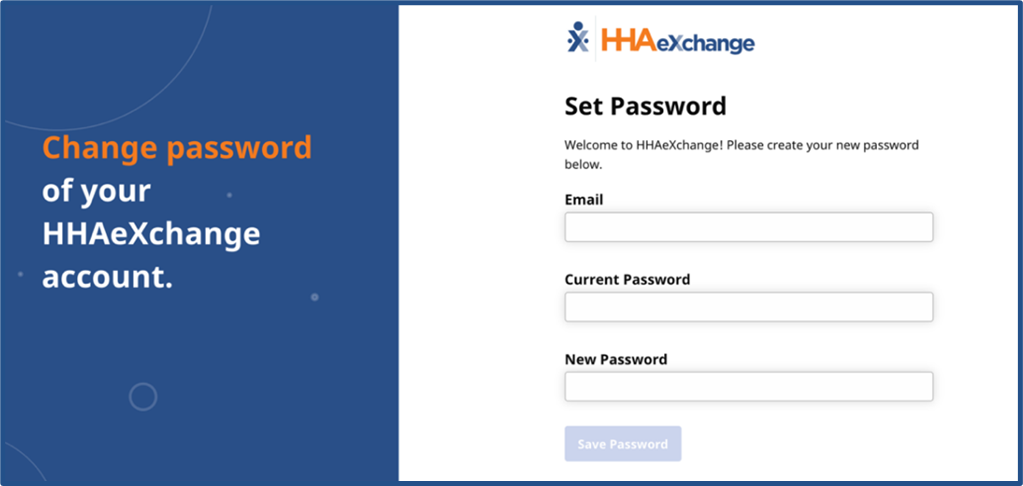
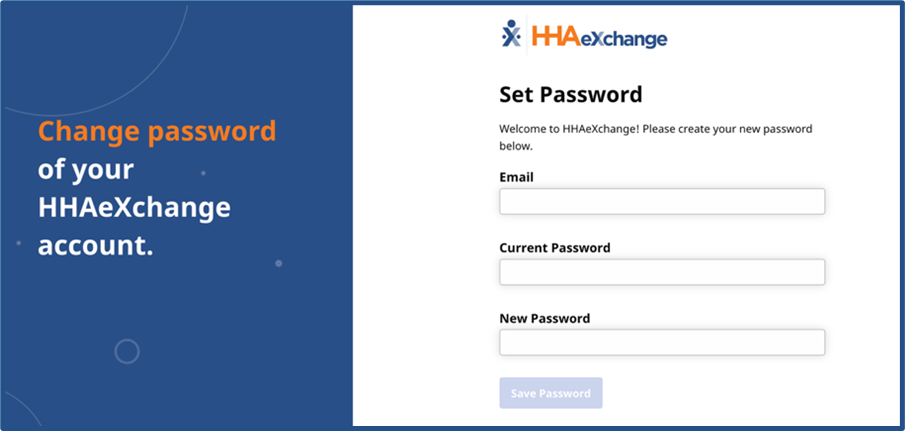
Click the link in the change password email to go to the Change Password screen. Log in using your Email address and the Temporary Password in that email. Then, create and enter a new password to use when logging in going forward.
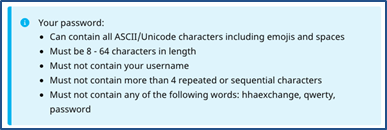
There are password requirements when creating your password. Below is a sample set of rules.

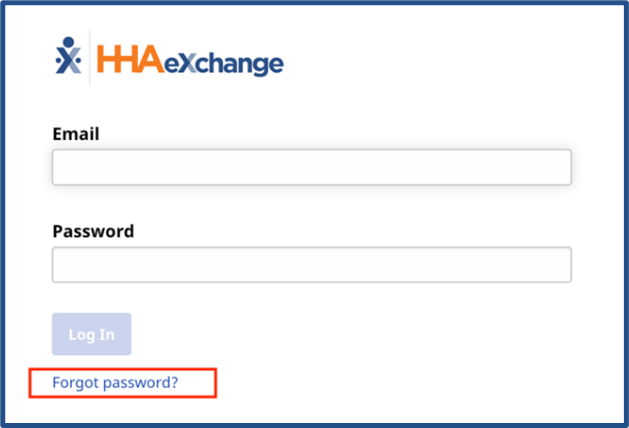
To reset your password, go to the Log In screen for Services Portal and then click the Forgot Password link below the Log In button.
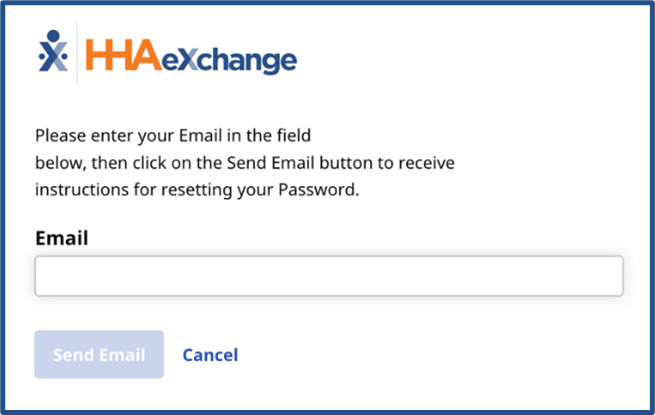
Enter your email address and click the Send Email button.
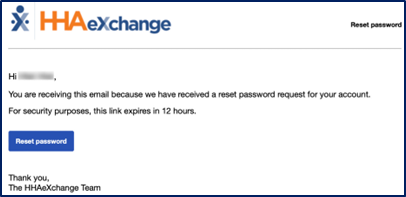
The system then sends you a reset password request email with instructions. The link expires 12 hours from the time of issue.
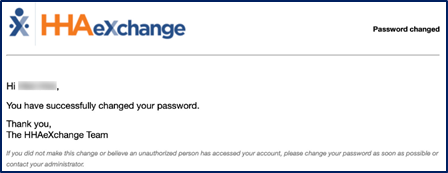
After the password is reset, the system sends a final confirmation email to state that you have changed your password.

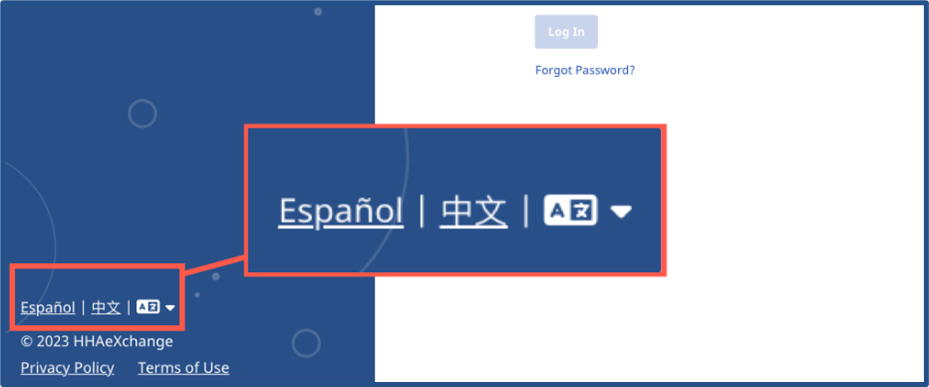
On the login screen (on the lower-left section), there is an option to change the login screen language. Available languages include Arabic, Chinese (Simplified), Chinese (Traditional), German, Haitian Creole, Italian, Portuguese, Spanish, and Tagalog.
For example, click on the Español link to change the login screen to Spanish or click the language icon (looks like a letter A in a box) to select an available language to translate the login screen to.

The Services Portal opens to the Timesheets page. The Timesheets page has four sections to include the
-
Navigation tab
-
System Menu
-
Announcement section
-
Hours Worked section.
|
Section |
Page Section |
Description |
|---|---|---|
|
1 |
Navigation Tabs |
The Navigation tabs include Timesheets and Shifts. These are the available pages to perform certain functions in. |
|
2 |
System Menu |
Use this menu to view or change system settings, change your password, or log out of the system. |
|
3 |
Announcement |
The Announcements banner appears with messages sent from the State. Users are able to see up to three announcements at once. |
|
4 |
Hours Worked |
This section displays the Beneficiaries and the hours worked for a selected time period. |

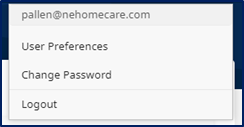
The System Menu is at the top-right corner of the screen. Click the Person icon  to view the menu options: User Preferences, Change Password, and Logout.

Click User Preferences to select your preferred Language, Time Zone, and set Notification Preferences for Email from the portal.
In the Select Language field, select an available language. English is selected by default. Available languages include Arabic, Chinese (Simplified), Chinese (Traditional), German, Haitian Creole, Italian, Portuguese, Spanish, and Tagalog.
Once a language is saved, the selected language is the language used in the Services Portal. This includes the menu dropdown options, menu and field labels, and button labels. In some cases, the language of certain words is not translated (this might include the names of service codes). In those cases, those words remain in English.
In the Time Zone field, select the time zone where you live and/or work.
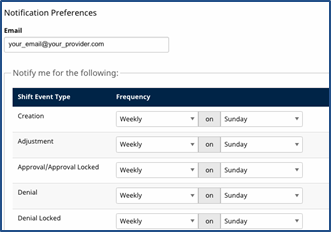
In the Notification Preferences section, select how often to receive emails (Frequency field) at the listed address (Email field) from the system. Depending on the preferences selected, the system issues e-mail alerts to the user for specific events and any action to take on shifts. For each event, select the Frequency (how often to be notified) and when (Weekly, Real-Time, Hourly, Daily, and Off).
-
Select Real-Time, to receive multiple emails in one day (as events happen).
-
Select Off for the system to not issue any notifications for that type of event. It is important to regularly check the Services Portal to act on your shifts.
To change any setting in User Preferences, make selections from the dropdowns and click the Save button at the bottom of the screen to save your preferences.

Click Log Out to log out of the system and go back to the Log in screen.

Announcements are messages sent by the State to Individual Providers. In the Services Portal, announcements are presented in a blue banner in the header section of the Home page, as seen below. Announcements are managed by the State and display on the portal according to the set date and time.
Up to three announcements can display at a time, each in its own banner. Users have the option to close each announcement by clicking the x at the top-right of the banner.

The Hours Worked section in the Timesheets page provides visibility into an Individual Provider’s schedules and total hours worked over specific time periods. Using this page, Individual Providers can manage their schedules efficiently for the Beneficiary they are associated with.
On a day-to-day basis, Individual Providers need to see how many hours they have worked in the last pay period, who have they provided services to (if multiple Beneficiaries) and the breakdown of hours per Beneficiary.
To start, select a date range from the Time Period field. As a result, the serviced Beneficiary and the Hours Worked for each display on the page for the selected period. From the results, click the Edit icon under the Actions column for a Beneficiary.
The Hours Worked for (Beneficiary) page opens to expand details and a breakdown of each shift for the chosen Beneficiary to include Date, Shift Time, Shift Duration, Billable Duration, Daily Total Time, Service Code, and Shift Status. The Total Hours Worked are summed up at the bottom of the page.
Click the Submit Hours option to move all the visits in the timesheet from a Performed status to an Approved Locked status.
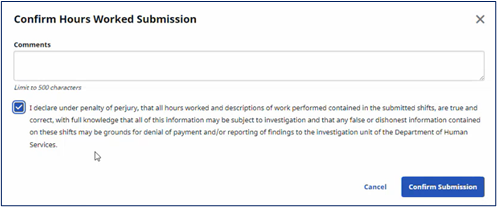
The Confirm Hours Worked Submission window opens. Enter any supporting notes in the Comments field and select the Confirmation checkbox. Click Confirm Submission.
Once submitted, the state can bill the visits. Statuses can no longer be changed once visits are billed.
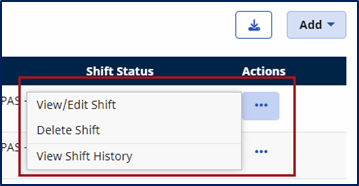
Under the Actions column, click on the Ellipsis… for a list of options, as follows:
-
View/Edit Shifts - To view or edit a shift.
-
Delete Shift – to remove a shift.
-
View Shift History - to view the shift history.
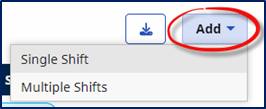
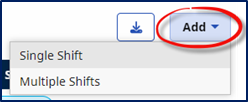
To add visits in general, click the Add button, at the top-right of the grid. Select Single Shift to add one, or Multiple Shifts to add several at a time.

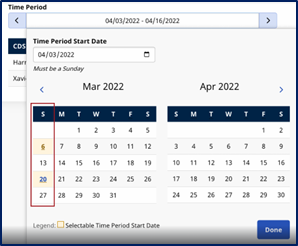
When selecting a date range in the Hours Worked section, calendar dropdowns appear to select dates (period). Beginning and end period dates are highlighted on the calendar for a visual reference.
Time periods are initially set as two weeks to view past and future schedules. A total of 13 time periods are available, including six in the past and six in the future (equivalent to 6.5 months of data).
The system automatically generates new time periods within a 3-month window, specifically tailored for bi-weekly scheduling once the previous period concludes.

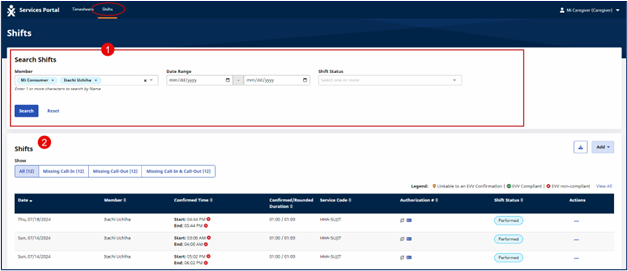
The Shifts page allows Individual Providers to search for all shifts. The Shifts page is comprised of two sections: Search Shifts and Shifts (search results).
|
Section |
Page Section |
Description |
|---|---|---|
|
1 |
Search Shifts |
Use the search filters to search for specific shifts or click the Search button to view all results. |
|
2 |
Shifts |
This area lists the search results, depending on selected search criteria. In addition, selection tabs are available to search for an exception call type under the Show field. In the results, each row line provides details about the shift. Click on the Ellipsis… under the Actions column to see available actions for the shift. |

In the Search Shifts section use the search filter fields to search for a specific shift, and/or to filter a list of shifts that you are connected to.
To search for a specific Beneficiary, enter the first few letters of the name in the Member (Beneficiary) field and select from the auto-filled options. The system defaults to pre-select all Beneficiaries who you work for. All other fields are available to search and sort.
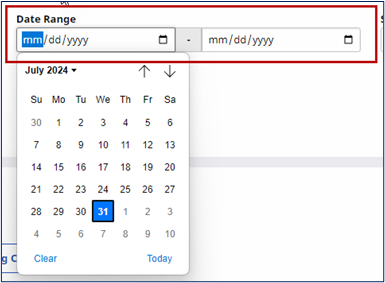
In the Date Range fields, click either to start (left) and/or end (right) fields to open a calendar view window to select a date and time range for your search. At the bottom of the calendar, click the Clear link to remove the currently selected date from the field. Click the Today link to set the selection to the current date and time.
Click Search at the bottom of the form to apply the filters or click Reset to clear any selected filters. Click the Search button to restore the full list.

All shifts are displayed in the Shifts page. By default, the shifts are sorted from newest to oldest. Each row contains shift information.
-
(Optional) Shifts can be sorted to show call types. The show All is selected by default and all shifts are displayed in the grid. Each tab displays the number of shifts per category.
-
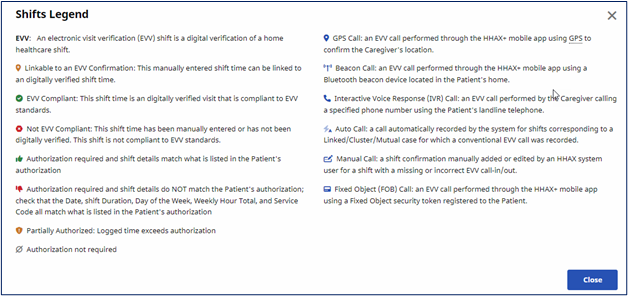
Shifts display according to search results. A Shifts legend helps identify call exceptions in the results under the Confirmed Time column. Refer to the Shift Legend section for a screen visual.
-
Add shifts (Single Shift or Multiple Shifts).
|
Column Name |
Description of Column |
|---|---|
|
Date |
The date of the shift. |
|
Beneficiary |
The name of the person receiving services. |
|
Confirmed Time |
The actual time of the shift as recorded with clock-in and clock-out. If the shift was recorded with EVV, then a green EVV checkmark appears near the confirmed time. Hover over the icon in this column to view EVV details. |
|
Confirmed Duration |
The total shift time (in hours and minutes) confirmed by the EVV clock-in and clock-out. |
|
Service Code |
The system name for the service performed during the shift. |
|
Authorization # |
The authorization number for the shift, if applicable. |
|
Shift Status |
The status of the shift: Performed, Approved Locked, Billed, Paid The Billed and Paid statuses are automatically applied when the state invoices and/or generates payroll for shifts in the state portal. |
|
Actions |
Click the Ellipsis… to view the available actions to take on that shift. |

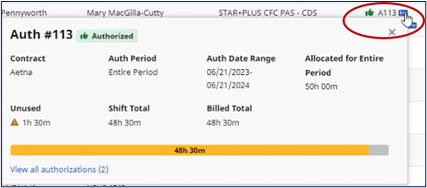
Authorization Details are available to view under the Authorization # column. Various icons display to show the authorization status per visit. Click the icon to show authorization details.
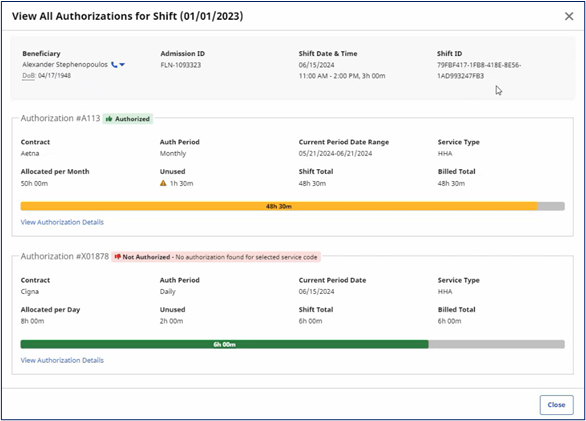
If multiple authorizations are applicable to a visit, click the View all Authorizations link at the bottom of the window. The View All Authorization for Shift (date) opens, displaying authorization details for the visit.

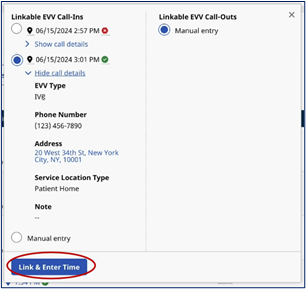
The Call Link feature allows Individual Providers to link EVV calls captured in the system, but not completely processed. In the search results of the Shifts page, click any of the subset tabs under the Show field to link visits with a Missing Call-In, Missing Call-Out, or Missing Call-In & Call-Out.
On the search results, visits with a link icon can be linked. Click on the link icon to proceed.
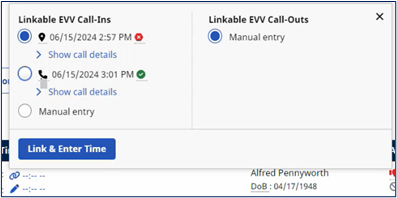
For this visit, there are two instances of EVV Call Ins. The first instance shows that EVV was not captured successfully, as denoted by the red x icon. The second instance is a phone entry showing success, denoted by the green check icon.
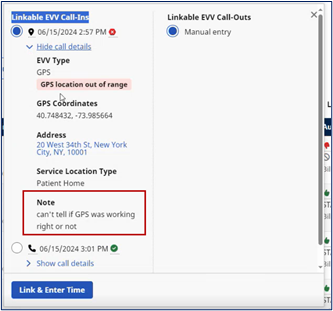
Click the Show Call Details link to open the details for the first instance to see the details for the EVV.
In this example, the GPS location is out of range with an added note stating a possible error.
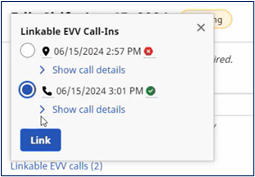
Select the second instance to review the details.
Click the Show call details link to review. To link this call, click the Link & Enter Time button to proceed.
A manual confirmation may be entered if there is only one call that can be linked to the visit, as seen in the Linkable EVV Call-Outs on the right side of the image above. This applies to either a Call-In or Call-Out.
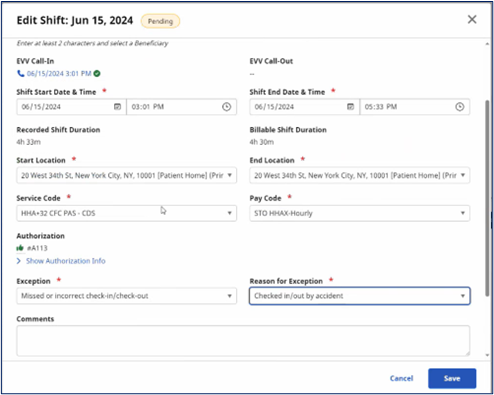
In the Edit Shift window, complete the required fields, to include the Exception (why an adjustment is made) and Reason for Exception (what led to the exception) fields. Add Comments if needed and click the attestation checkbox (not shown). Click Save to link the call.

-
Locate the shift from the search results and click the Ellipsis… under the Actions column and select View/Edit Shift.
-
The Edit Shift window opens. Edit the applicable fields, as needed. Fields with a red asterisk require completion.
-
The Exception (why an adjustment is made) and Reason for Exception (what led to the exception) fields are required to edit the shift. These fields are dynamic. In essence, the Reason for Exception depends on the selected Exception.
-
Add notes in the Comments text field to support the update. Some exceptions require a note.
-
Select the attestation statement.
-
Click Save.

-
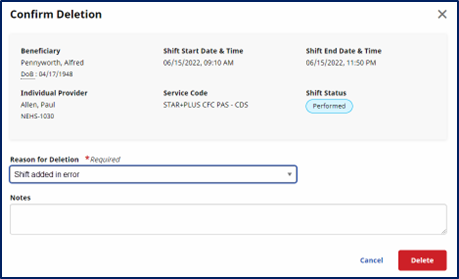
Locate the shift from the search results and click the Ellipsis… under the Actions column and select Delete Shift.
-
The Confirm Deletion window opens. From the Reason for Deletion field, select the reason to delete the shift.
-
Enter supporting message in the Notes field, if needed.
-
Click Delete to remove shift.

-
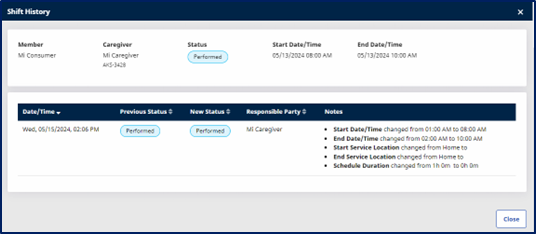
Locate the shift from the search results and click the Ellipsis… under the Actions column and select View Shift History.
-
The Shift History window opens displaying shift information including shift details, status changes, and notes.
-
Click Close to exit the window and return to the shift results.
|
Field |
Description |
|---|---|
|
Beneficiary |
The name of the Beneficiary who received services. |
|
Individual Provider |
The name of the Individual Provider who provided services. |
|
Status |
The status of the shift. |
|
Date |
The date of the shift. |
|
Start/End Time |
The start and end time of the shift. |
|
Date/Time |
The date and time that the action happened on the shift. |
|
Previous Status |
The status of the shift before the action happened. |
|
Notes |
Information about the shift, including changes, reasons for change, and notes left by the person who made the changes, or performed the action. |

Shifts can be added in the Services Portal in either the Hours Worked section of the Home page or in the Shifts page. To add shifts in the Services Portal, click the Add button, at the top-right of the grid. Select Single Shift to add one, or Multiple Shifts to add several at a time.
Shifts can also be added via the Mobile App, using the Unscheduled Visits tab.

Complete the following steps to add a single shift for a Beneficiary.
-
On the Hours Worked for..(Beneficiary) page, click the Add button.
-
Select Single Shift from the menu.
-
The Add Shift window opens. Complete the required fields (marked with red asterisk), as follows:
-
Shift Start Date and Time
-
Shift End Date and Time
-
Pay Code (select the available value)
-
Payer (select the available value)
-
Service Code (select the available value)
-
New Reason – Select the reason for adding the shift
-
Reason for Exception – Select why this shift was added
-
-
Select the attestation statement checkbox (if required).
-
Click Save.
The shift appears in the Hours Worked for… with a Performed Shift Status. From here, perform needed actions (such as view/edit, delete, or view history).

Complete the following steps to create multiple shifts at once.
-
On the Hours Worked for...(Beneficiary) page, click the Add button.
-
Select Multiple Shifts from the menu.
-
The Add Multiple Shifts window opens. To begin adding shifts, click either on the Add Shift button at the top-right of the Shifts section or click the +Add Shift link under the table.
-
The Shift #1 window opens. Complete the required fields (marked with red asterisk), as follows:
-
Shift Start Date and Time
-
Shift End Date and Time
-
Service Code
-
Pay Code
-
Payer
-
-
Click Add Another to add another shift.
-
The Shift #2 window opens. Repeat step 4, subsequently to add more shifts. Click Add & Close to finish adding shifts. More shifts can also be added by following Step 3.
-
When all shifts are added for the Beneficiary, add Comments as needed.
-
Select the attestation statement checkbox (if required).
-
Click Save.
