What types of visits can I create in the system?
There are two visit classifications to include Skilled and Non-Skilled.
-
Skilled Visits (clinical) involve care by a licensed medical professional (such as a nurse or physical therapist).
-
Non-Skilled Visits involve assistance with daily routines, grooming, and general support.

There are three ways to create a new visit (Skilled or Non-Skilled), as follows:
-
Manually enter the new visit on the Patient’s or Caregiver’s Calendar page
-
Use the Copy and Create function on the Patient’s or Caregiver’s Calendar page.
-
Create a Master Week.
Once a visit is saved, the system automatically performs a series of validations and authorization checks to ensure that the scheduled visit does not breach any agency rules or contractual obligations.
Because each Patient has unique services or scheduling requirements, HHAeXchange recommends that scheduling is performed from the Patient’s Calendar page. In addition, keep in mind the authorization limits that the system tracks, displayed and highlighted on the Patient calendar as authorized or unauthorized visits.

Non-clinical visits in the system are classified as Non-Skilled, meaning only non-skilled disciplines can be assigned to them. Complete the following steps to create a non-skilled visit.
-
Go to the desired patient and click the Calendar page from the left navigation.
-
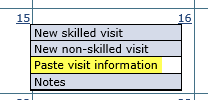
Click the date number link at the top-right corner of the calendar cell and select New non-skilled visit from the menu.
-
The Non-Skilled Schedule window opens on the visit Schedule tab. Complete the required fields (marked with a red asterisk) to include Schedule Time, Pay Code, Primary bill to, Service Code, and Duration.
If a Caregiver is marked Absent, has a Restriction for the selected Contract, or is scheduled for an In-Service on the date of the visit, the system issues a warning either requesting confirmation or stating that the selected caregiver cannot be scheduled. -
Click Save to create the visit.
Once saved, the system automatically performs a series of validation and authorization checks to ensure that any agency rules or contractual obligations are not breached. If a validation error is detected, then the system warns or restricts one from saving the visit.
If a visit is scheduled with a Service Code that does not match one of the patient's authorizations, then that visit is unauthorized and displays in pink in the patient calendar. Unless the Service Code is set up to bypass prebilling, in which case, it displays in white.

Skilled visits or, clinical visits are those involving medical services and only skilled disciplines (such as nurses or physical therapists) can be assigned to them. Complete the following steps to create a skilled visit.
-
Go to the desired patient and click the Calendar page from the left navigation.
-
Click the date number link at the top-right corner of the calendar cell and select New skilled visit from the menu.
-
The Skilled Schedule window opens on the visit Schedule tab. Complete the required fields (marked with a red asterisk) to include Schedule Time, Primary bill to, Service Code, and Duration.
-
Click Save to create the visit.
Once saved, the system automatically performs a series of validation and authorization checks to ensure that any agency rules or contractual obligations are not breached. If a validation error is detected, then the system warns or restricts one from saving the visit.

The Copy and Create tool is used to apply new visits to the patient calendar in either of the following ways:
-
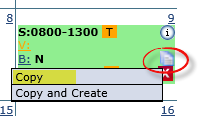
Select Copy to duplicate visit information to a ‘clipboard’. Once copied, apply the visit information to other dates.
-
Select Copy and Create to copy the visit information and open a new window to apply the information to other dates. Edits can also be made to the visit information.

Complete the following steps to copy a visit using the Copy and Paste tool.
-
From the patient’s Calendar page, click the Copy and Create icon on the right side of the calendar date cell.

-
Select Copy from the menu. The system alerts that the visit details have been copied to the clipboard.
-
Once copied, click the date number link in the desired calendar date cell and select Paste visit information from the menu.

-
Once selected, the visit details from the first shift are copied to the selected date. The visit details may be applied to multiple dates, as desired.
Even if a copied visit is authorized, pasting the visit information on a day that is not covered by the authorization results in an unauthorized visit (displays in pink).

Yes, the Copy and Paste tool is used to copy a visit and create multiple visits. Complete the following steps to copy a visit and create multiple visits.
Follow the steps below on how to copy and create multiple visits.
-
From the patient’s Calendar page, click the Copy and Create icon on the right side of the calendar date cell.

-
Select Copy and Create from the menu. The system alerts that the visit details have been copied to the clipboard.
-
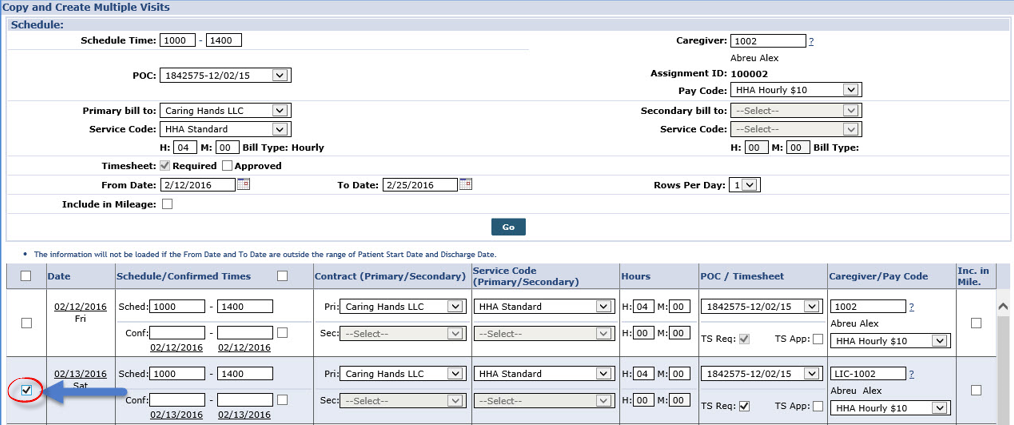
The Copy and Create Multiple Visits page opens. Select the checkboxes in the right column to copy the visit information to multiple days. Visit information may also be edited for each day it is applied to.

-
Once the visit information is applied to the selected days, scroll down and click the Save button. Refresh the webpage to see the updated calendar.

