Call Dashboard
The Call Dashboard is used to capture and track EVV failures and rejections.
There are only two outcomes for calls sent to the Call Dashboard:
-
Link calls that were made but never applied to a visit.
-
Reject calls that cannot be matched to any visits.
This section covers the Call Dashboard, linking calls, and rejecting calls pages.
This topic provides the general steps to review exceptions, link calls, and reject calls. Managing individual exceptions and polices is the responsibility of each individual Agency.

The Call Maintenance is a real-time hub for tracking and reviewing Caregiver time and attendance. In this hub, EVV that cannot be matched to a Visit is reviewed and held. All EVV held on this page is assigned a Status, such as Call from Caregiver Number or Phone Number Not Found, which corresponds to the reason the EVV was held. Complete the following steps to review EVV held on the Call Maintenance page.
-
Go to Visit > Call Dashboard to access the Call Maintenance page.
-
Click Search to access the following: all held EVV on the Call Maintenance page, leaving search filters blank; or specific EVV based on search criteria using the available filters such as Status, Coordinator, or From/To Date.
-
Results are generated. Each line item is an EVV that could not be matched with a scheduled visit. Items in each row have three main components, as highlighted in the image and described in the table below.
Unlinked Calls
-
Columns highlighted in RED indicate the Caregiver placing the confirmation. Information is based on the Time and Attendance PIN of the Caregiver placing the EVV confirmation.
-
Columns highlighted in BLUE indicate Call details captured by the EVV including the Patient, Call Date and Time, Call Type (In or Out), and the Caller ID used.
-
Columns highlighted in ORANGE indicate the reason why the Caregiver’s EVV was not automatically linked to a scheduled visit.
-
-
Click the Caregiver Name link to view the Caregiver’s scheduled visits for the day. Visit details display in a popup.
-
Click the number in the Caller ID column to view the Patient’s scheduled visits for the day.

On the Call Maintenance page, EVV may be linked to a visit if enough information is available to determine the origin of the call and the associated visit. When linked, the EVV is removed from the Call Maintenance page. The following steps demonstrate an example of linking an EVV.
In the following example, Caregiver Alan Anderson places an EVV with a Caller ID of 999-999-9999 for a visit on 8/24. The Status of Phone Number Not Found indicates that no Patient has this number listed on their profile.
HHAeXchange recommends consulting an Agency’s supervisor for best practices policies before linking an Unsuccessful EVV.
-
Click the Caregiver Name column to access the Caregiver schedule details.
-
The pop-up window opens. Confirm that the Caregiver was scheduled for a visit on 8/24. As illustrated in the image, Caregiver Alan has a visit on 8/24. However, the Patient’s approved phone number is 987-654-3210.
The Link option is not available to link this call.
-
Upon determining that the Caller ID number is a legitimate second phone line for the Patient, click the Edit link (Phone2) under the Phone column to edit the phone number for the Patient. Click the Update link to save the change.
-
The Caller ID now matches a number on the Patient’s Profile. The status on the Call Maintenance page changes to Issue Fixed: Linkable Call, allowing the EVV to be linked.
Click Link to link the EVV with the visit. The exception is removed from the Call Maintenance page.

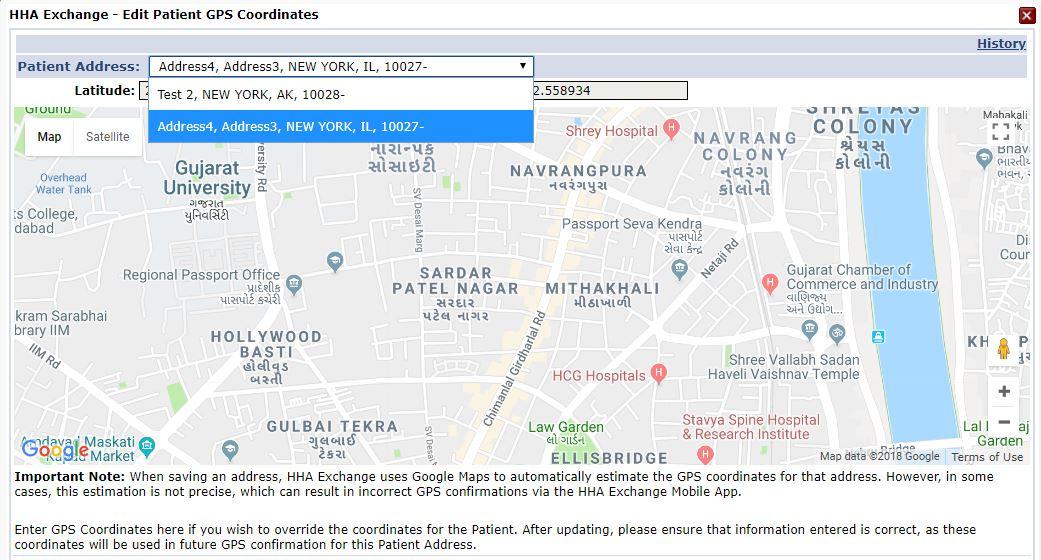
To see a Patient’s Address GPS coordinates in the Call Maintenance page, click the GPS icon to view the EVV location. The popup window shows the multiple locations. This applies to the various Call Maintenance pages, such as Rejected Calls.
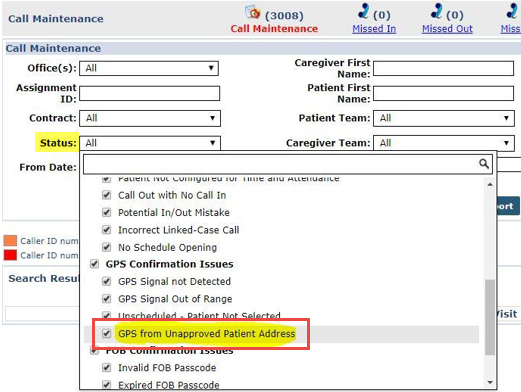
In support of the Multiple Address feature, select the GPS from Unapproved Patient Address exception on the Call Maintenance page to search for such visits.

The following example illustrates how the system validates a GPS confirmation for Patient’s with multiple GPS Allowed addresses on record: EVV confirmation is possible from multiple locations.
Address 1 – Set as Allow GPS
Address 2 – Set as Allow GPS
Address 3 – Set to NOT Allow GPS
-
GPS confirmation received within range of all three addresses; Result: Valid GPS confirmation
-
GPS confirmation received within range of Address 2 + 3; Result: Valid GPS confirmation
-
GPS confirmation received within range of only Address 3; Result: Call Maintenance exception for GPS from Unapproved Patient Address

At times, the coordinates attributed to an address by Google Maps do not properly reflect the actual coordinates of the Patient’s home. This may be common for Patients living in rural addresses or in large apartment complexes in a city.
To address this issue, users may recalculate the coordinates of a Patient’s address using the coordinates associated with GPS based EVV that is being held on Call Maintenance. This allows Agencies to correct the coordinates attributed to a Google address by replacing them with the more accurate EVV coordinates.
When the coordinates of a Patient’s address are changed, all future EVV placed via GPS uses the updated coordinates to complete the confirmation. Coordinate updates should only be done for GPS based EVV that routinely ends up on the Call Maintenance page with a Status of GPS Signal Out of Range for a specific Patient. Complete the following steps to update Google coordinates for a Patient’s address.
-
Click the GPS icon under the Status column of the held EVV.
-
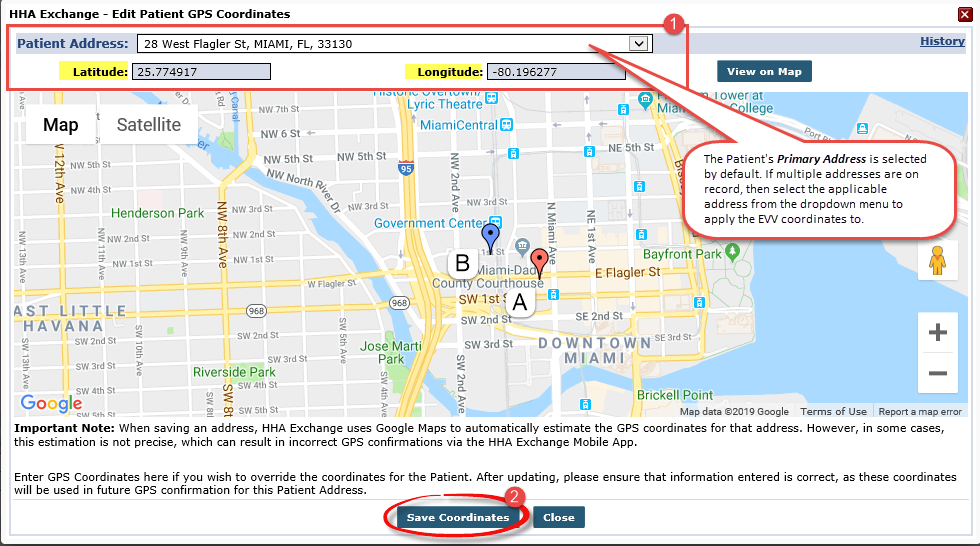
The Edit Member GPS Coordinates window opens, displaying the coordinates of the EVV using Google Maps. The map contains a red marker (A), which indicates the current Google Map coordinates associated with the Member’s address and a blue marker (B), which indicates the Caregiver’s coordinates at the time the EVV was placed. The Latitude and Longitude fields (above the map) indicate the coordinates of where the EVV was placed.
1) The Member’s Primary Address is selected by default. If multiple addresses are on record, then select the applicable address from the dropdown. 2) Select the Save Coordinates button at the bottom of the window to overwrite the Google coordinates with the EVV coordinates.
Google Coordinates (Red Marker) and EVV Coordinates (Blue Marker).
The Latitude and Longitude values in this window may not be edited; these represent EVV data received by HHAeXchange.
-
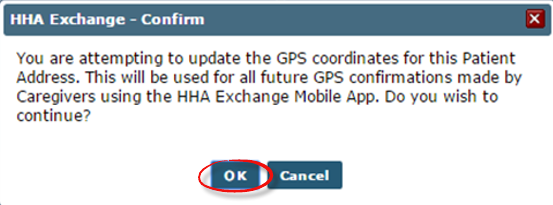
A confirmation message opens alerting the user that all future GPS-based EVV for the Patient is authenticated using the updated coordinates. Click the OK button to confirm and save.
-
On the Call Maintenance page, click the Search button to prompt the system to reevaluate the previously held EVV. With the updated coordinates reflecting the Patient’s address accurately, the EVV is processed and linked properly to the corresponding visit(s).

An EVV that cannot be linked can be rejected. A rejected EVV is moved from the Call Maintenance page to the Rejected Calls page. The following is an example of rejecting an Unsuccessful EVV.
Caregiver Peter Capelli has placed a confirmation. The Status of Caller ID Not Available indicates the Caller ID was blocked.
-
Click Peter’s name under the Caregiver Name column to confirm the visit on 8/24. This opens a menu containing additional schedule information.
In this example, the visit cannot be linked because the system could not verify the Caller ID. Therefore, there is no way to confirm if the EVV was made from the Patient’s home. Moreover, without a number to save, the Link option does not appear.
-
Click the Edit link to open the Visit details and select the Timesheet Required checkbox. To verify this visit, the Caregiver must submit a physical, signed timesheet to confirm the shift.Timesheet Required
Once the Caregiver hands in the Timesheet, approval must be manually entered in the system by selecting the Timesheet Approved checkbox on the Visit Window.
-
On the Call Maintenance page, click the Reject link under the Action column.
-
Click OK to confirm the rejection.
-
After confirming, the EVV is removed from the Call Maintenance page and placed on the Rejected Calls tab of the Call Dashboard.

Rejected Calls may be reversed if an EVV was mistakenly rejected. Reversing a rejected call sends it back to the Call Maintenance page, where the EVV can be linked to the appropriate visit. Complete the following steps to reverse a rejection in the system.
-
Go to the Reject Calls page and search for the applicable rejected call.
-
In the results, locate the call and click the Information bubble for details.
-
The Call Rejection Details popup opens containing details such as who rejected the EVV, date and time of rejection, and a Reverse Call Rejection link. Click the link to continue.
-
Click Yes to confirm the action.
-
The EVV is removed from the Rejected Calls page and routed back to Call Maintenance.
-
Link the EVV to the appropriate visit.
An EVV can be rejected and reversed multiple times. The record in the Call Rejection Details popup maintains a record of each rejection.


