EVV Configuration
Agencies must determine the functional parameters of EVV confirmation and properly manage information and settings on Patient and Caregiver Profiles. This ensures proper usability and success of EVV.

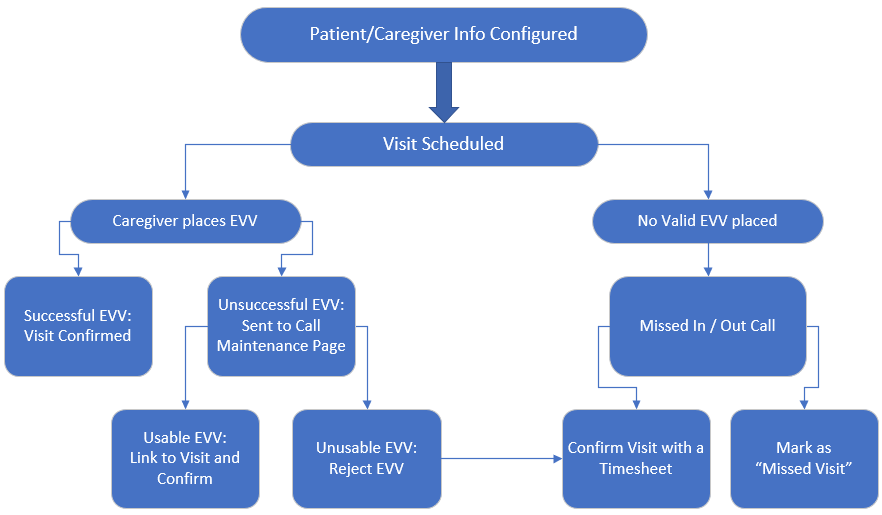
The flowchart below illustrates the process flow on how EVV works in the HHAeXchange system.
Some Agencies may have their own internal policies for EVVs and manual visit updates. Please ensure to check with your Agency’s Compliance Officer to confirm internal practices and procedures.
EVV confirmation may be made using Caller ID, GPS, or FOB codes. Each method must be activated and set up manually by the Agency on the Agency Profile and Office Setup pages.
Go to Admin > Agency Profile to setup EVV configuration at the Agency level. The system stores up to 3 unique phone numbers for every Patient. On the Accept Time and Attendance Call From field determine which of these phone numbers is to be used for Caller ID-based EVV.

Go to Admin > Office Setup to setup EVV configuration at the Office level as described in the table below.
|
Field |
Description (This allows…) |
|---|---|
|
Mobile GPS Visit Verification /Tolerance Range (ft) |
Caregivers to place EVVs using the Mobile App. The Tolerance Range (ft) refers to the acceptable distance range a Caregiver can make a valid EVV from. If the Tolerance Range is set to 100 feet, the Caregiver can successfully place an EVV via GPS within 100 feet of the Patient’s address based on the address’s coordinates.
|
|
Mobile Fixed Visit Verification |
Caregivers to enter FOB codes using the Mobile App.
|
|
Unbalanced Tolerance |
To set a window for Caregivers to place a linkable EVV. For example, if the Unbalanced Tolerance is set to 15 minutes, then the Caregiver has 15 minutes from the scheduled start time of the visit to place an EVV. If they attempt to place one outside of this window, the EVV will not link to the visit.
|


When a Caregiver Clocks In or Out, the system verifies the EVV based on information maintained on the Patient’s General and Profile pages. Follow the steps below to enter and maintain Patient confirmation information.
-
Go to Patient >General and select the Edit button.
-
The EVV settings are in the General section.

-
The EVV Required checkbox is automatically selected when a Referral converted to a Patient.
-
Select the Enable FOB Confirmation checkbox if the Patient uses an FOB device. Enter the required FOB Device ID and FOB Seal ID fields (if this option is selected). The Caregiver must enter the Device ID each time an EVV is entered.
-
The Caregiver with Access to Patient Info via Mobile App dropdown field contains the names of Caregivers who use the Mobile App and have been configured to view clinical information from it. Select one or more Caregivers to grant them access to the Patient’s clinical info.
-
Select the Patient’s Profile page and go to the Address section.
-
Complete the Patient’s demographic information. Multiple Addresses can be entered for a Patient as a GPS-enabled Address Type. Verify that all addresses are accurate, as the system uses these values to validate EVV confirmations.

-
For other forms of EVV, the Patient Phone Number(s) is used to confirm an EVV. Verify the Phone Number Information on the Patient Profile.

Caregivers must enter their Time & Attendance PIN (Assignment ID) to verify their identity whenever placing an EVV (using an approved phone). This allows the system to match up their call with the proper visit.
EVVs made on the Mobile App require a Mobile ID verification number, issued when a Caregiver creates a profile on the Mobile App. Caregivers must provide this Mobile ID to the Agency to link with the system. Once the Agency enters the ID on the Caregiver’s Profile page, the system recognizes EVVs placed from the Caregiver’s Mobile App.
 fields")
Once the Caregiver Mobile ID has been entered, the system requires a Mobile ID Type. Select Clinical to allow the Caregiver to review the Patient’s medical and clinical information if they have been granted access to this information. The Caregiver cannot view any medical or clinical if Non-Clinical is selected.