Track Location Where EVV is Performed
To accommodate Electronic Visit Verification (EVV) state mandates required by the Cures Act, the system has been updated to capture EVV at the location where services are performed. Providers can associate a Patient’s phone number or FOB device to a specific address on the Patient Profile to indicate where EVV is captured. In turn, the address is saved upon Visit confirmation.
Not valid for Billing Only addresses.

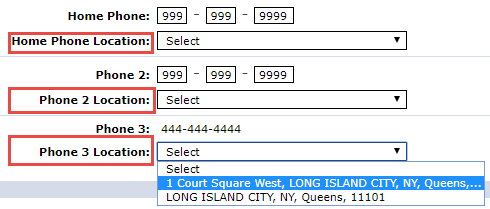
To associate a Patient address with a phone number, go to the applicable Patient Profile page under Patient > Profile and click the Edit button. On the Phone Number Information section, Phone Location fields have been added under each Phone field (Home Phone, Phone 2, and Phone 3). To connect the phone to an address, select the applicable address previously entered in the Address section from the Phone Location dropdown.
Note that a Patient Address can be associated to multiple phone numbers; however, each phone number can only be associated to one address. To clear out an address association, select the Select value from the dropdown and save.
Any Patient Phone Numbers left unselected default to the Primary address on record on the Patient Profile.
Once saved, the Phone Location fields are populated with associated addresses, viewed on the Patient Profile page.

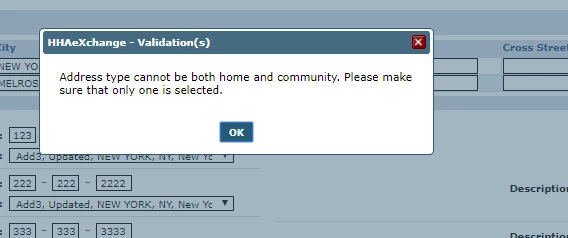
Home and Community options have been added to Address Types to allow further categorization of the Patient address. Although Address Types is a multi-select column, the options of Home and Community cannot be selected together. In essence, a Patient address cannot be both Home and Community.
If Address Type is unselected for any address entered, then the system defaults to the Home value capturing where the service was performed.
For Linked Contracts, Payer permission must be granted to the Provider to edit Address fields.

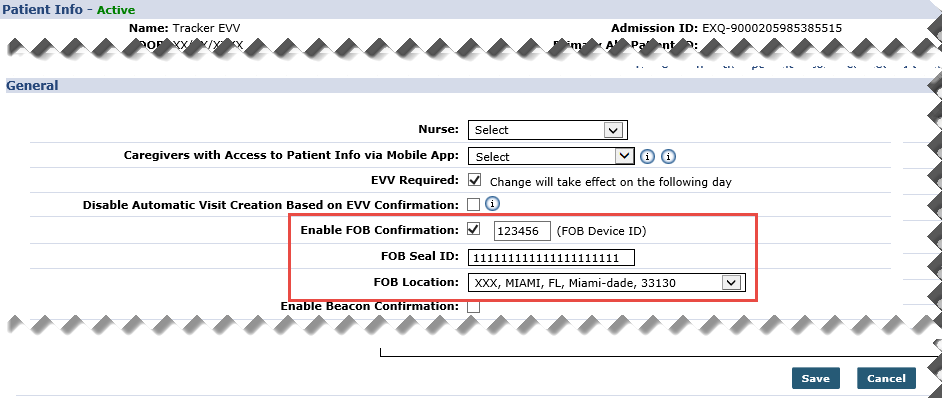
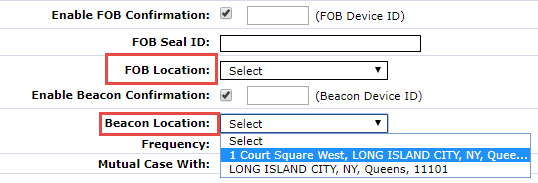
If a Patient has been set up with a FOB device, then the Patient Addresses can be associated to the FOB device in the Patient General page under Patient > General. An FOB Location field has been added to associate an address to the device. On the FOB Location dropdown, select the applicable address as entered in the Patient Profile page.
Only one address can be associated with the FOB device.
Once saved, the FOB Location field is populated with the associated address, viewed on the Patient General page.

When an address is updated or removed from the Patient Profile page, the system removes the association with the applicable FOB device.


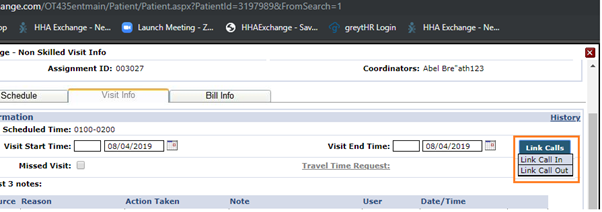
The system captures the associated Patient address when a Call In or Call Out is made for a Patient visit. If an error occurs during this process, then the call goes to the Call Dashboard to be resolved. Use the Link option under the Call Type column on the Call Maintenance screen to store the confirmed EVV and the associated Patient address . The system stores the address according to the EVV modality (Phone, FOB, GPS) used to Call In or Call Out.

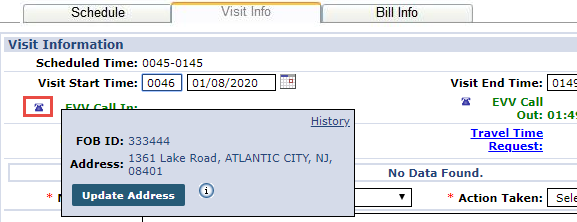
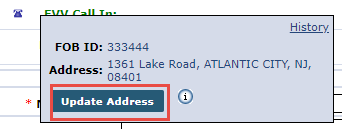
After a call is successfully linked, the address (if available) is stored and visible in the Visit Info tab of each visit along with the EVV ID used for the confirmation. Hover over the telephone icon in respective EVV Call In or EVV Call Out fields to view the stored address.
In rare occasions, a Patient visit may start in one location and end in another.
The absence of the Telephone icon may indicate that the visit is either manually confirmed or not yet confirmed.
At times, an EVV ID and Confirmation Time is present for a visit without an address. This indicates that there is no address associated with the EVV method used, Phone or FOB. In this case, an address can be associated and then the visit can be manually updated as described below.

Stored addresses may need to be manually updated if the address associated with an EVV method is incorrect and stored for a confirmed visit; or no address is associated to the EVV method used resulting in a missing address.
To manually update a stored Patient Address, go to the Patient Profile page under Patient > Profile and click the Edit button. On the Phone Number Information section, select the applicable Phone field and the correct stored address.
To associate the correct address to an EVV Method, go to the Patient General page under Patient > General. From the FOB Location field dropdown, select the correct stored address.
Once the proper address is associated, go to the applicable Visit Info tab and hover over the Telephone icon to access the confirmed address window. Click the Update Address button. HHAeXchange finds the address matching the EVV ID used for confirmation.
Stored addresses can also be removed using the Update Address button.
A Confirmation window opens to confirm the address association. Click OK to refresh and store the address for the visit. If the address is incorrect or missing for the Call IN, it is likely incorrect or missing for the Call OUT and vice-versa. Be sure to check both the EVV Call In address and EVV Call Out address for accuracy.


