Non-Homecare-Portal
HHAeXchange offers software solutions focused primarily on homecare services. The Non-Homecare Portal is designed to accommodate Providers who offer services that are outside the typical homecare sphere. The Non-Homecare Portal is used by Providers to receive case authorizations from the Payers where they either accept or decline them. Examples of services could be transportation, construction, and food services. Furthermore, the the Non-Homecare Portal facilitates communication between these Providers and the Payers.

Like the Member Placement functionality for homecare services, the Non-Homecare services are assigned by Payers to respective Providers who service Members. For example, if a ramp is needed at a Member’s home to facilitate mobility, a Payer provides a case authorization to complete the service order. The Provider, in turn, receives the Pending Case on the Non-Homecare Portal and either accepts or denies the Pending Cases (Authorizations). As services are completed, the Provider enters a Service with details of the work performed under each specific authorization to begin the payment process.

The HHAeXchange Non-Homecare Portal is a web-based application that requires an internet connection to access the system. Any disruptions to internet service ends a user’s session. No offline mode is available for this portal. In addition, if the system does not detect any activity for 15 minutes, the user is logged off for security purposes.
Complete the following steps to access the Non-Homecare Portal.
-
Go to the HHAeXchange home page and click on the Login link.
-
In the Client Login window, enter your Username and Passowrd and click the Log In button.
User Settings for the Non-Homecare Portal are located on the far-right corner of the screen. Click the gear icon to change a password, access help topics, and to log out of the system.

Complete the following steps to change your password.
-
Click the gear icon and select Change Password.

-
The Change Password screen opens. Enter the Current Password and a New Password in respective fields. Click the eye icon to view the newly entered password.
 Passwords require a minimum of 8 alphanumeric characters with at least one capital letter, one numeric value, and one special character.
 -
Re-enter the new password in the Confirm Password field.
-
Click the Save icon to save the new password.
When an Agency Admin creates a New User Account, a Create Password process is generated by the system once the new profile is saved. Complete the following steps to create a password.
-
The user receives a system email with link and instructions. Click the Create Password link in the email.
-
The link routes to the Create Password screen. Enter a new Password and re-enter the password in the Confirm Password field.
-
The Accept Terms and Conditions checkbox appears if the agency requires it. Select the checkbox to accept.
-
Click Save Password to continue.

At the bottom of the Login page, users can readily view the status (health) of the various HHAeXchange system functionalities via the System Status. This is particularly helpful for users to gauge when systems slowness is reported or detected or when system access is down.


The Non-Homecare Portal dashboard is comprised of various pages, displayed on the left navigation panel. Use this menu to navigate the portal and select the desired pages and functionality. Red numbered circles indicate pending or new unread information.
The Home page is comprised of three sections: Pending Cases, Unread Notes, and Recent Authorizations. Each of these sections is covered below in detail.

The Pending Cases section contains case authorizations issued by a Payer to the Provider for consideration and possible acceptance. Each one has an associated expiration time. To view a pending case, click the eye icon to the right of the pending case summary .

The Pending Case window opens to display the details of the case. Select the Service Location Code from the dropdown options if required. The Service Location Code corresponds to the office location in which the Member is serviced. This code modifies the information in the billing file when transmitting claims to the Payer.
New Pending Cases issued are presented within seconds on the portal without any additional interaction. If a Pending Case is not accepted by the cutoff time it is removed from the Pending Cases section. It is also removed from this view if canceled by the Payer.
Click Accept to accept the case or Decline to decline the case.

Accepted cases move from the Pending Cases section to Recent Authorizations section on the portal. Refer to the Authorizations section for further details.
If a case is declined, then select the decline reason on the pop-up window. The Payer then receives notification that the Pending Case has been declined. The case authorization is then moved back to the Payer for placement with another Provider.

Accepted cases move to the Recent Authorizations section on the portal. Only the five most recent placements are visible on the Home page. Click Authorizations on the left navigation panel to open the Authorizations page.

On the Authorization page, select the Payer and click the Search to access all corresponding case authorizations.

To view the authorization details for a case, click on the eye icon to the right of the line for an individual authorization.

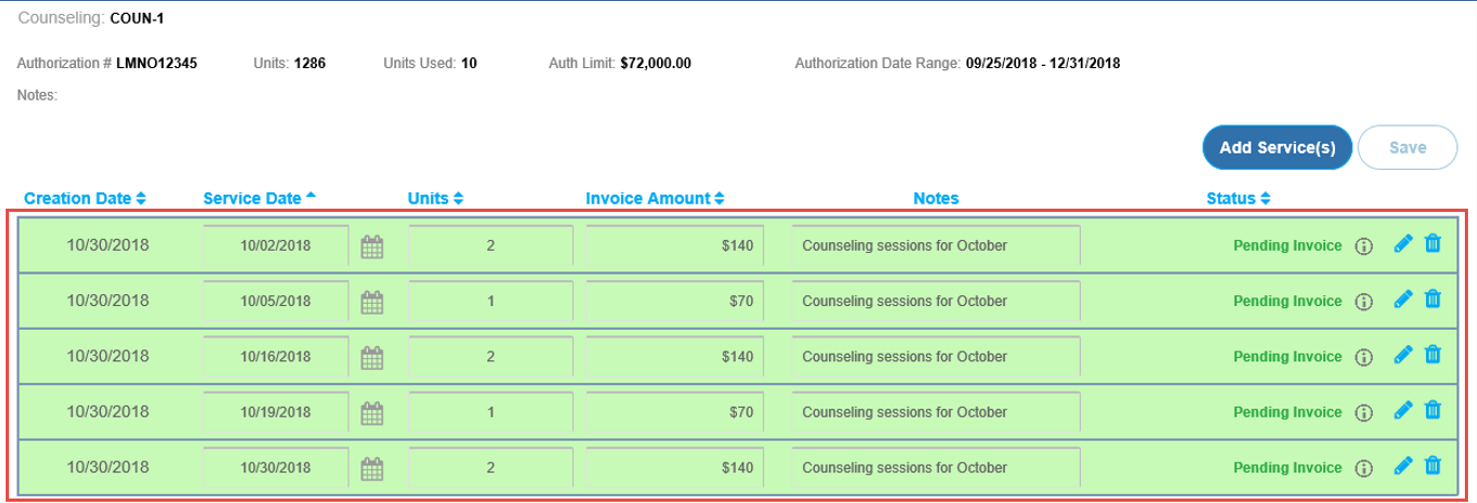
The Member details are displayed at the top of the Authorization page followed by the authorization details.
Authorization details include the Authorization Number, the number of Units, Units Used, Auth Limit (dollar limit for the entire case, if applicable), and the Authorization Date Range, described as follows:
-
Authorization #: Authorization number provided by the Payer.
-
Units: Number of authorized units
-
Auth Limit ($): Specifies the dollar amount limit for the aggregate of all services under the authorization.
-
Authorization Date Range: Indicates the date range for the service order.
As services are invoiced, this section recalculates to display a balance of values.
The Payer controls the number of Units and invoice limit total when issuing a case authorization. The billing rate for the Provider can also be defined.
Complete the following steps to add services to an authorization.
-
Click Add Service(s) to add a Service Invoice to the case.

Use the Notes tab to view specific notes associated with the case.
-
The Add Service(s) window opens. On the Calendar side (1), select the applicable date(s) to invoice. On the Service Information side (2), enter the number of applicable Units. The Invoice Amount auto-calculates accordingly. Enter a Note describing services (optional). Once complete, click the Save icon (3).

- All Authorization criteria must be achieved to successfully create a Service Invoice. For example, the date of service must be within the Authorization Date Range, the cumulative number of units cannot exceed the Total Units. The Authorization Limit must not be exceeded. The date cannot be beyond the current date.
- If the selected dates contain a combination of some inside fixed rate periods and some outside, then the Invoice Amount box is grayed out with a warning stating: The Invoice Amount cannot be displayed due to variable rates. In this case, the Invoice Amounts must be edited manually once the Service Invoices are added to the grid using the pencil icon.
-
Once saved, the Authorized services display in green. Except for Notes, all other columns are sortable. The Creation Date indicates the date when the invoice is created while the Service Date indicates the date when the service actually took place.

-
Click Add Service(s) to add more service invoices to the authorization. Repeat Steps 1-3.
-
Services exceeding the authorization limits are displayed in pink. In this case, 2000 Units have been invoiced, exceeding the 1286 Units available for the Entire Period, which is outside the authorization limits. Click the pencil icon to edit the invoice and refer to the Edit Services section. To delete the invoice, click the trash bin icon.

Complete the following steps to edit an invoice.
-
Locate the Patient and invoice.
-
On the selected visit(s), click the pencil icon on the invoice row. The row turns gray indicating that it is in edit mode. Adjust the row information as needed, ensuring it falls within the authorization limits). Notice red the Commit Changes note on the top-left of the grid, as a reminder that changes have not been saved. To save the changes, click the Save button.

If you attempt to navigate to another function in the portal without saving the change, a pop-up message alerts you that the changes have not been saved. Click Yes to close the alert and save the changes or No to discard.
-
Once saved, the changes display as updated.
The Message Center serves as a communication hub between the Provider and MCO on the Portal. Messages are organized in three categories: Unread, Sent, and Read. The selected box displays in orange.

Unread messages remain on the Home screen pending attention. Click on the Unread message to access.

The message populates in the Received Note window with details such as source (Sender) and if the message is Member-specific. Notes are read-only. No reply or forward function is available.
Once opened, this message moves to the Read box.

Sent messages remain in the Sent box as reference. To send a note from the Portal, click the New Note button at the far right.

On the New Note window, complete the available fields. Refer to the table below for brief descriptions. Click Send to send the message.
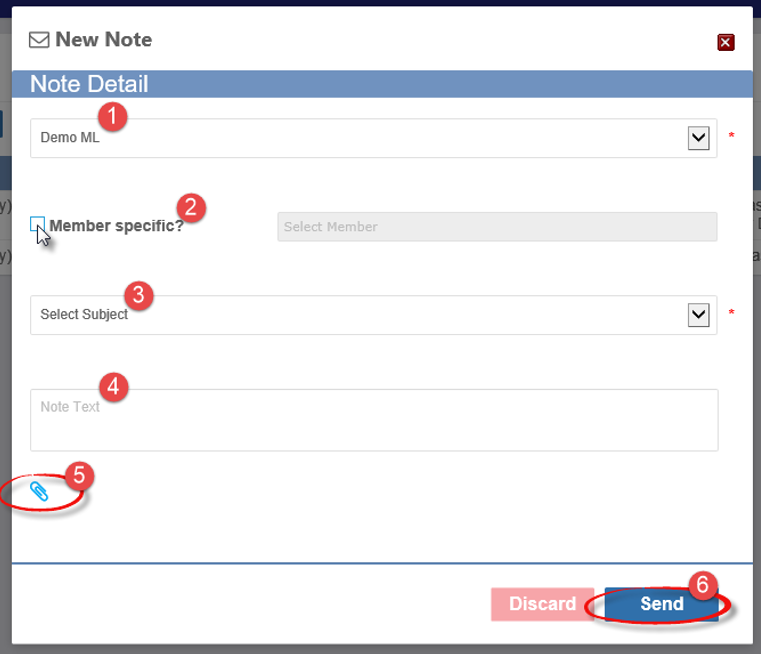
| Field | Description |
|---|---|
|
Recipient |
Select who to send the message to |
|
Member specific |
If Member-specific, select the checkbox and Select the Member from the dropdown menu. Member list appears only after checkbox is selected. |
|
Select Subject |
Select a Subject from the dropdown options |
|
Note Text |
Compose the note in the text box. |
|
Attachment |
Click the paperclip icon to attach supporting document to the note. |
Read messages move to the Read box.

The Member Search page provides search filters to locate a Member in the system, such as Last Name, First Name, Member ID, Payer, Phone Number, and Office.

Click Billing from the left menu panel to access the Billing page. The Billing page is used to track invoices. Select the MCO, or Payer, from the MCO dropdown field and click Search.

The Billing Page is comprised of three areas: Total Invoiced Processed Amount summary window, Search Filters, and the Main Panel.

On the top-right above the search filters, a Total Invoice Processed Amount is provided along with the Total Payment Amount which indicates the total amount billed compared to the total amount paid to the Provider.

Use the search filters to locate specific invoices or check the status of an invoiced Service. Available search filters include the Payer/MCO, Member’s Name, Member’s ID Number, Invoice Status, Invoice Date, or Service Date.

The main panel illustrates the line items which have been moved to the Billing page. Each line item contains the following:

| Column | Description | |
|---|---|---|
|
1 |
MCO/Payer |
Indicates the applicable Payer of payment |
|
2 |
Member Name |
The Member to which services were rendered |
|
3 |
Service Date |
The date of service |
|
4 |
Billing Code |
Specifies the applicable billing code |
|
5 |
Invoice Amount |
Specifies the amount invoiced |
|
6 |
Authorization # |
The Authorization number which applies to payment |
|
7 |
Invoice Status |
Indicates the status of the Invoice |
|
8 |
Invoice Number |
Specifies the Invoice Number for this payment |
|
9 |
Invoice Date |
The date when the Invoice was created |
|
10 |
Payment Status |
Indicates the status of payment in the system |
|
11 |
Payment Amount |
The actual amount paid to Provider. Click on the link to access details of the payment. |
While the Billing page illustrates payments that are in process, the Billing tab within the Authorization page provides Billing information specific to a Member. Use the search filters to locate billing information.
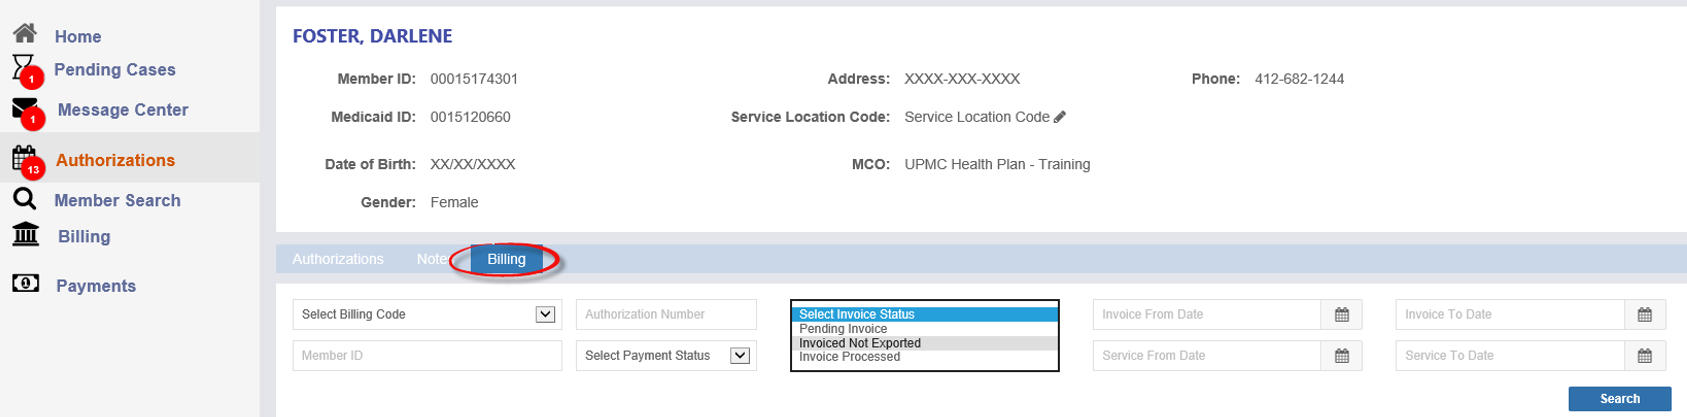
Also shown are the possible statuses for the invoice which can be accessed by hovering the mouse over the information icon. Refer to the status definitions in the table below.

The following describes each status:
-
Pending Invoice: The Service has been entered, waiting for the system to process via the nightly process.
-
No Matching Authorization: The Service entered does not meet authorization requirements; adjust or edit the Service accordingly before it can proceed to billing.
-
Invoiced Not Exported: Indicates that required data is missing from the Service or from the Member profile. Provider must contact Support for further assistance.
The following are Reason Messages describing why an Invoice remains un-exported.
Reason Messages
Member name cannot be blank
Member address cannot be blank
Member City cannot be blank
Member State cannot be blank
Member Zip Code cannot be blank
Member DOB cannot be blank
Member Gender must be specified
Member MR Number cannot be blank
Primary DX is required
Authorization Number is required
Same Service performed on the same day
Allow zero rate Visits to be exported
Prevent Duplicate Billing
Manual Hold
Admission ID cannot be blank
No reason provided – wait for overnight process update
The Reason Message(s) above can be seen when hovering over the invoice status Invoiced Not Exported. Note that one or more messages may apply. Provide this information to your Support Specialist to correct the issue.

Non-Homecare providers can view a claim status once an 837 is submitted to a payer. Providers can capture any issues prior to receiving the 825 and can also reduce duplicate billing.
Once a visit is submitted, the claim status appears as a link under the Claims Status column.

Hover over the claim status link to view the tool tip for the status. For example, a Submitted claim shows 837 Transfer to SFTP. Refer to the table below for Claim Status definitions.

Click on the Claim Status link to view the claim history.

| Field | Description |
|---|---|
|
Submitted |
File successfully send from HHAeXchange, pending 999 |
| Not Submitted |
Claim to be processed via the nightly process or a technical issue occurred with the submission of this claim |
| Unexported |
Claim is being prepared for resubmission |
| Resubmission |
Claim is reprocessed and resubmitted |
| 999 Accepted |
837 is accepted by the Payer's processing system |
| 999 Rejected | 837 has formatting issues because of missing information on the Patient or Provider Profile |
| 277ca Accepted | Claim is accepted for processing in the Payer system |
| 277ca Rejected | Claim is not accepted because of missing information or Patient eligibility |
Select Payments from the menu to open the Payments page. The Payments page assists in tracking payments and export payment information. The Payments page is comprised of Search Filters and the Main Panel.

User the search filter fields to narrow search results by MCO/Payer, Check Number, Check Date From, and Check Date To.
The main panel illustrates the line items which have been moved to the Payment page. Refer to the table below for a description of each line item.

| Column | Description | |
|---|---|---|
|
1 |
MCO/Payer |
Indicates the applicable Payer of payment |
|
2 |
Check Number |
Check Number for payment |
|
3 |
Check Date |
The date when payment was issued |
|
4 |
Billed |
Specifies the billed amount |
|
5 |
Paid |
Specifies the paid amount |
|
6 |
Rejected |
Specifies if any amount of the invoice was rejected |
|
7 |
Processed |
Indicates the date when the invoice was processed in the system |
|
8 |
File Name |
Indicates the name of the export file |
|
9 |
Export Date |
The date when the invoice file was exported |
|
10 |
Export Icon |
Allows user to export payment information |
Click Admin on the left navigation menu to access the Admin feature, housing administrative functions of the portal such as User Management and SFTP Setup.
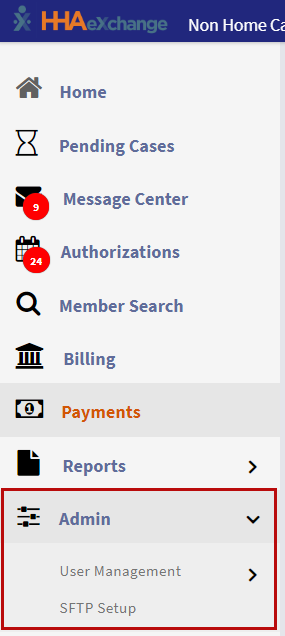
Click on User Management to open the User Management feature, used to add or edit users in the system.
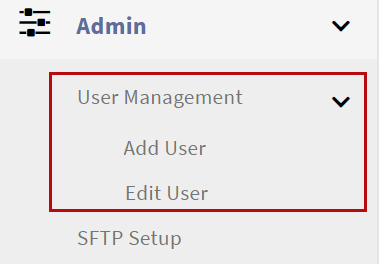
Click Add User to open the Add User window. Complete all required fields marked with a red asterisk and click Save to create the user in the system.

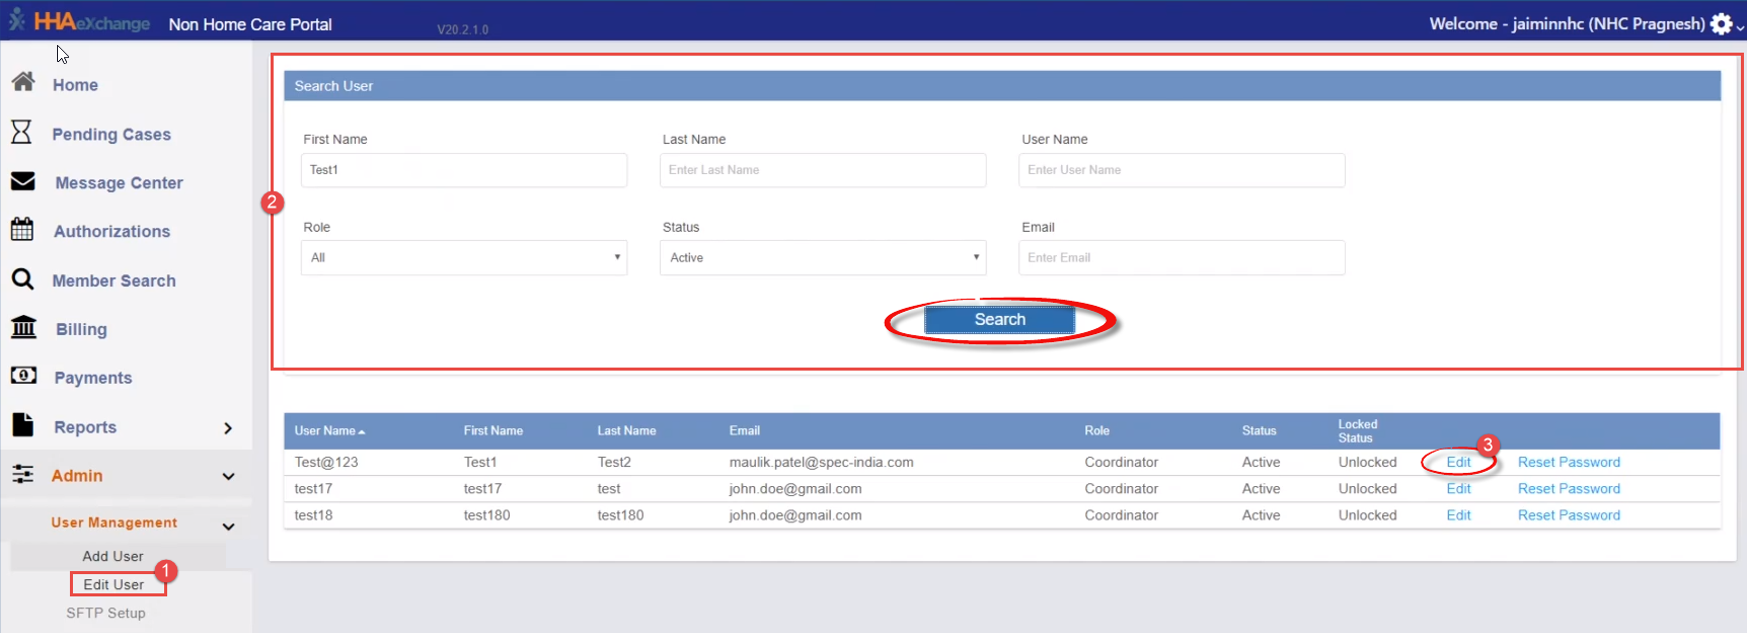
Click Edit User to search and locate a user. Use the top section of the page to search for a user. Click Search to view results on the bottom half of the page.
On the results click the Edit link to open the user profile and edit or click Reset Password to reset the user's password.

The SFTP Self-Service feature is for Providers who interface with HHAeXchange from a 3rd Party EVV vendor. Once access is granted, go to Admin > SFTP Setup to access the feature.
Upon initially accessing the SFTP page, the SFTP Authorization, User Agreement appears. Click I Agree (required) to agree with the terms and conditions before proceeding.
This Agreement remains on the page until it is accepted. After acceptance of these terms, periodic agreements may appear when policy changes or updates are applied.

Upon agreement of the user terms, the user is routed to the SFTP Setup page. The Username field is pre-filled with the Provider Prefix Code and ID, assigned by HHAeXchange and uneditable by the user. Your Username is needed to log into your SFTP site.
On initial access, Providers must enter an Email address to receive SFTP Alerts, and create and confirm a New Password for the SFTP function. The Confirm Password field serves as a confirmation that the password matches the entered password.

Click the Restrict Access by IP checkbox to open access restrictions settings; either by individual IP addresses or a range can be defined by the Provider. These settings are managed on this page and can be changed at any time.
Click the Apply Setting button to save. A validation message alerts of a successful save.
To reset a password, enter a new password in the Enter New Password field and reenter the new password in the Confirm Password field.
Password management is controlled by the Provider. Once a password is saved, the system indicates when and who changed the password.

Passwords expire periodically. Email alerts are sent to indicated email address.
Click the History link at top-right of screen to view a history of Username, SFTP Email Alerts, Access Restrictions, and IP Address.
- HHAeXchange does not save or manage your Password in its database.
- It is your sole responsibility for remembering and maintaining your Password.
- If you forget your Password, you can always reset it from the SFTP Setup page.
- When partnering with a 3rd party vendor, you must provide them with your Username and Password.
- Every time you change your Password, you must notify all 3rd parties so that they can continue to be able to send files.
The EDI Tool feature is used to transfer electronic data directly into the HHAeXchange system without the use of an FTP/SFTP application. In addition, use this tool to correct failed records directly on the screen.
When enabled, the EDI Tool option displays under the Admin menu. The red circle on both the Admin menu icon and EDI tool label indicates failed records. The EDI Tool label shows the number of failed records, encased in a red circle.

The EDI Tool page is comprised of three sections: File Upload, Search Uploads, and Search Results.

The Upload File section is used to upload or import a file into HHAeXchange. Refer to the NHC EDI Import Guide for naming convention standards.
In the Search Upload section use the search filters to locate specific uploads: To Date, From Date, and Show to see results according to upload status such as:
-
All: All files
-
Completed: Files that finished processing
-
Failed: Completed but with failed records
-
Pending: Uploaded but not processed
The Search Results section yield results based on selected search criteria. Each row contains file information as described in the table below.
| Column | Description |
|---|---|
|
File Name |
Name of the file as per naming convention |
|
Upload Date |
Date when the file is uploaded |
|
Total Records |
Indicates the number of records in an uploaded file |
|
Rejected Records |
Indicates the number of rejected records. Rejected records cannot be fixed in the tool. |
|
Failed Records |
Indicates the number of failed records in the uploaded file. Failed Records can be fixed in the tool. |
|
Fix |
Icon to open the Failed records screen |
|
Fixed |
Indicates the number of records fixed within the file |
|
Cleared |
Indicates the number of records cleared within the file |
|
Download |
Icon to download the complete file. |
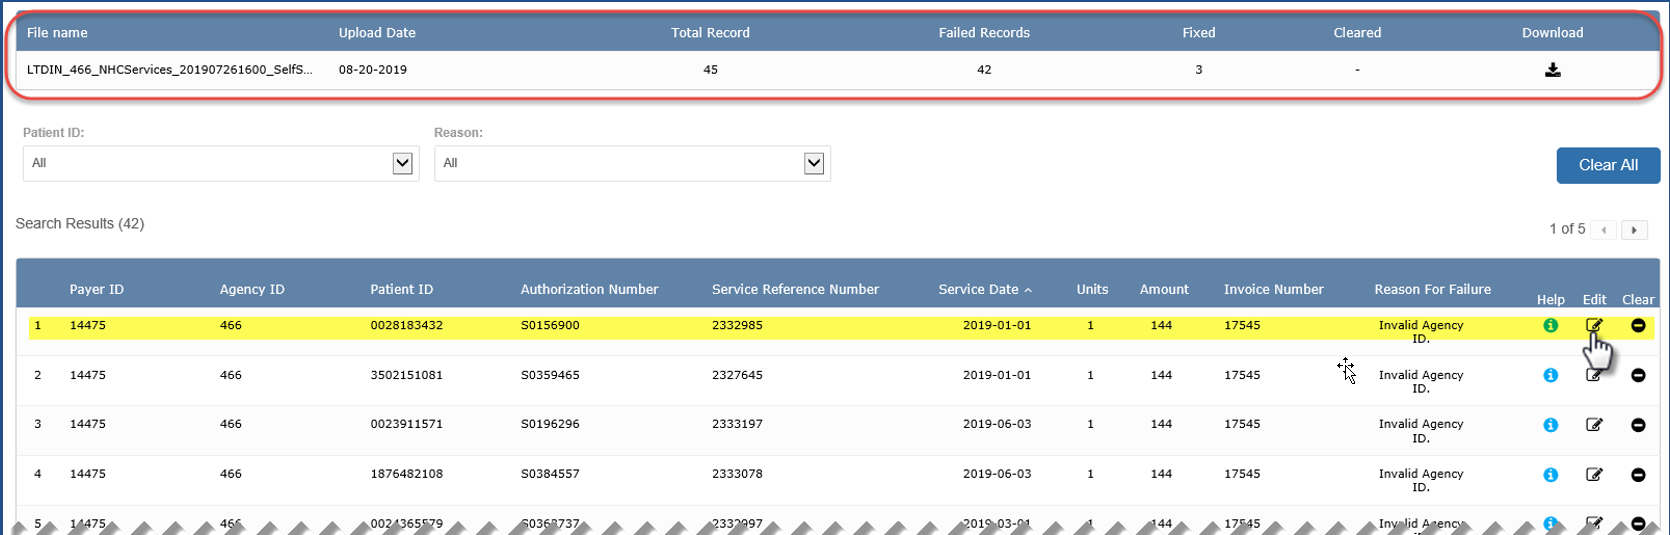
Complete the following steps to correct failed records in an uploaded file. A wrench icon![]() under the Fix column indicates a failed record.
under the Fix column indicates a failed record.
-
Select a file with a failed record from the Search Results. Click the wrench icon
 under the Fix column.
-
On top of the Fix screen, the file is summarized with the specific failed records listed underneath. Each row contains the Payer ID, Agency ID, Patient ID, Authorization Number, Procedure Code, Service Reference Number, Service Date, Units, Amount, Invoice Number, Reason for Failure, and action item icons: Help, Edit, and Clear.
Click the pencil icon under the Edit column to correct the first record.
-
The fields for the record populate right underneath the row. Locate the field to fix. Click Save when the field is corrected.

The fixed record is reprocessed overnight. Correcting a record does not necessarily mean that the record is fixed. If the record fails again, it returns as a new failed record.
-
If there is an error with the correction or in any of the fields, the system alerts of an error to a specific field. Correct said field and click Save when the button becomes available.

Click on the help icon to access guiding documentation to aid in fixing the record. Repeat Step 3.
-
When the record is edited, the summary section indicates that there are 4 Fixed records and that 41 Failed records remain.

-
Proceed to fix another record. Click on the pencil icon on another record and correct. Click the Save button.
-
The system alerts of a successful edit. Click OK to continue.

-
The summary section indicates that there are 6 Fixed records and that 39 Failed records remain.
This next example demonstrates the Clear function. The Clear function is typically used when a user does not want a record to be reprocessed. The goal of the EDI Tool is either fix or clear all failed records.
To clear, click on the Clear icon on the record.

-
The system prompts for a clear record confirmation. Click Yes to clear.

Once cleared, the system indicates that the record has been successfully cleared. Click OK to close.
-
To revert back on a cleared record, click on the revert button to re-open the record.

The Patient ID and Reason (for failure) search fields are included to facilitate specific record searches from the results.
-
The Clear All button clears all the rows in the results and is only visible when uncleared records exist.
-
The Unclear All button unclears all the rows in the results and is only visible when cleared records exist.

There are two download options using the EDI Tool: Complete File or Failed records.
To download the complete file, click the download icon on the file row from the search results. Follow the system prompts to save to your workstation.

To download only the Failed records, click the download icon from the summary section from the Fix screen. Follow the system prompts to save to your workstation.

Files are downloaded in CSV format. To open the file from your workstation, select Open With and select a tabbed text editor, such as Notepad ++. This preserves the formats for each field.
System notifications can be received from the HHAeXchange system on the Non-Homecare Portal. Notifications may require acknowledgment or attention before the user can proceed in the portal. Refer to the Pop-Up Notification section.
System notifications are viewed directly on the portal upon login. To the right of the System Notifications label, a number in parenthesis indicates the notification count. The first ten notifications are displayed. Use the forward arrow to toggle to and from the next page. To return to System Notifications at any point, click on the Home page and select System Notification.
Use the available search fields described below to generate notification searches in the Search Notification section. Click Search to generate results.

| Field | Description |
|---|---|
|
Keyword |
Free-text field to enter a keyword |
|
Priority |
Select the notification priority: All, High, Medium, or Low The Priority appears with respective icon in the results: red for High, orange for Medium, black for Low. |
|
Status |
Select the notification status: All, Open, or Closed (Open = Saved, Closed = Marked as Read) |
|
From/To Date |
Select date or date range |
On the search results, the notifications appear from the most recent at the top. Each row includes the notification's Priority icon, when Received, the Message title, the Status, and a Save as Read button.
The left-most column checkboxes are used to multi-select notifications to Save As Read. Save as Read messages are removed from the default System Notifications list. Users can always search for removed messages as Closed status messages.

The Priority, Received, Message, and Status columns are sortable.
Notifications sent by HHAeXchange appear when logging in, requiring you to read the message before continuing in the system. Select to Leave as Unread or Save as Read.

Select Leave as Unread for the notification to remain Open and the message can be accessed in the default System Notification grid. Open status notifications remain open until Save as Read is selected for that message.
Select Save as Read to close the message. The status becomes Closed and the message is removed from the default System Notification grid. Closed notifications can be viewed by selecting All or Closed in the Status field when generating a search.
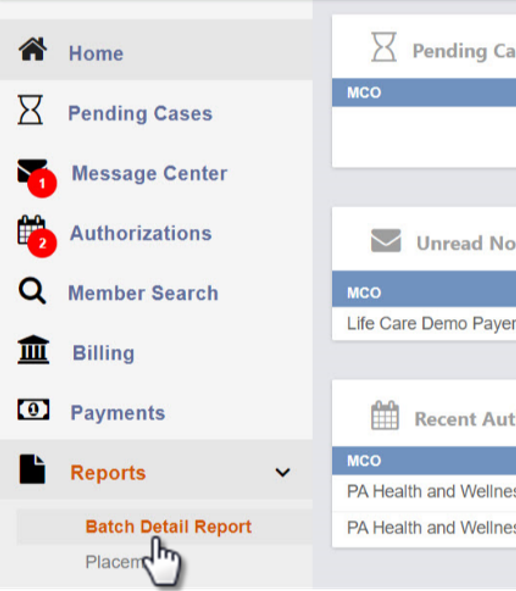
The Reports section on Non-Homecare portal provides reporting functionality. From the left navigation menu, select Reports to access the page.
The Reports option is only visible and available when enabled by HHAeXchange System Administration.
Enabled reports appear indented under the Reports label. For example Batch Detail Report and Placement.

-
From the menu, click on the desired report.
-
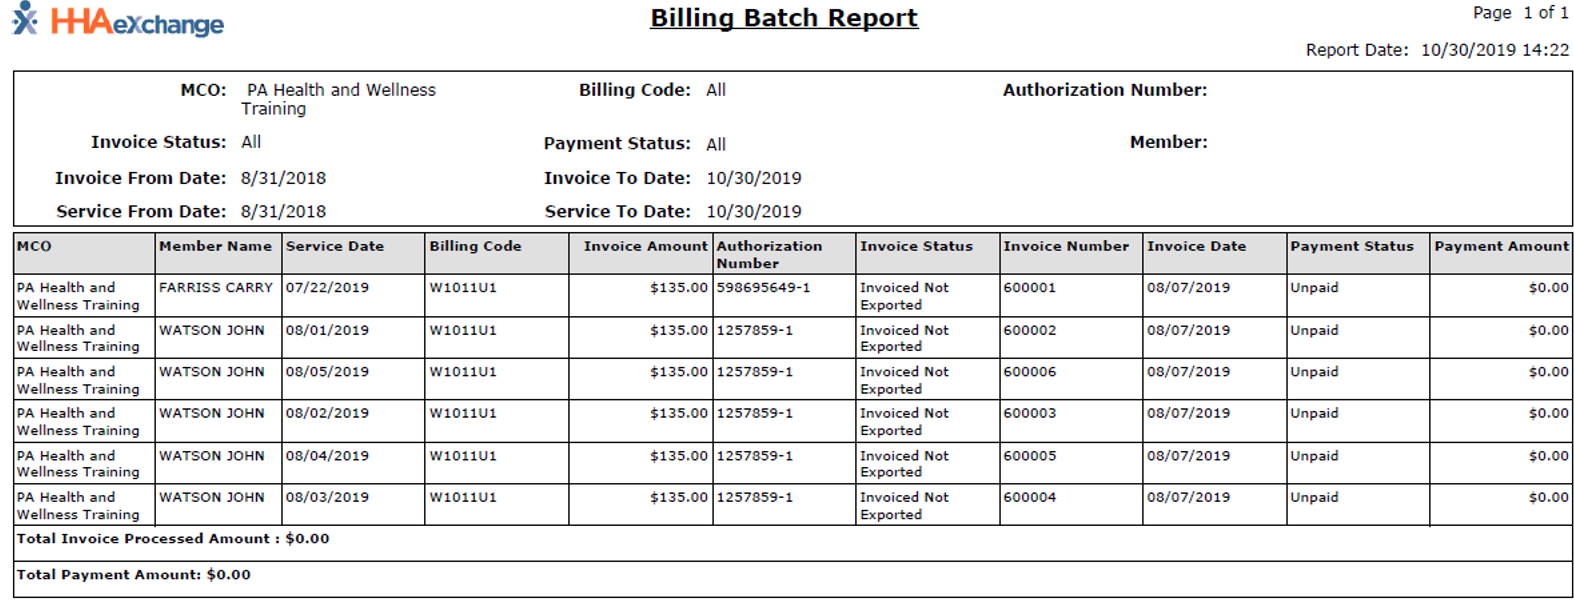
The HHAeXchange Report Center opens. Select the required MCO field and any other available filter field. Click View Report.

-
The system generates the report in PDF format.
Providers with proper permissions can add new users or edit existing users on the Non-Homecare portal. Role-based permissions are described in the section below. Permissions also include access and control of the Reports in the portal.
The two roles in the Non-Homecare portal are Admin and Coordinator. The following table lists additional functions per role, by default. On the left navigation panel, click Admin to access administrative functions.
| Admin | Coordinator |
|---|---|
|
|
Users can only access functionality if role permission is granted for the feature. Roles can only be created and managed by HHAeXchange System Administration.
-
Go to Admin > User Management > Add User.
-
The Add User page opens. Complete the required fields, marked with a red asterisk, as described in the table below.

Field Description *First Name
(Required) Enter the user's first name
*Last Name
(Required) Enter the user's last name *Username
(Required) Enter the user's Username in the system (for example, firstlast) Status
Select the user's Status: Active or Inactive *Role (Required) Select the user's role: Admin or Coordinator *Email (Required) Enter the user's email address where all communication is sent to the user. This includes the welcome email with temp password and any password resets. -
Click Save to create the user profile.
If a field is incorrectly entered or missing, the system alerts with inline highlighted field(s). The Save button is unavailable until all fields are properly completed.

The system issues a success confirmation alert when the user profile is correctly saved.
The user receives a welcome email with log in instructions, URL, and temporary password.

-
Go to Admin > User Management > Edit User.
-
Use the search filters to search and locate the applicable user to update and click Search to generate results.
-
Locate the user and click the Edit link.
-
The Edit User page opens with existing details to update, except the Username field which remains locked and cannot be changed.

-
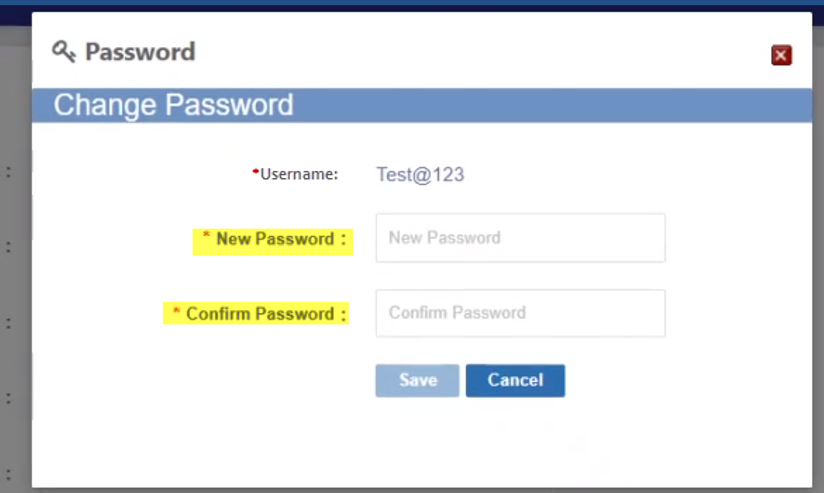
To change the user's password, click the Change Password link.
Only use the Change Password feature to permanently change the user's password. To generate a temporary password, use the Reset Password link in the User Search results for the user to change their own password. -
On the Change Password window, enter a new password in the New Password field and reenter the password in the Confirm Password field.
-
Click Save.
Aside from searching for users in the portal, the User Search feature provides several functions directly from the search results.
-
Go to Admin > User Management > Edit User.
-
Use the search filters to narrow search criteria. Click Search to generate results.
-
From the results, several actions can be performed with the available links on the user row.
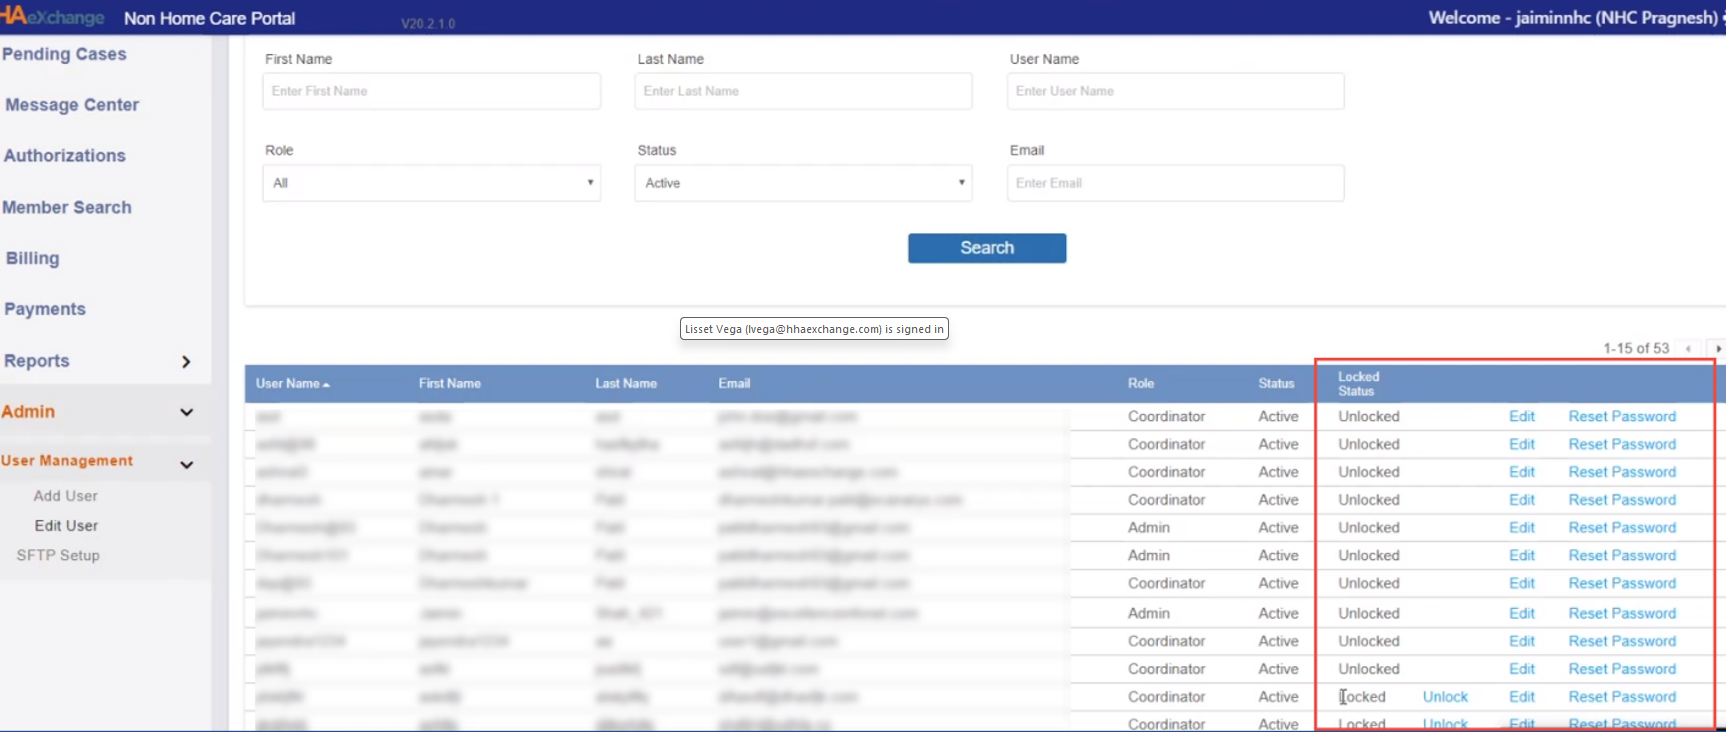
Link Description Unlock
Only appears when the user account is locked. Click Unlock to unlock the user's account Edit
Click to open the Edit User screen and make updates. Reset Password
Click to generate an email message to the user prompting a password reset. The email provides instructions, the login link, and a temporary password.