Set Up a New Office
To set up a new Office, go to Admin > Office Setup > New Office. You can also edit an existing Office by selecting Search Office and then clicking on the Office you would like to edit. Remember that adjustments made on this page affect the Office level, not the Agency level.
The Office Details page consists of multiple sections. Sections marked here with an asterisk are crucial for correctly setting up an Office, but we recommend reviewing all sections. Make sure to click the Save button at the bottom of the page after making any changes.

The General section is used to set basic Office information and requirements. All fields marked with an asterisk are required. Click the History link to view previous settings.

|
Field |
Description |
|---|---|
|
Default Coordinator |
Select a default Coordinator for the Office. |
|
NPI No. |
The Office’s National Provider Identifier number. |
|
Office Code* |
(Required) The three digit code used to distinguish each of the Offices within an Agency. This code attaches itself to certain identifiers (such as a Patient’s Admission ID). |
|
Office Grouping* |
(Required) Select the Office level under the Organization Structure. |
|
Office Name* |
(Required) Enter the Office name. |
|
Provider ID (33b) |
Enter the Provider ID for the system to automatically populate the 33b field on the HCFA 1500 form when generating invoices in that format. |
|
Provider Zip Code |
The Office’s zip code. |
|
API |
The Office’s Atypical Provider Identifier number. |
|
Status |
Select Active or Inactive. |
|
Tax ID |
Enter the Tax ID used for invoicing. |
|
Taxonomy Code |
Enter the code that describes the Provider or Organization's type, classification, and area of specialization. |
|
Web Applicant Unique URL |
The Office’s unique Web Applicant Portal URL. |
The Scheduling section is used to manage settings related to scheduling Visits.
All fields marked with an asterisk are required. Click the History link to view previous settings.

|
Field |
Description |
|---|---|
|
Allow Caregiver In-Service and Visit Overlaps |
Select this box to allow you to schedule In-Service and Visits for Caregivers at overlapping times. |
|
Notify Caregivers via Text if Eligible for Open Shift w/o Mobile App |
Select this box to send out shift broadcasts via text message to Caregivers who do not use the HHAeXchange Mobile App |
|
Allow Caregiver Absence and Visit/In-Service Overlaps |
Select this box to allow you to schedule In-Service and Visits for Caregivers during marked absences. |
|
Display MD Order Caregiver Tab as Duty Code View |
Select this radio button to have the Caregiver tab on the Patient MD Order display your list of available duties for selection |
|
Display MD Order Caregiver Tab as Order/Goal View |
Select this radio button to have the Caregiver tab on the PAtient MD Order display using the Order/Goal format used for other disciplines. |
|
Automatically adjust schedule to match confirmation times |
Select this box to update scheduled Visit times to match confirmed Visit times on the Patient's calendar. |
|
Master Week Rollover Time Frame |
This field shows how many days into the future Visits is created under the Master Week feature. This is also the time frame for calculating Authorizations. This number can be adjusted by theHHAeXchange Support Team. |
|
Auto-Approve Patient Schedule Changes for Consumer Directed |
Select this box to automatically approve Consumer-Directed scheduling change requests if there are no scheduling conflicts. In the event of a conflict, the request is sent to the Patient Visit Family Dashboard. |
|
Scheduling Alert for No Matching Authorization |
Select this box to trigger an alert if a Visit is created without an Authorization. |
|
Authorization Utilization Threshold Alert |
Select this box to trigger an alert icon on the Authorization when it reaches 95% utilization. |
|
Allowed Address Types* |
(Required) Use this dropdown to select the types of addresses where a Caregiver can Clock In. Home and Community are selected by default. |
| Automatically adjust for Daylight Savings Time | Select this box to automatically take Daylight Savings Time into account when calculating billable hours. For more information about Daylight Savings Time and its effect on your HHAeXchange portal, see Daylight Savings Time. |
| Allow Caregiver to select the visit as a Non-Member Home Visit | Select this box to bypass the tolerance test and allow Caregivers to visit Patients in the community. |
The Mobile section is used to manage settings related to EVV and the HHAeXchange Mobile App. Click the History link to view previous settings.

|
Field |
Description |
|---|---|
|
Mobile Fixed Visit Verification |
Select this box to enable Caregivers with Mobile Access to perform Electronic Visit Verification by using a Security token registered to the Patient. |
|
Mobile GPS Visit Verification |
Tolerance Rage: Select this box to enable Caregivers with Mobile Access to perform Electronic Visit Verification by using their GPS enabled smartphone. Tolerance Rage must be set in feet to flag whether user is within acceptable range of Patient residence. For example, if Tolerance Rage is set at 300 ft and Caregiver performs verification while at 305 ft, a call maintenance exception displays. |
|
Unbalanced Tolerance |
Set your Provider’s tolerance window for accepting Time and Attendance calls. If the Caregiver attempts to make a visit verification call either before or after this tolerance window, the call with be routed to the Call Maintenance page. For example, setting an Unbalanced Tolerance of 1 hour would allow a Caregiver to successfully call into an 8 AM shift from between 7:01 AM and 8:59 AM. |
|
Open Case Settings |
View Open Cases: Select this box to to show shift details to Caregivers. In order to submit requests for these visits, Request and Accept Open Cases must be checked off. Request and Accept Open Cases: Select this box to allow certain Caregivers to submit requests for broadcasted shifts which are available to them. Acceptance Request Limit: The number entered here represents the total pending requests a Caregiver can have at one time. Canceled, rejected, and approved request do not count against this number Refer to Case Broadcasting for details and instructions. |
|
Allow Single Clock in/out for Consecutive Shifts (Mobile App) |
Select this box so that when there are consecutive shifts for a Single Patient or consecutive shifts for Linked Patients, you only require the Caregiver to Clock-in and Clock-out once. For the Single Patient case, they are presented with the Carepath (optional), then the Plan of Care for each shift followed by the Signature page (optional). For Linked Patient cases, for each Patient they are presented with the Carepath (optional), then the Plan of Care followed by the Signature page (optional). Refer to the Mobile App Consecutive Shifts for details and instructions on a single Patient; for Linked and Mutual Patients refer to Clock In and Out of Linked and Mutual Visits. |
|
Enable Mobile App Offline Mode |
Select this box to allow all Caregivers linked to this office to operate without Internet Connectivity. Refer to Mobile App Offline Mode for more information. |
|
Allow Caregivers to modify Confirmed Time via the Mobile App |
Select this box to allow Caregivers linked to this office to edit the Confirmed Time of completed visits |
|
Mobile Offline Sync Period |
This field defines the time in hours to sync schedule and Patient data to the Mobile App for offline processing when Internet connectivity is lost. The default period is 24 hours and can be set from 24 hours to 120 hours inclusive. |
|
Allow Caregivers to enter Time via the Mobile App when there is no preexisting EVV |
Select this box to allow Caregivers linked to this office to be able to enter a time for visits without a preexisting EVV. |
|
Enable Alternative EVV Workflow |
Select this box to select an alternative EVV workflow option to satisfy local regulatory requirements. |
|
Allow the Caregiver to view compliance information via the Mobile App |
Select this box to allow Caregivers to view Compliance Information on the Mobile App for all disciplines they are configured for so they can be informed of upcoming requirements. This option only applies if you are using the new Compliance Module. |
|
Time in hours that a Caregiver can update Duties after a Patient Visit |
This field defines the number of hours post-visit that the Caregiver can edit Duties using the HHAeXchange Mobile App. A value of 0 indicates that updates cannot be made by the Caregiver. |
|
Enable the I’m Awake button for midnight shifts |
Select this box to display a check-in button on the Visit Details screen after the Caregiver clocks into the shift. This button is clicked throughout the shift to prove they are awake and servicing the Patient. |
|
Extend the Visit End Time to include time to enter duties |
Select this box to record the timestamp for the end of the visit when the Caregiver clicks Save after entering duties. If unchecked, the timestamp to designate the end of the visit is when the Caregiver clicks Clock Out. |
|
Allow Users and Caregivers to use the Chat service |
Select this box to enable the Chat screens in ENT and on the Caregiver’s Mobile App for the selected office. If unselected, these screens are grayed out. |
|
Enable Mobile App Biometric Two Factor Authentication |
Select this box to require a mobile enabled Caregiver to provide their login/password and matching Biometric info to validate their identity to gain access to the app. |
|
Enable Unscheduled Visit Service Code Selection |
Select this box to display a list of Service Codes from the active Authorizations for the Patient that the Caregiver can choose from when performing an Unscheduled Visit. |
|
Enable Unscheduled Visit POC Selection |
Select this box to display an active POC from the Patient so the Caregiver can add POC duties for unscheduled visits. |
|
Display Other Duties when there are POC Duties assigned |
Select this box to display "Other" Duties for each visit when there are Duties assigned to the Patient on the Mobile App. |
|
Display Other Duties when there are no POC duties assigned |
Select this box to display "Other" Duties on the Mobile App when there are no Duties assigned to the Patient. |
| Remove Unscheduled Visit Capabilities | Select this box to disable the Unscheduled Visit feature in the HHAeXchange Mobile App. |
|
Allow Caregivers to Log Duties After Clock In |
Select this box to Allow Caregivers to log duties after they Clock-In |
|
Enable Service Selection |
Select this box to enable the Caregiver to select the Service being provided during the Patient visit. |
|
Patient Confirmation of Visit Times |
Select this box to enable the Patient to confirm the Start and End Time of the Visit. |
To create Case Broadcast settings, go to Admin > Office Setup to access the Mobile settings and select the applicable fields in the Open Case Settings section.

These settings determine the configuration for all new Caregivers, who have a matching set of options on the Caregiver level. The following table provides a description for these settings.
|
Field |
Description (If selected…) |
|---|---|
|
View Open Cases |
Caregivers can see the section for Open Cases on their Caregiver Mobile App. Viewing open cases shows shift details to Caregivers. Request and Accept Open Cases must be selected to submit requests for these visits. |
|
Request and Accept Open Cases |
Caregivers can request cases marked as Open via their Mobile App. Requesting and accepting Open Cases allows certain Caregivers to submit requests for broadcasted shifts which are available to them. If the View Open Cases is not enabled, then this option is not available. |
|
Acceptance: Request Limit |
Once selected, this field requires a numeric value between 1 and 9999 representing the number of pending requests a Caregiver can have at one time. Cancelled, rejected, and approved requests do not count against this number.
If selected, Caregivers have a limit on how many Open Requests they can place with the Office before the function is disabled. The Request and Accept Open Cases must be selected for this option to be available. |

The Address section is used to edit the Office street address and phone number(s) . The State and Zip fields must be filled to save any changes.

In addition, select:
-
Use Office Address for Invoice to use this Address for invoices rather than the Address entered in the Agency Profile page.
-
Use Office Address for Clinical Documentation to use this Address on clinical documentation.
-
Enabled MN Tiered Caregiver Rates to add Minnesota State Specific tiered rates based on tiered levels assigned to Caregivers, and are used for final billing rate calculations.
Providers can add additional logos at the Office level to support an Agency’s multi-office model, comprised of different business lines and/or regional affiliates. This is standard functionality at the Agency level, only supporting one, unified logo across the system.
To enable, tick the Use Office-Specific Logo checkbox under the Address section.
![]()
To add the office-specific logo, click the attach (paperclip) icon and follow the prompts to load the logo. Once saved, the logo appears in all relevant areas across the application for the Office, such as in printed invoices.
Newly added logos are reduced to the required dimensions (height/width) to preserve the quality of the logo.
By default, all office users with permission to access and edit Office Setup (normally users with Administrative functions) can record and activate a Broadcast Message. To add or remove permissions, go toAdmin > User Management > Edit Roles and select Action from the Section dropdown field and select applicable title(s) from the Roles dropdown field. Select the View button.
A list of permissions appears. Scroll to Broadcast Message and select or deselect the Broadcast Message and Edit Broadcast Message permissions.

The Recording Information for Conexus and Message Broadcasting section is used to set up the Conexus function for the Office. The Office ID field is system-assigned to the Agency and acts as the Office Conexus Login as well the login ID to access the HHAeXchange Phone Recording Center. The Password can be managed by users as needed.

The QuickBooks Configuration section is used to configure specific QuickBooks information, such as QB Account Name, QB Account Number, and Terms

The Overtime Scheduling section is used to specify or define Overtime settings. This feature is found underAdmin > Office Setup.

|
Field |
Description |
|---|---|
|
Overtime Validation at the time of Schedule |
Select Yes or No. If Yes, then users must enter their login password and select an Override Reason to schedule a Caregiver for a visit that exceeds the overtime threshold. |
|
Hourly Equivalent for Live-In Shifts |
Set an overtime threshold for Live-In Visits. |
|
Prompt Password at (for Caregivers with both Hourly and Live-In Visits) |
Indicate the hourly threshold (HH:MM) before overtime begins (when Caregiver has both Hourly and Live-In visits). |
|
Prompt Password at (for Caregivers with only Live-In Visits) |
Indicate the hourly threshold (HH:MM) before overtime begins (when Caregiver has only Live-In visits). |
This feature is activated by HHAeXchange System Administration. Contact HHAeXchange Support Team for details, setup, and guidance.
The Exclusion and Verification Lists section allows users to review the applicable subscriptions and settings to HHAeXchange’s exclusion and verification list service. These services run a search through various databases (such as OMIG (Office of the Medicaid Inspector General), OIG (Office of Inspector General), and GSA (General Services Administration)) to ensure Physicians and Caregivers are not on any exclusion lists.
Refer to the Exclusion and Verification Lists topic for details and instructions.

The Exclusion and Verification Lists settings are viewed at an office level. Go to Admin> Office Setup > Edit Office and scroll to the Exclusion and Verification Lists section. The image shows the selected state in the Exclusion List State dropdown field and the selected options for the office to run exclusion and verification lists for caregivers and physicians.

The dropdown options of the Caregiver Verification Lists and Physician Verification Lists are available for viewing purposes only (not editable), as seen in the image below for caregiver lists. The same applies for the Physician Verification Lists. These dropdown menus are organized alphabetically by state followed by the list name.

Go to Admin > Physician Setup > Physician Search to search and locate the physician. On the Add Physician page, scroll down to the Licensing Information section to view the available lists. To add or edit a physician’s licensing information, click the Edit icon.

The Edit Licensing Information window opens. In the License Number field, edit or enter the physician’s license number, select the applicable Profession from the dropdown menu and click Save.
The system updates Licensing Information records after successfuly saving the physician’s profile from the pop-up window.
The Required Fields section is used to set specific fields as required across the system, where they are denoted with a Red Asterisk*. Program providers and FMSAs can require fields when entering or editing Applicants (Caregiver) in the system.
Select the Required Fields using the three multi-select dropdowns: Required Caregiver (Employee) Fields, Required Caregiver (Applicant) Fields, and Required Patient Fields.

For the state of Texas, Required Caregiver (Employee) Field values include the following:
-
Zip Code(s)
-
State
-
City
-
Street Address

The values in these fields correspond directly to the checkboxes used to define Required Fields for Caregivers and Patients. Using the dropdown fields, define Required Fields for the three defined categories. By default, no fields are required for Applicant Caregivers; only those saved as Employees are tracked against existing requirements.
|
|
*HCA/PCA: Health Care Assistant/Personal Care Aide
We recommend selecting at least the following fields for Caregiver profiles:
-
Notification Preferences
-
Mobile/Text Number
-
Email
-
SSN
|
|
|
|
We recommend selecting at least the following fields for patient profiles:
-
Address Line 1
-
Medicaid ID (if your contracts are Medicaid-funded)
The Travel Time Setup section is used to manage Travel Time settings. See Travel Time Configuration for more information on these settings.

ODT must be enabled to apply to a visit. Complete the following steps to configure ODT at an office level.
-
Go to Admin > Office Setup > Search Office to search and locate the office.
-
On the Edit Office page, in the Scheduling section, select the Calculate and Pay Off Duty Time (ODT) checkbox.
-
In the Max ODT required field, enter the maximum number of minutes to pay off duty. Any time beyond the defined time is not paid.
-
Click Save.
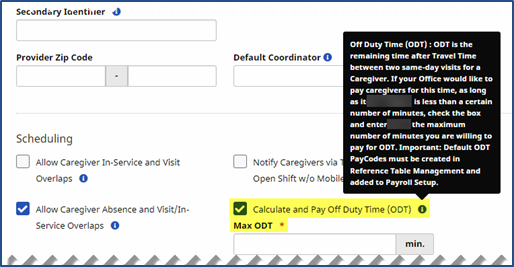
Default ODT Pay Code(s) must be created via the Reference Table Management.
See the Reference Table Management topic to assign ODT rates.
The Caregiver Absence/Restriction page is comprised of three sections: Absences, Paid Time Off Accruals, and Restricted. The Absence function is used to record and track a Caregiver’s absences and paid time off (PTO) balances.
Some Agencies allow the scheduling of absent Caregivers. Check the Agency settings under Admin > Office Setup > Search Office > Edit Office to enable/disable the Allow Caregiver Absence and Visit / In Service Overlaps field.

Before selecting specific Absence reasons, these options must be configured via the Reference Table Management functionality. Follow the steps below to add Absence reasons.
-
Go to Admin > Reference Table Management.
-
Select Caregiver Absence Type under the Caregiver section from the Reference Table field. Click Search to view the current options. Click the Add button to add a Preference.
-
The Absence Type window appears providing various fields as shown. Complete the required (denoted by red asterisks) and optional fields, as follows:
-
Enter the Absence value in the Absence field.
-
Select the PTO Accrual Type (Bonus, Personal, Sick Leave, or Vacation).
-
Enter a Description (optional).
-
Ensure the Status field is set to Active.

Additional Caregiver PTO Accrual Types are created via the Reference Table Management functionality under the Caregiver PTO Accrual Type category.
-
-
Click the Save button to finalize.
The Automatic Email section allows you to set up automatic email notifications, ensuring the right people at your agency are informed when specific actions are taken within the HHAeXchange portal and Mobile App. This section only appears for a previously-created Office, and not on the New Office page.
The Automatic Email library of Common Notifications includes a diverse number of notification emails created according to functionality and business needs. To add specific intended recipients, click the Edit icon at far right corresponding to the applicable Common Notification.

Once the Edit icon is clicked, the Automatic Email Recipients window opens for the Authorized Edited notification. Select specific recipients and/or recipient groups (e.g., Patient Coordinator and Roles).
Only intended recipients can be edited using the Automatic Email functionality. Refer to the table below describing recipient types.

|
Recipient Type (Select…) |
Description |
|---|---|
|
|
Enter specific recipient’s email address to receive notification. Enter as many email addresses as needed separated by a comma and space. |
|
Coordinator of Patient |
Directs the system to automatically send an email notification to a Patient’s Coordinator as indicated in the system. |
|
Roles |
Expands a multi-select menu to indicate applicable roles to receive notification. All is the default selection. Users may select a specific role as assigned by the Agency. |
Select the Active checkbox to generate an automated message for all entered recipients when the appropriate condition is met. To stop the automated message for all recipients, unselect the Active checkbox.
To ensure that notification emails are received, scroll to the Received Note Notification section, underneath the Automatic Email section. Click the Add Custom Notification button to indicate the information selected under the Note Reasons field for the notification.

In the Automatic Email window, complete the required fields indicated in the table below.

|
Field |
Description |
|---|---|
|
Notification Name* |
(Required) Subject or title of the notification used to identify the notification under the Received Note Notifications column. |
|
Note Reason* |
(Required) Select the reasons to issue an automatic email (functionality to execute). Note Reasons originate on the Payer side and indicate the corresponding Payer. All is the default selection; however, each dropdown is populated with associated Payer Reasons by Office. |
|
Emergency of Priority* |
Select Yes, No, or All. This field is used to configure the priority of the messages so that emails are only sent based on priority settings.
|
|
Recipients |
Refer to previous section. |
|
Active |
Refer to previous section. |
The following image is a sample email notification for a Confirmed Placement.
